
SmartKitPro wrteam.in

WRTeam is a company built with the ideology of customers first. We are a team of enthusiastic individuals, with foresight for innovation and a passion for solving everyday problems using the latest technology.

We trust in your ideas and want to help you bring them to life, so you can focus on your long term vision while we do all the hard work. As a service providing company, we understand your needs and strive hard to provide you with the best possible quality of service whether it is the development of your app, logo design or branding, or UI/UX improvements.

To achieve the above, we have handpicked our people and recruited a team of multi-talented individuals, each of whom adds a unique skill to our team of service providers. We ensure quality by imparting strict testing of all our products, listening to the customer complaints, and solving their problems on a priority basis.

How to Setup Flutter in Android Studio

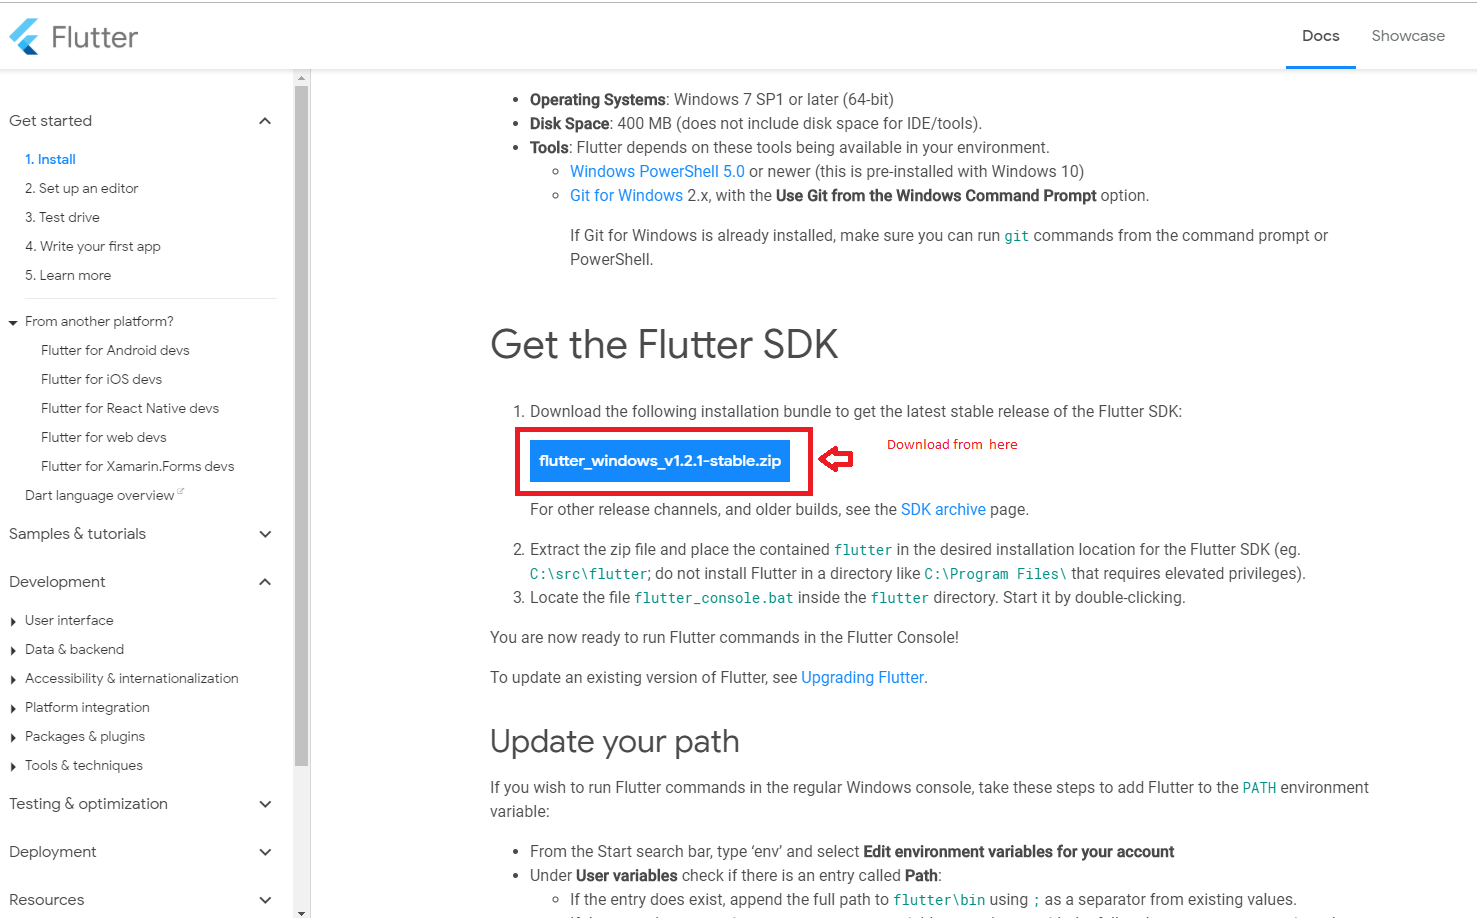
  1. Download Lastest Flutter SDK from below link.in that click on flutter_window_xxx.zip button.
  2. Flutter sdk Here

  3. SmartKitPro

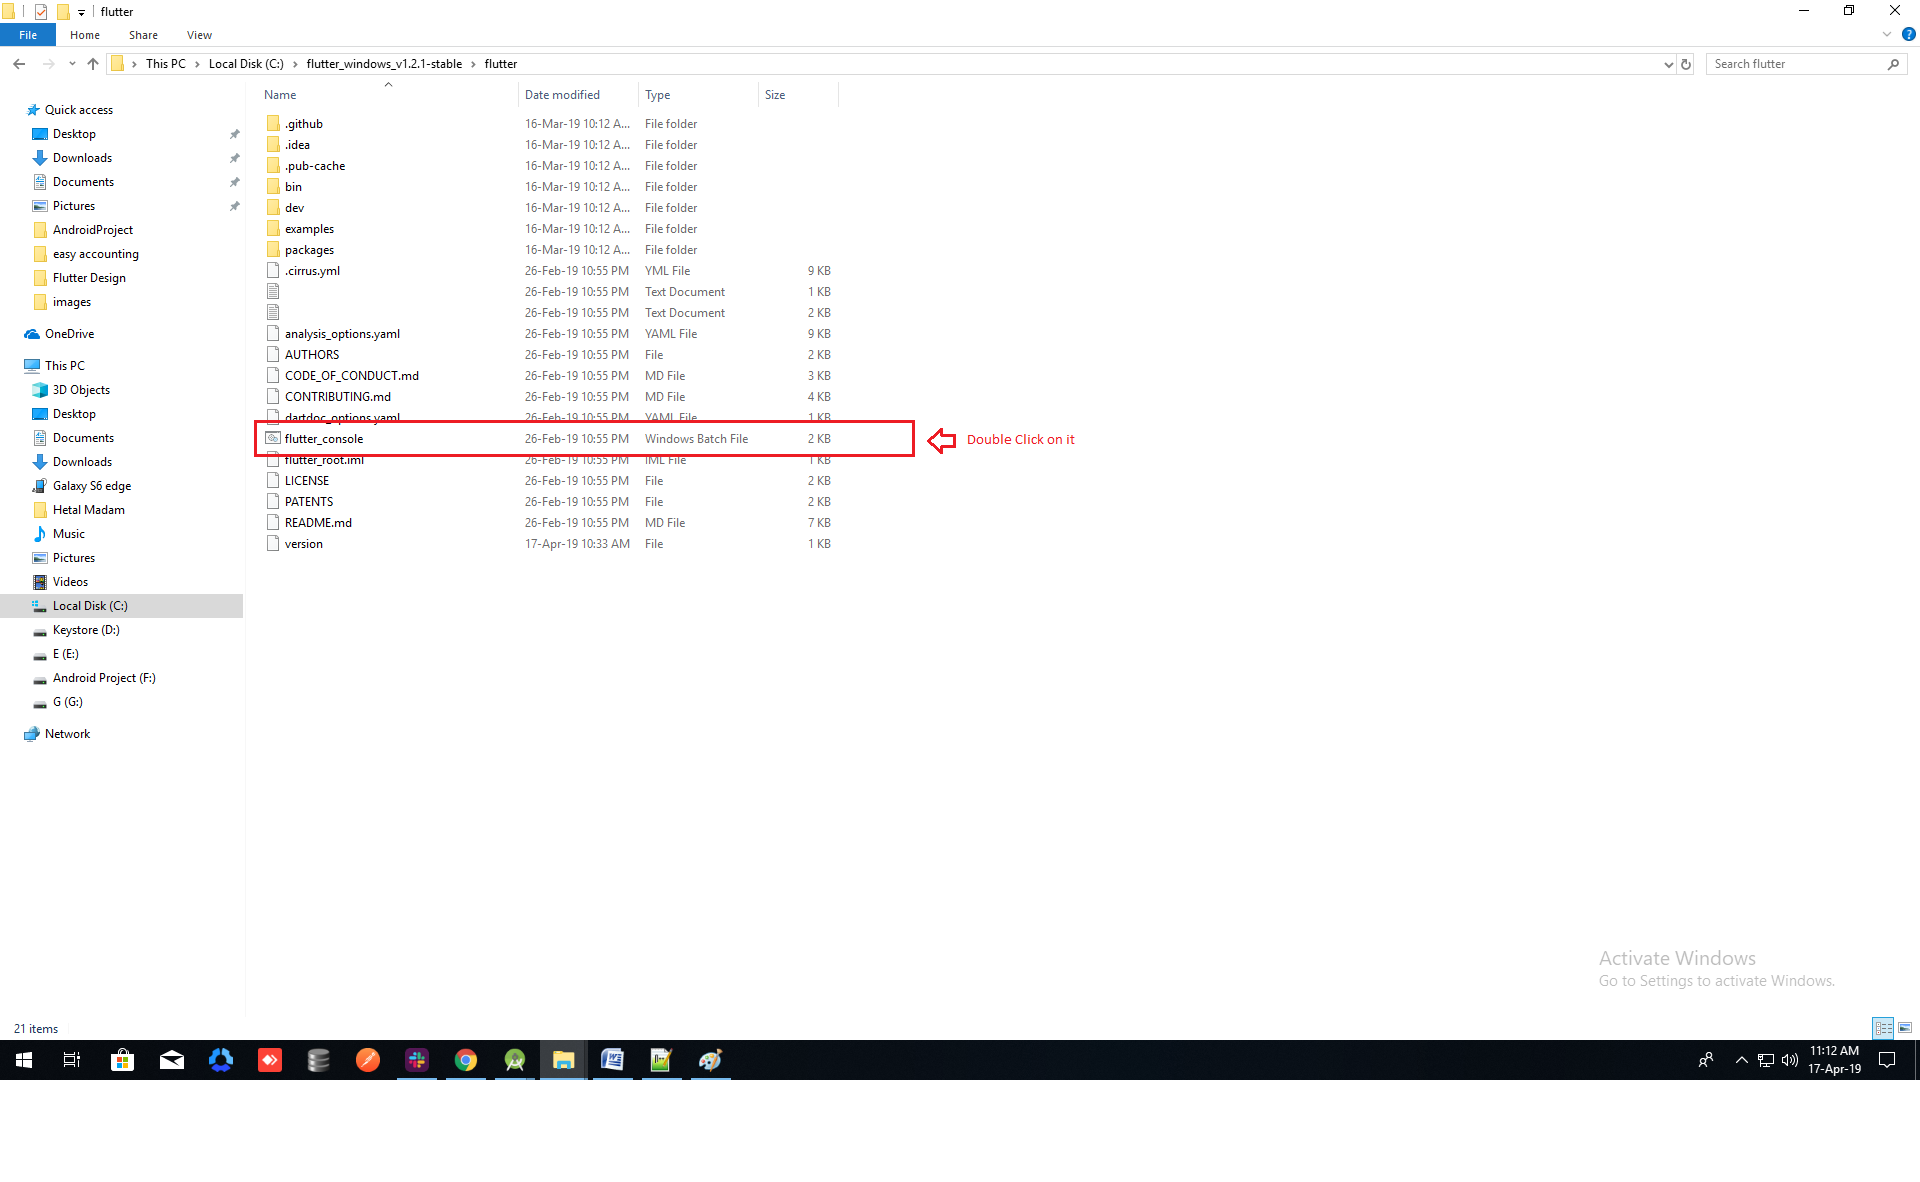
  4. Extract the zip file and copy flutter folder into your desired installation location for the Flutter SDK (eg. C:\src\flutter; do not install Flutter in a directory like C:\Program Files\).

  5. Inside Flutter folder find flutter_console.bat. Start it by double-clicking.


  6. SmartKitPro
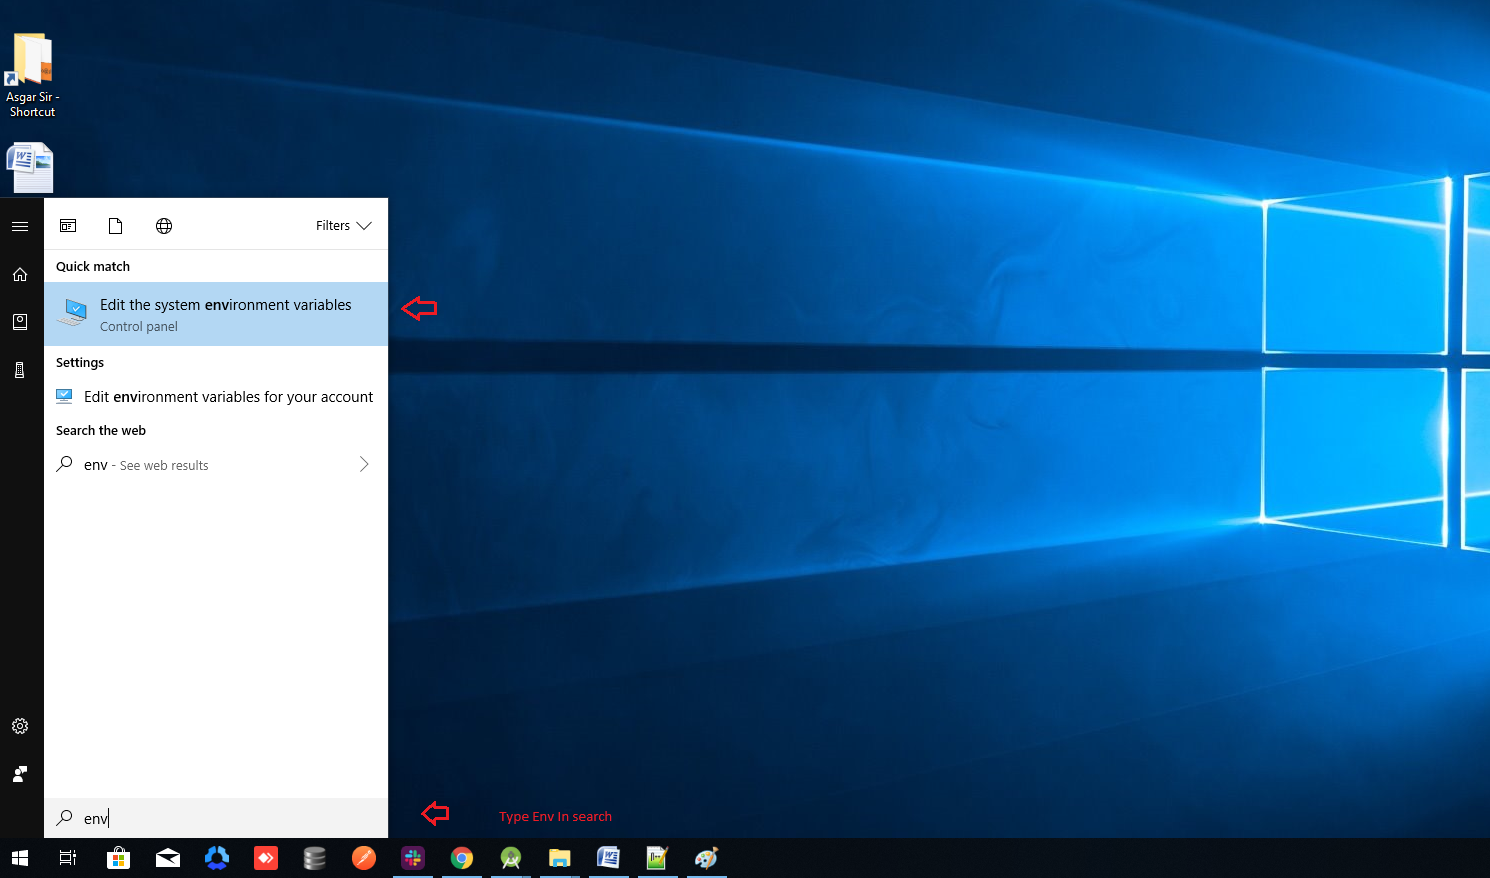
  7. Now set your enviournment variable
  8. From the Start search bar in , type 'env' and select Edit environment variables for your account

  9. SmartKitPro

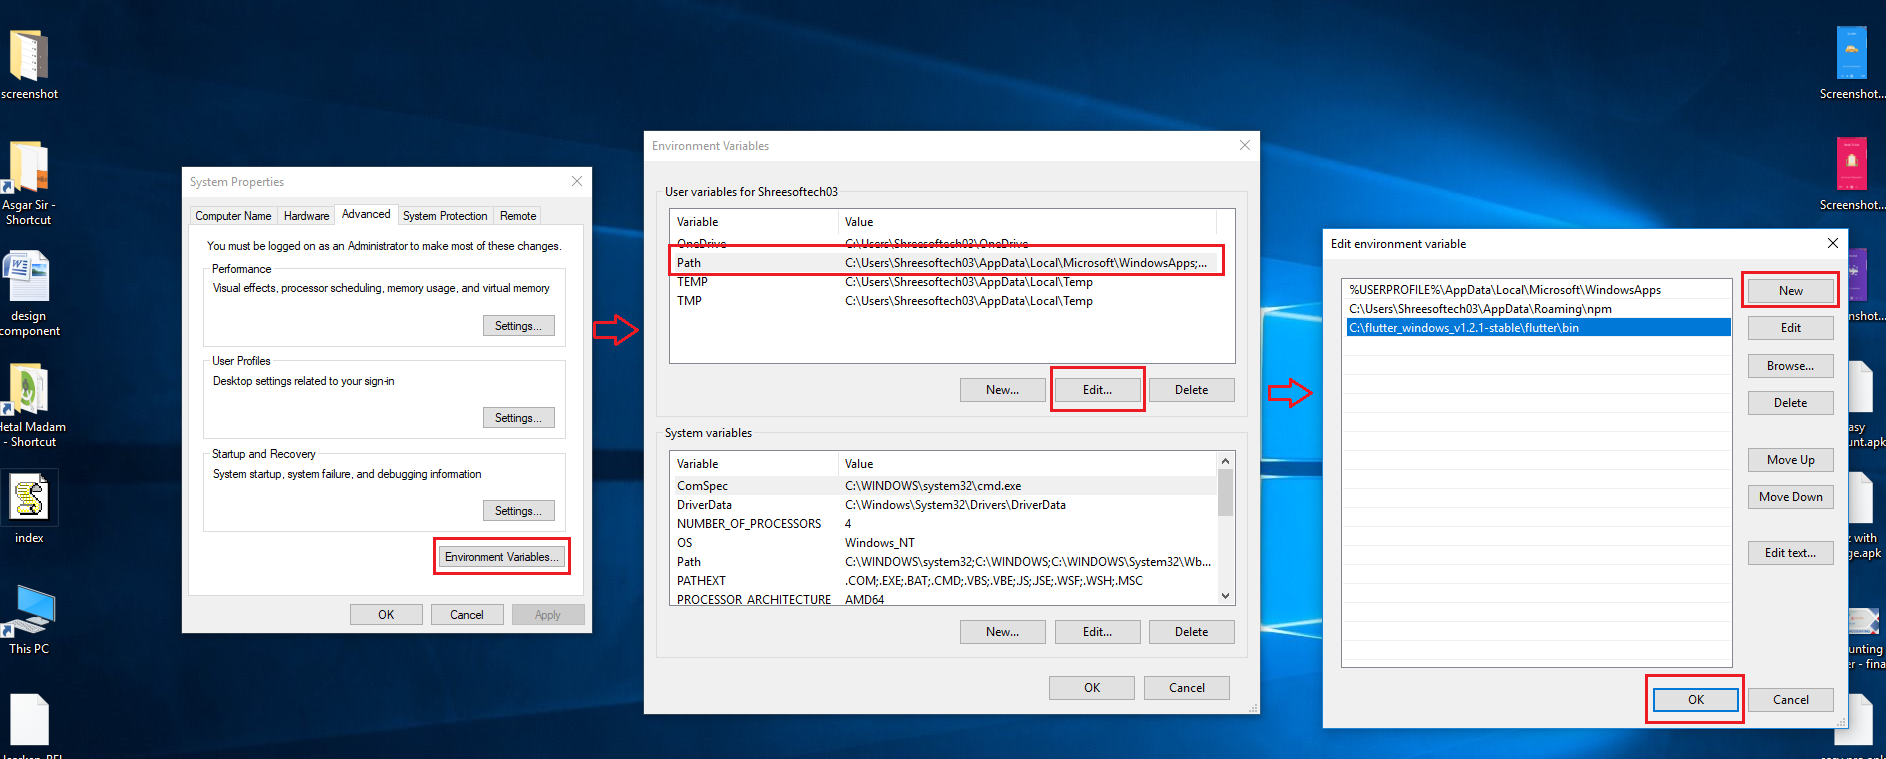
  10. Under User variables check if there is an entry called Path:
  11. Click on Edit.new Dialog open from it click on new and copy full path to flutter\bin as its value
  12. Now Restart your pc for changes to take effect
  13. SmartKitPro

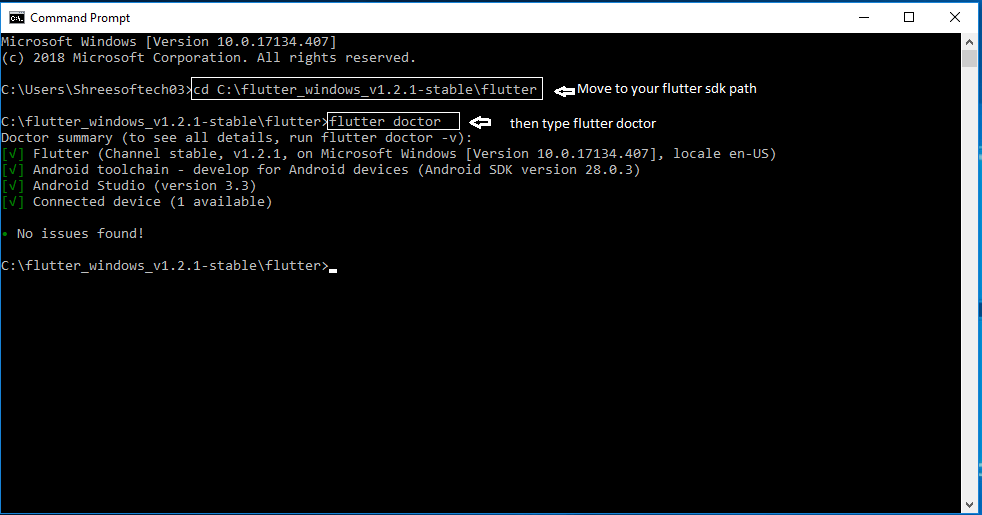
  14. Now check everything is ok or not
  15. open cmd and do following shown in below picture

  16. SmartKitPro

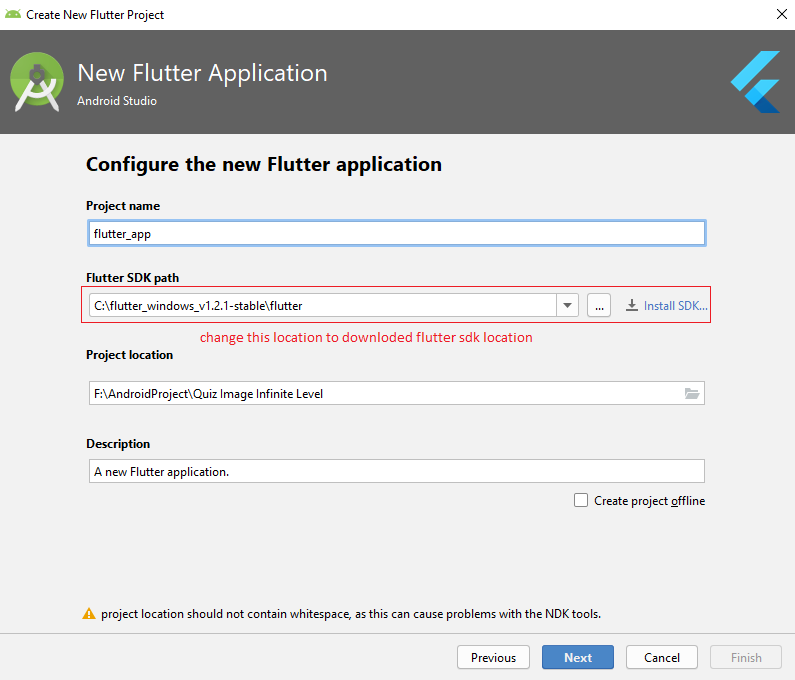
  17. Now open Android Studio and create new flutter project then select your flutter sdk file to the location where we have downloaded earlier and that's it
  18. SmartKitPro

How to upgrade flutter version?

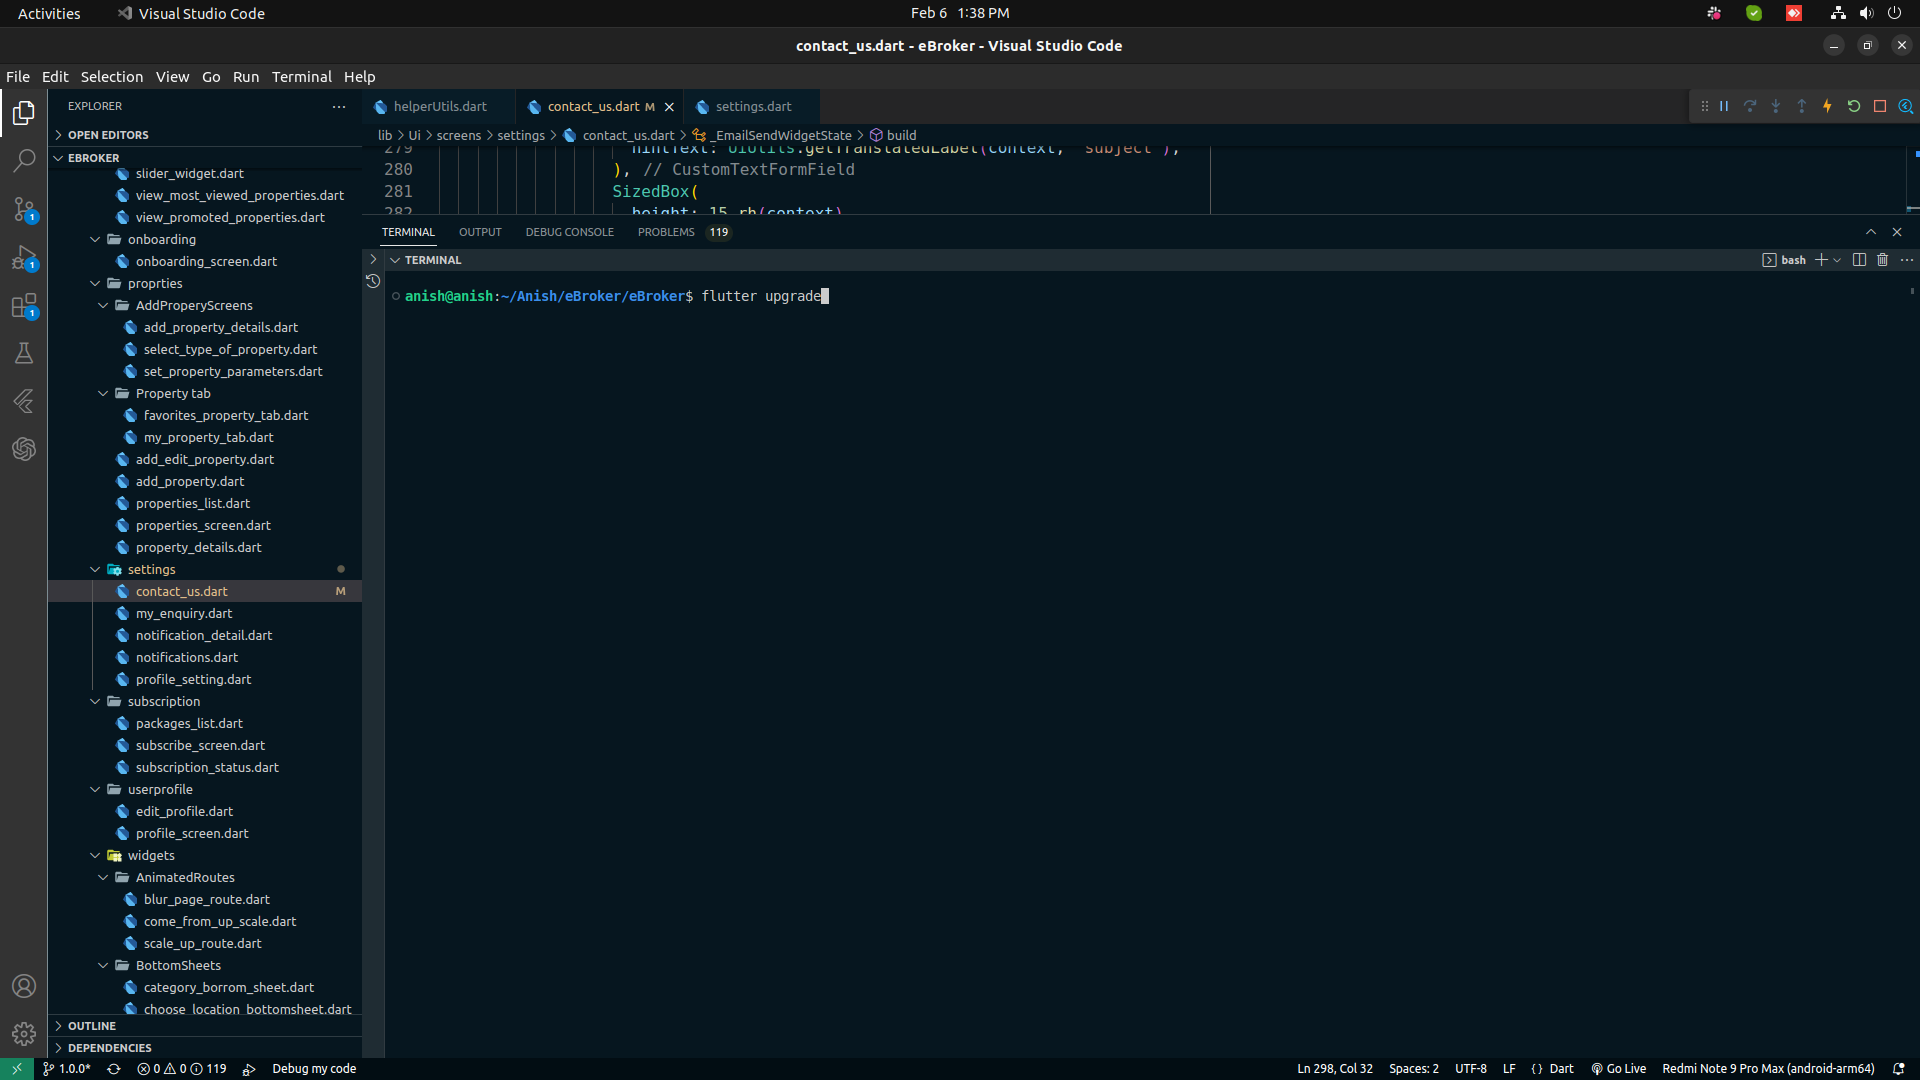
  1. for upgrade go to terminal in android studio and type flutter upgrade it will automatically pick latest version with stable channel
How to Run App with command?

  1. first, open your project
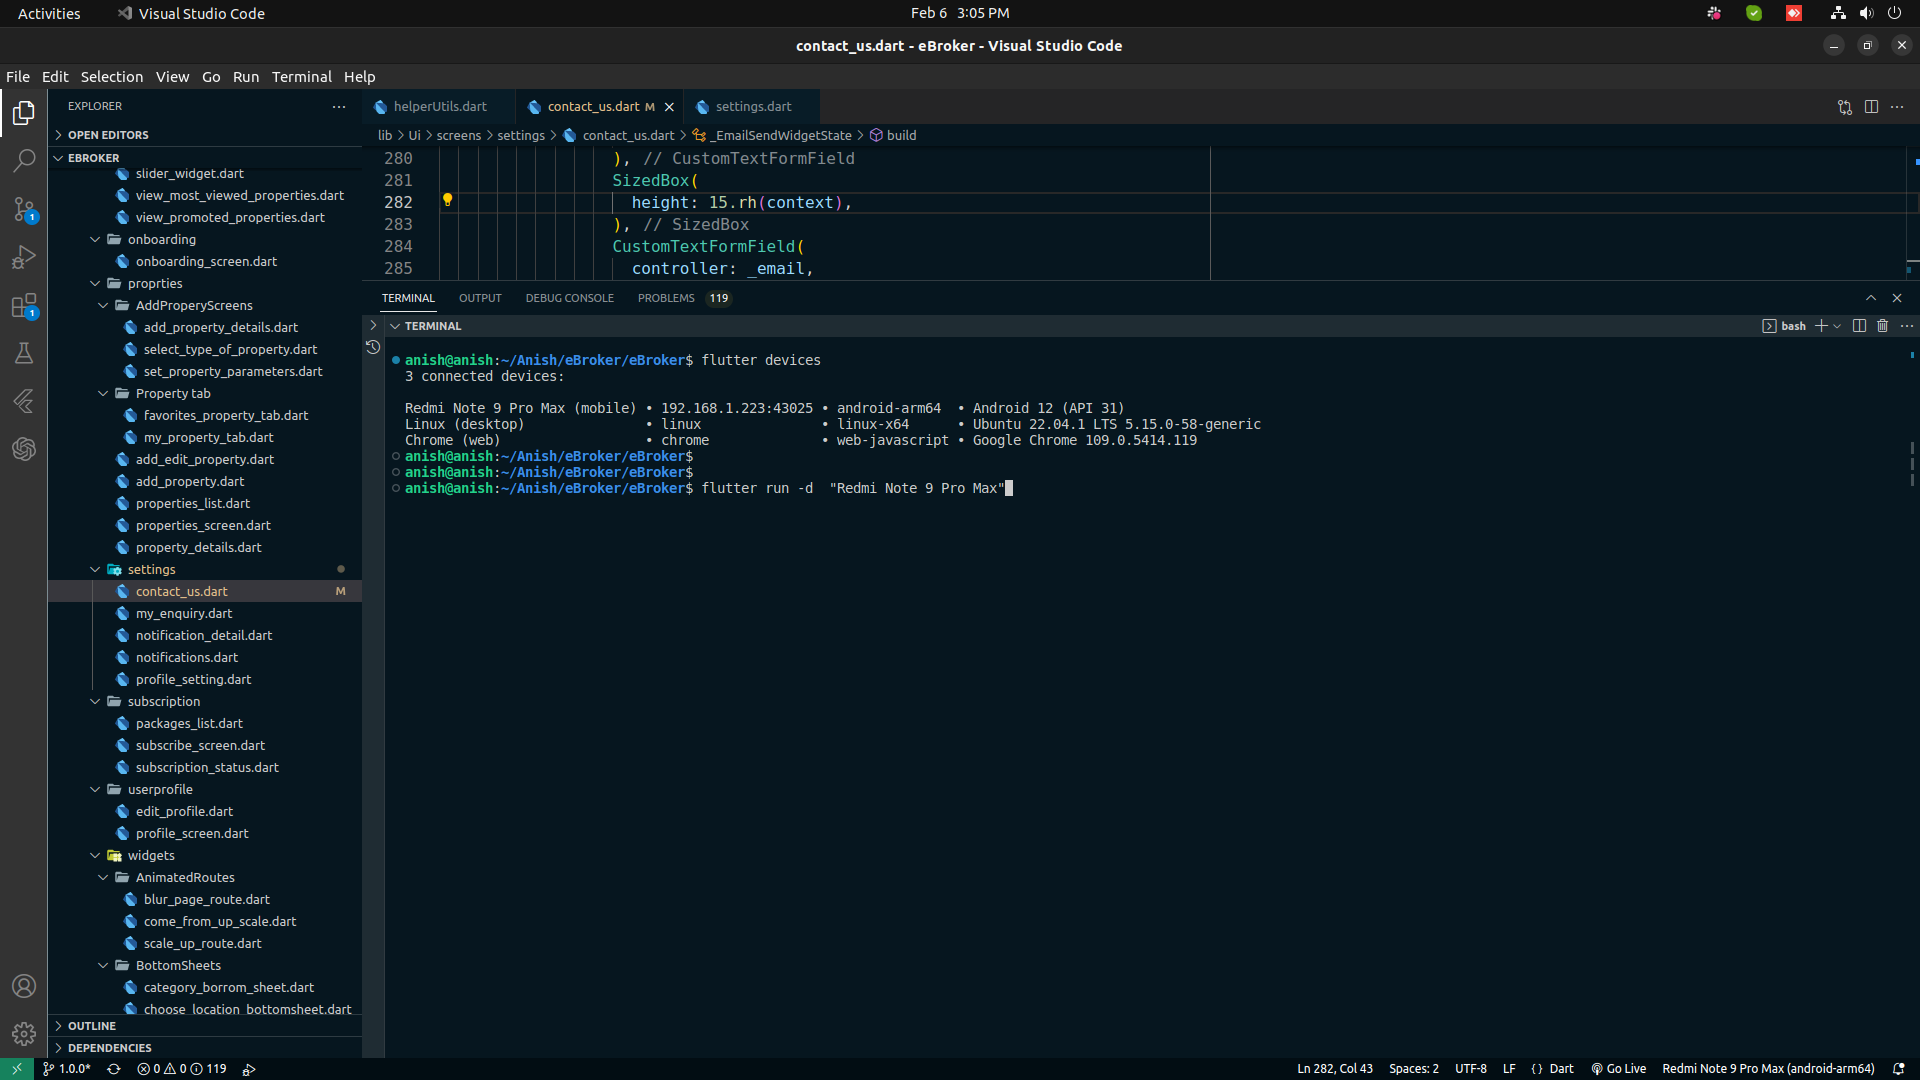
  2. Enter this command in editor's terminal flutter run .You can choose in which device you want to run app by flutter run -d "DEVICE NAME OR ID"
  3. You will get device name and id by running this commnad flutter devices
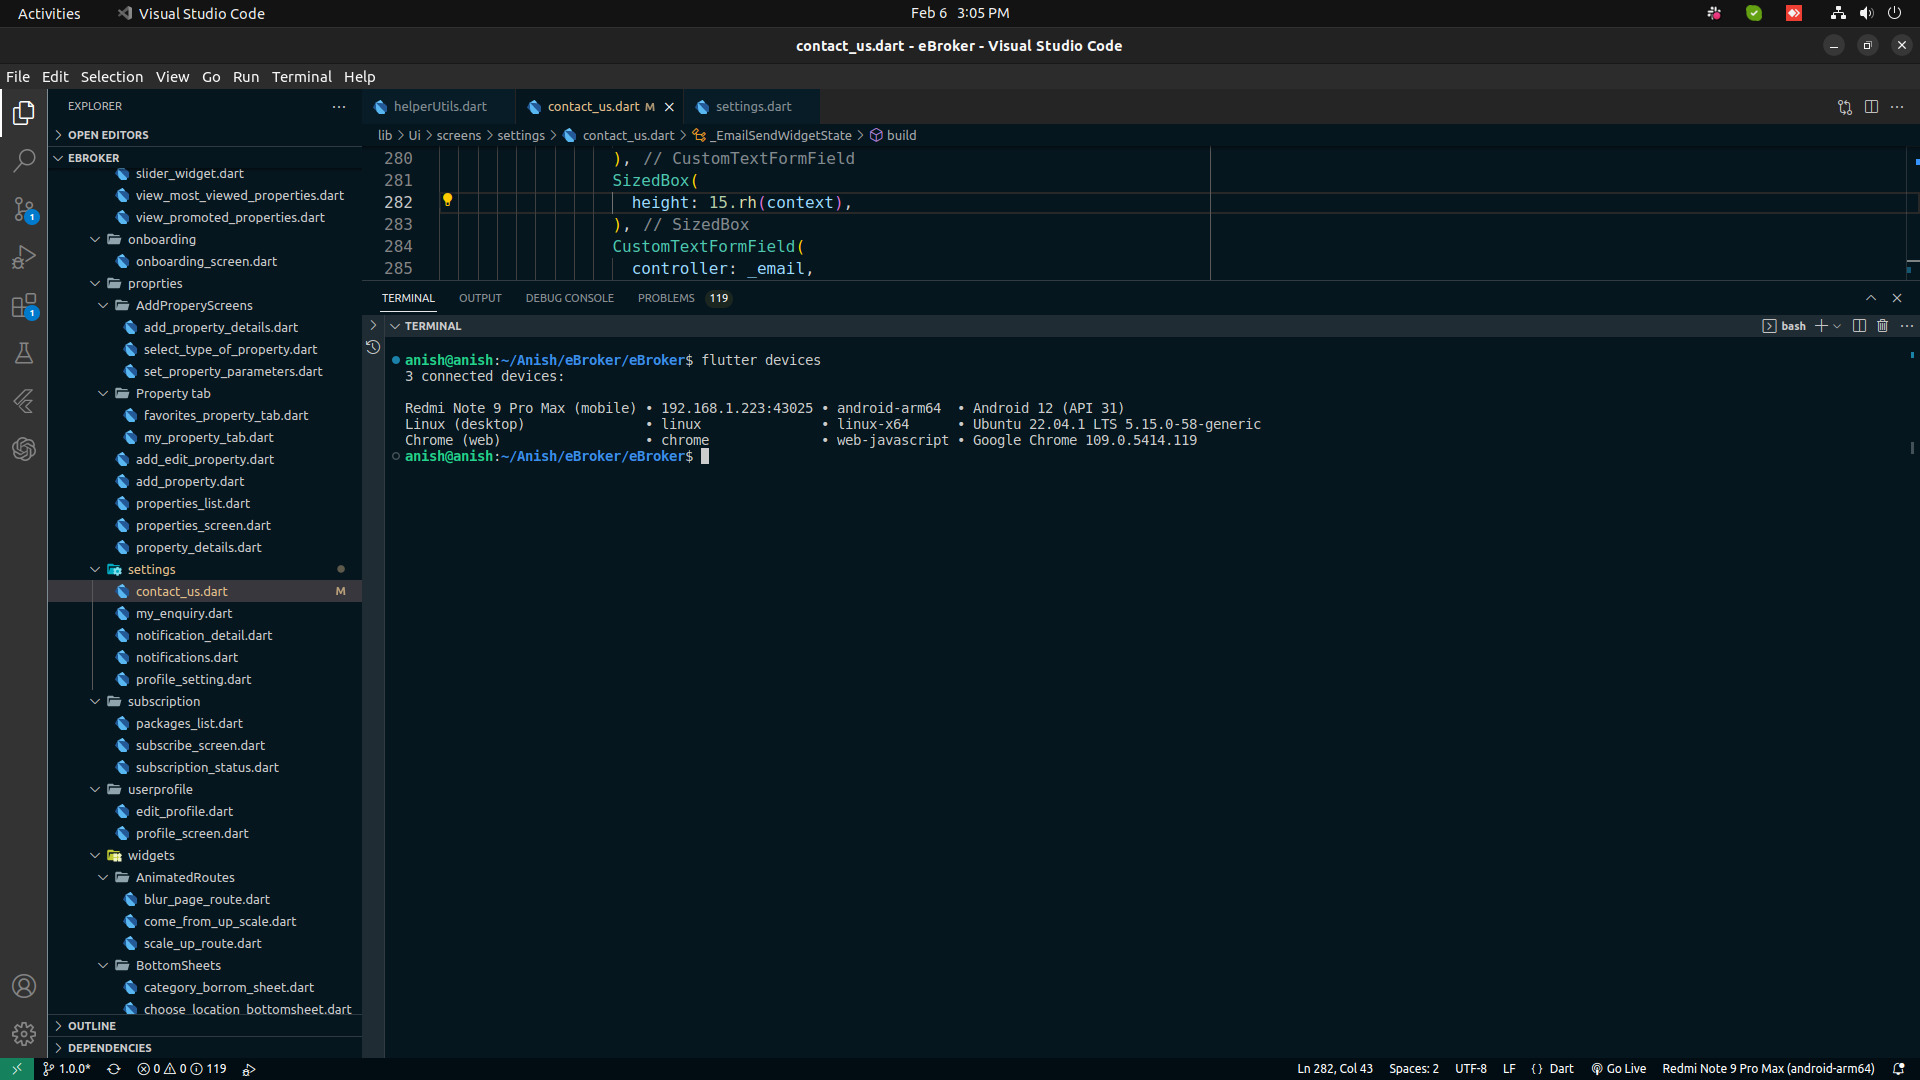

  4. And run on specific device,

Setup Project on MacOS

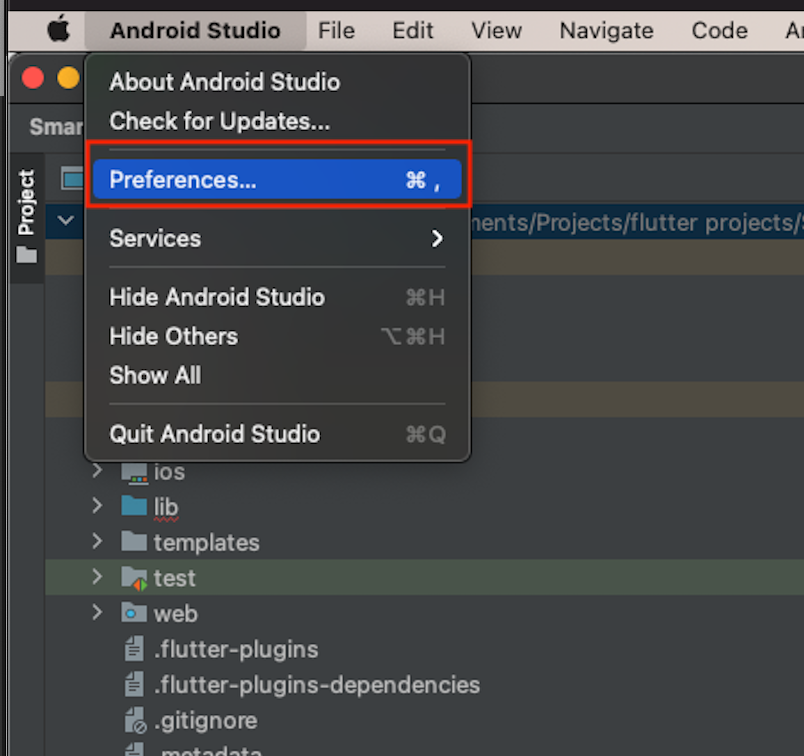
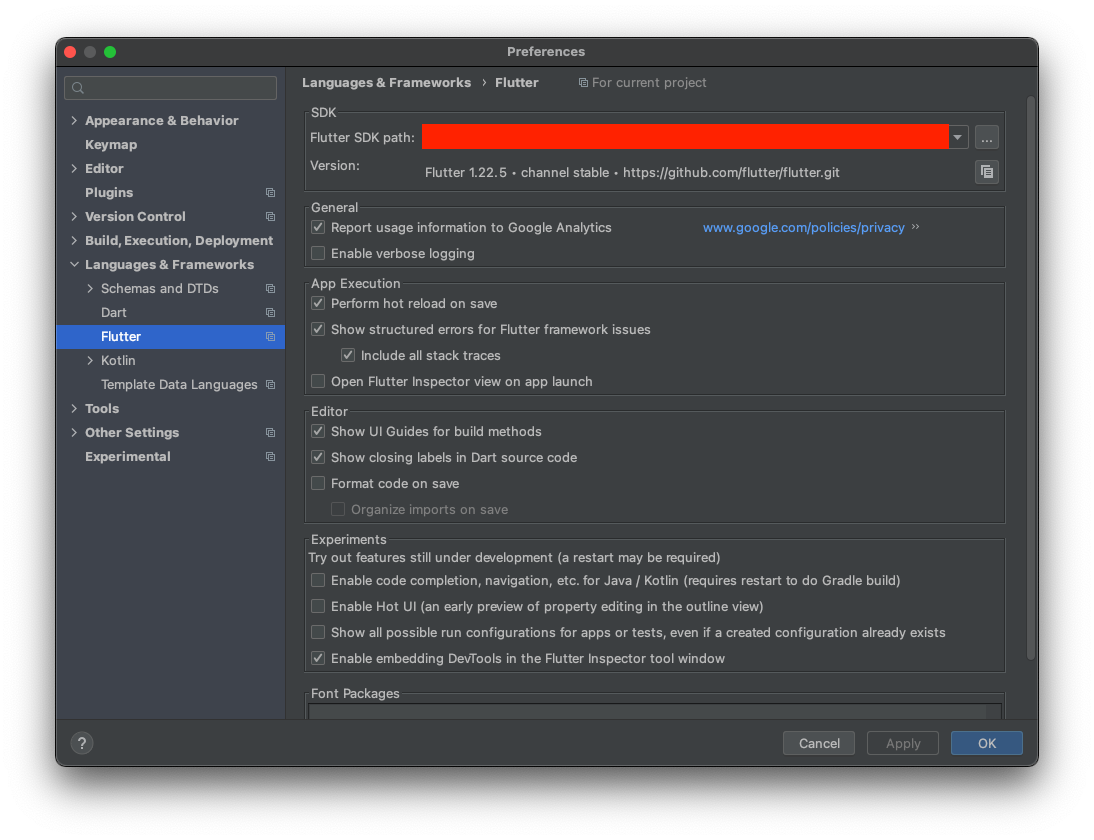
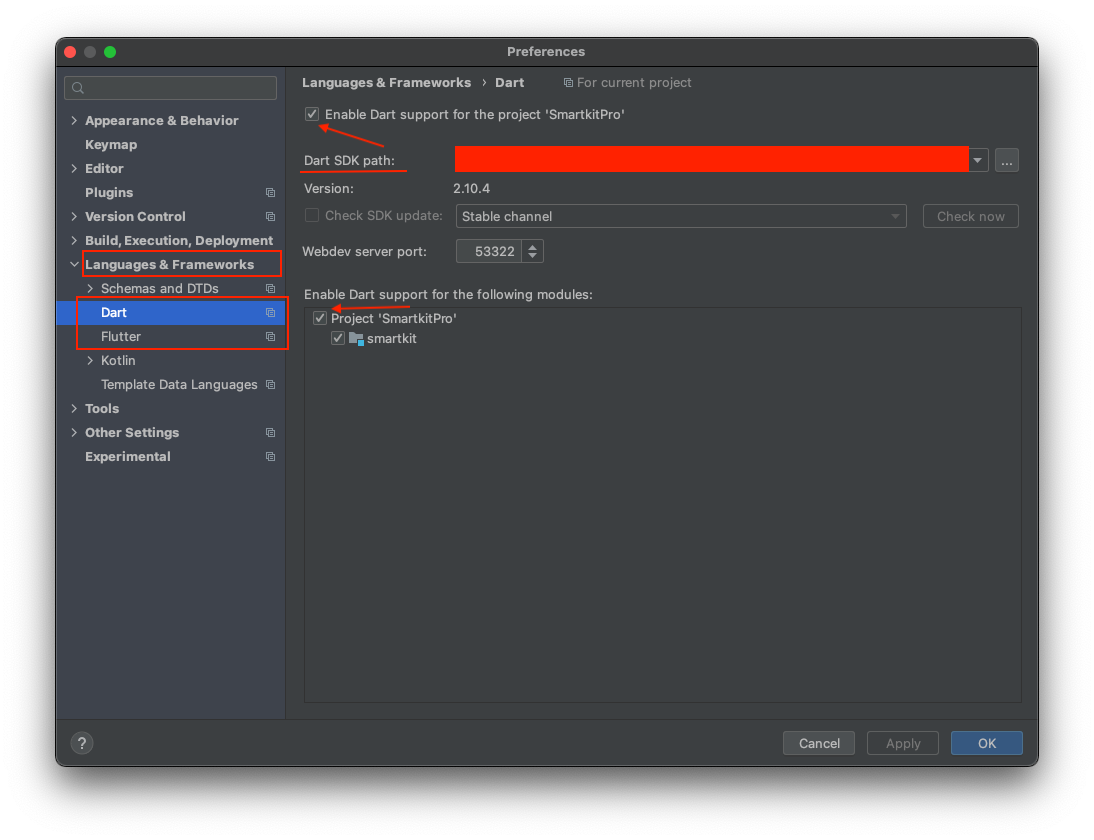
  1. Open Project folder in Android Studio. Go to Preferences > Language & Frameworks > Flutter and Set Flutter SDK Path & Enable Dart support for Project and Apply and OK.

  2. SmartKitPro

    SmartKitPro
    SmartKitPro

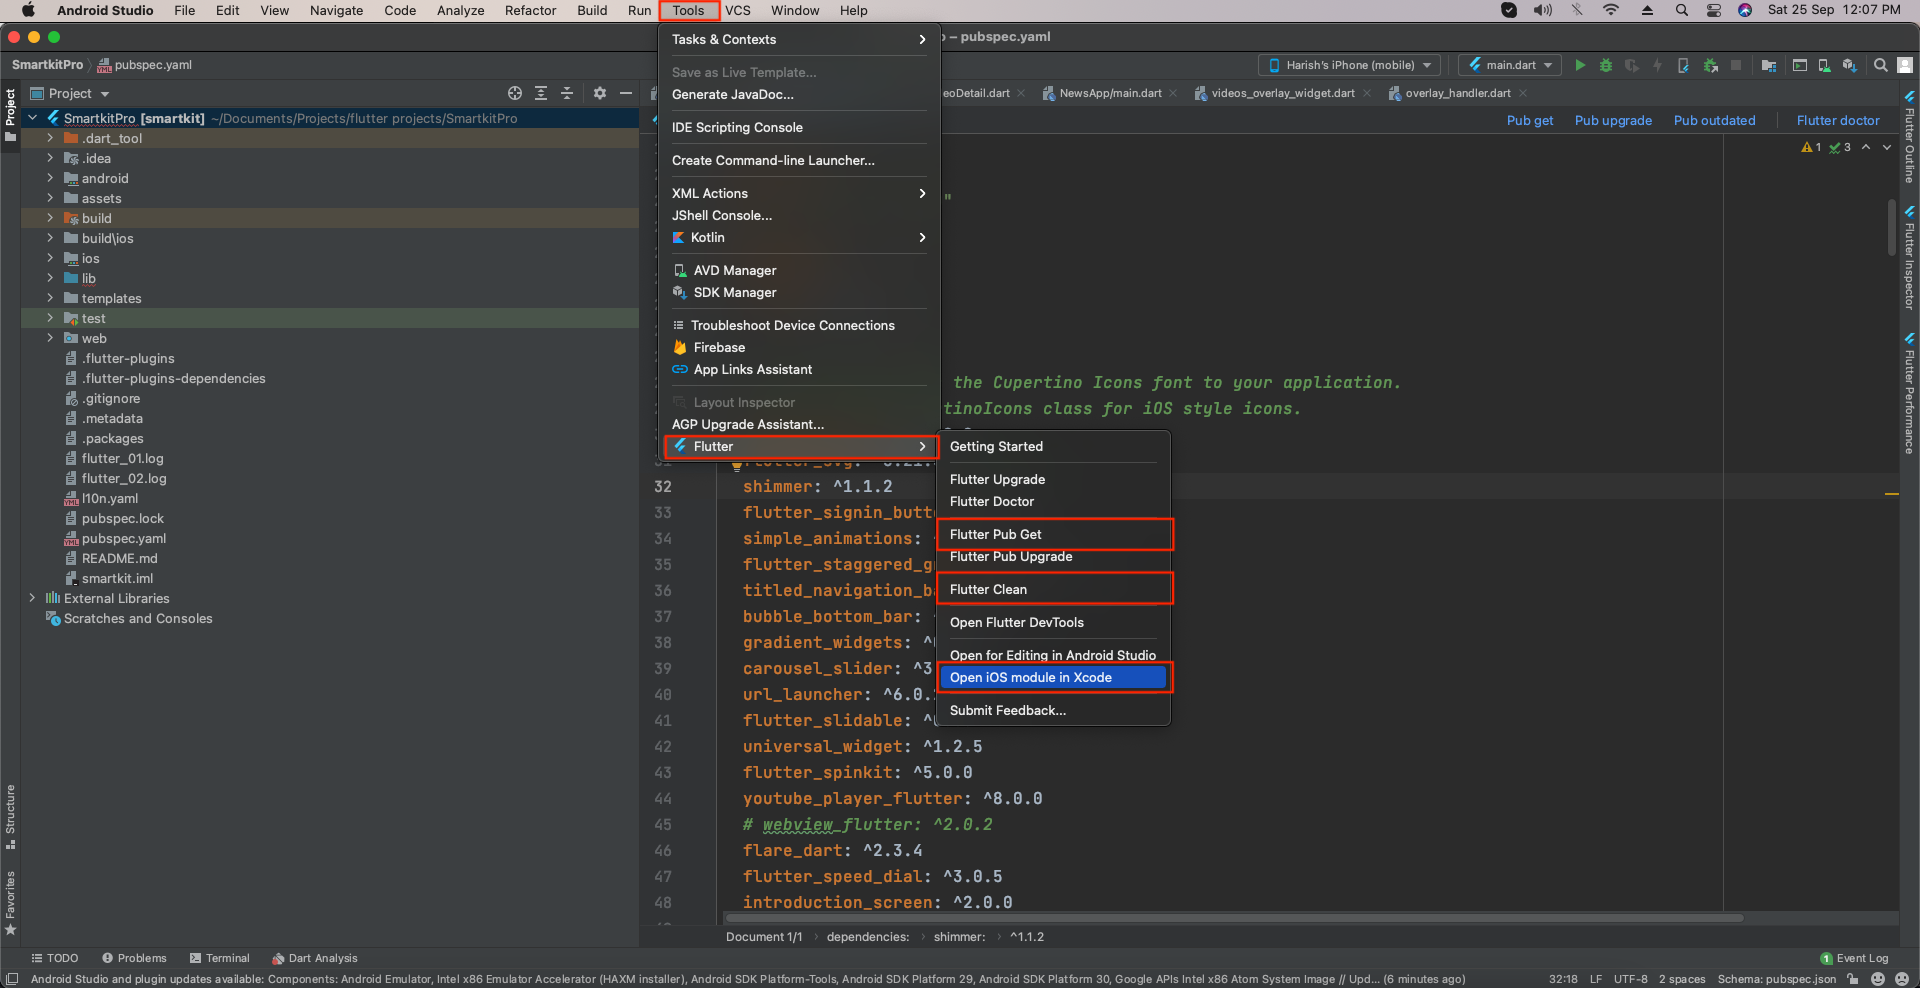
  3. Next: Go to Flutter > Clean Flutter > Flutter Pub Get.

  4. Go to Terminal > write command -> cd iOS and press enter key and then write command pod install. After finishing pods installation.

  5. Go to Flutter > Open iOS module in Xcode

  6. SmartKitPro
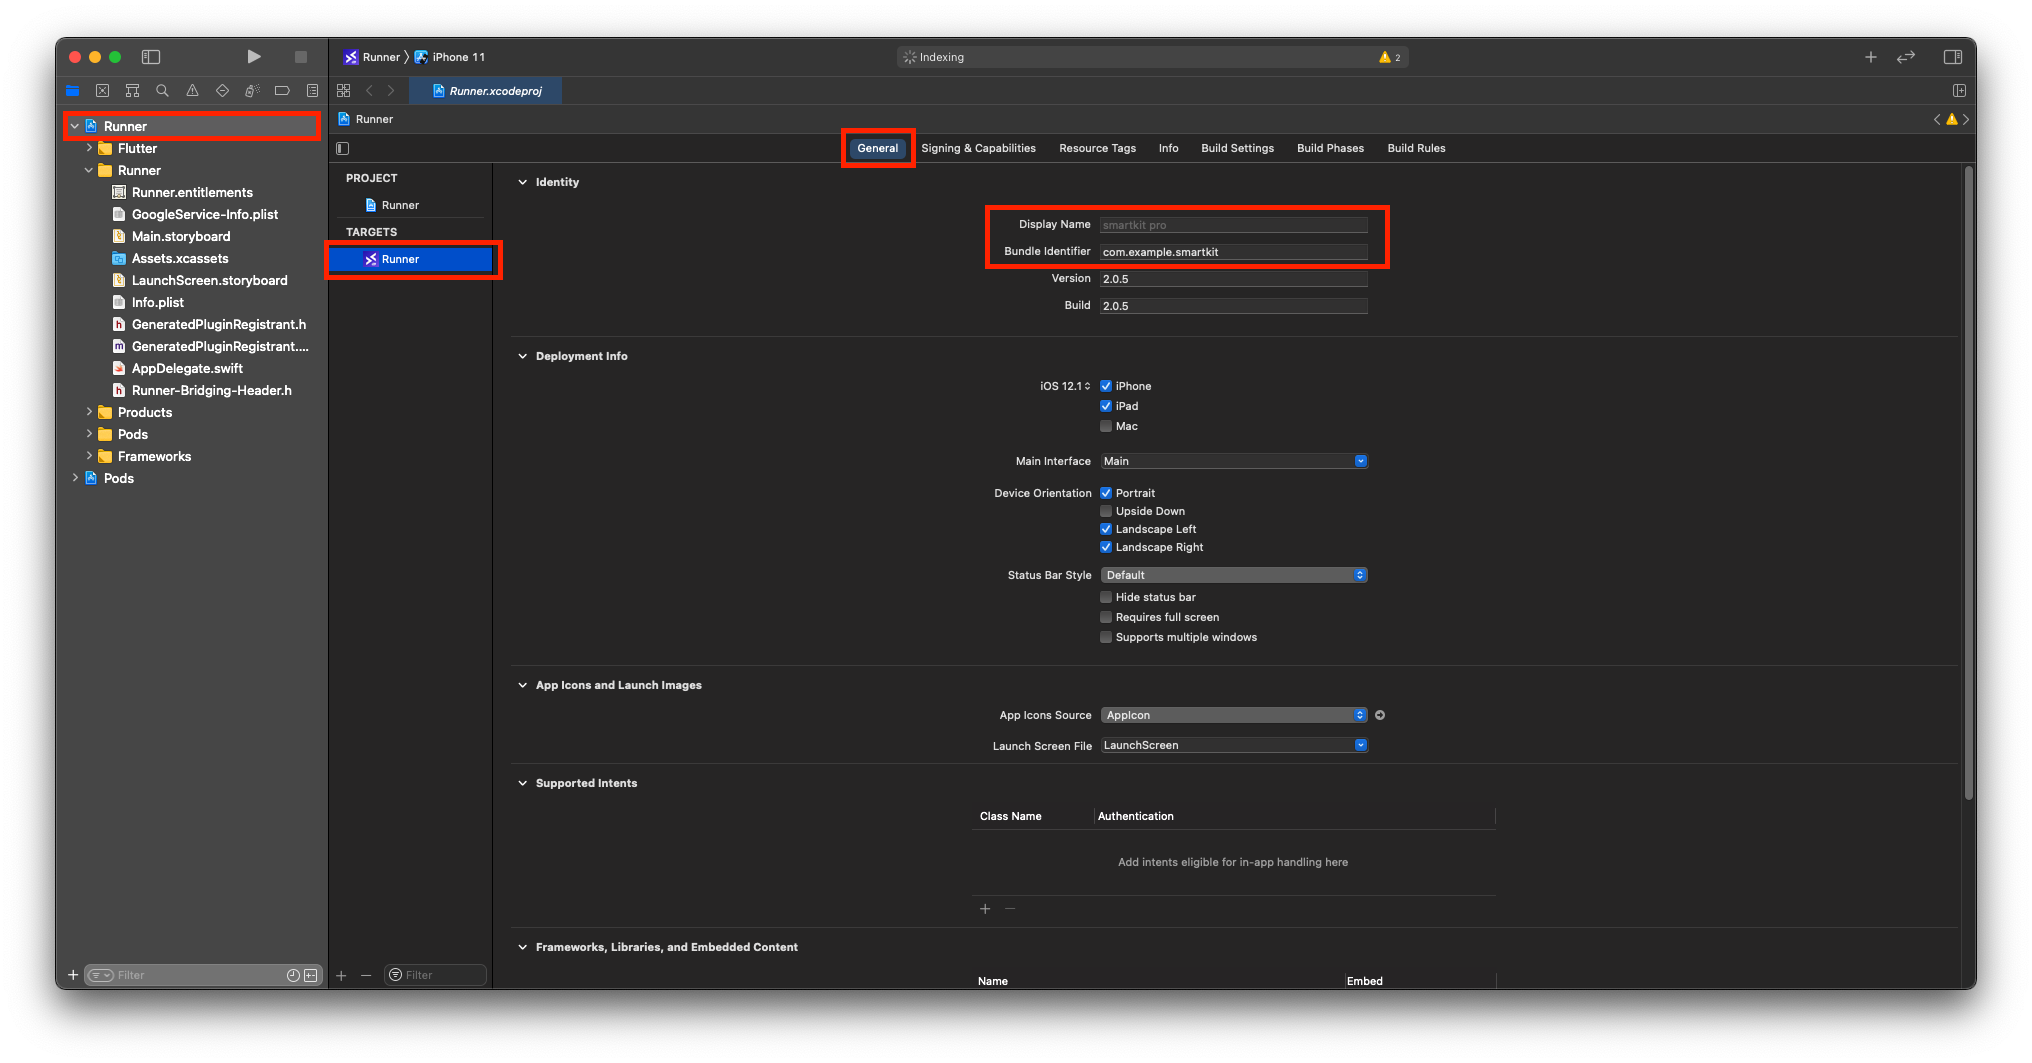
  7. Select Project > Target > Check For Display Name and Bundle Identifier in General Tab.
  8. SmartKitPro
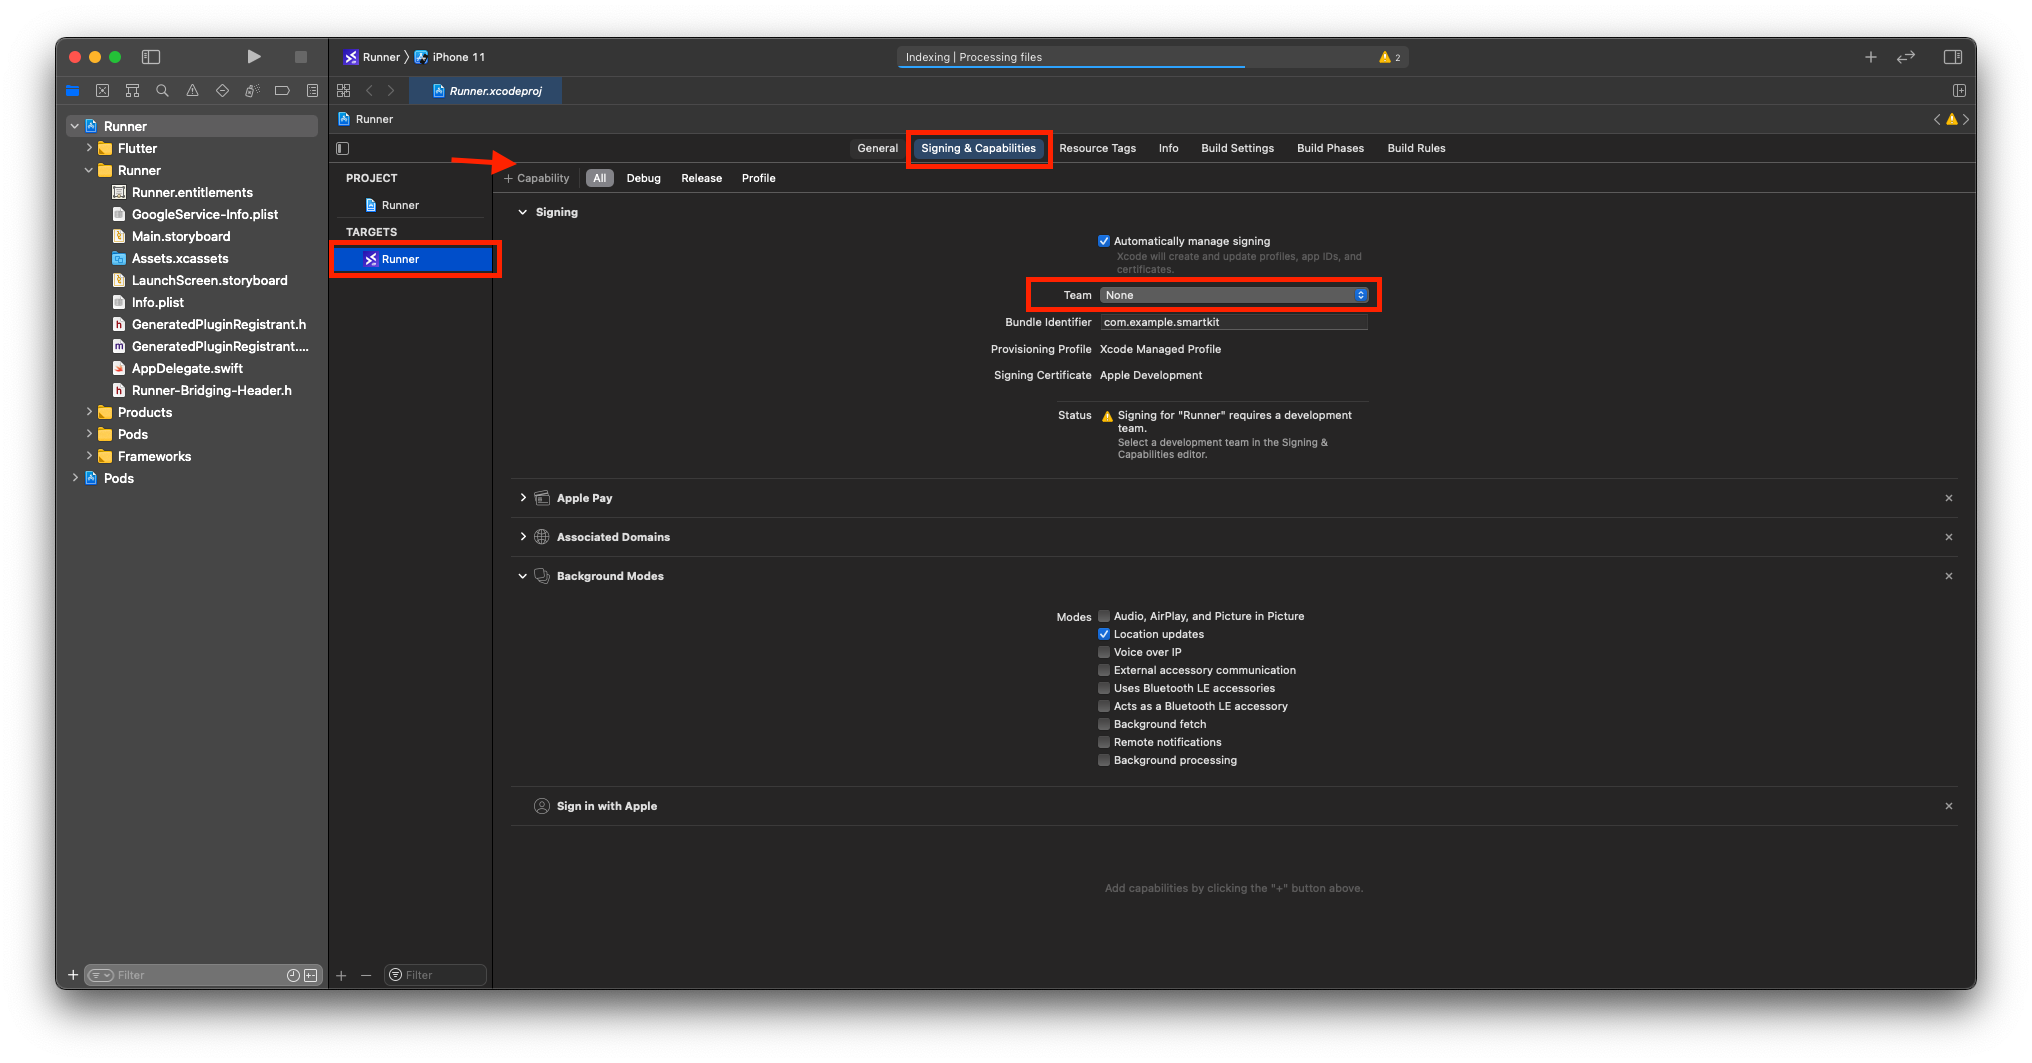
  9. Now go to Signing & Capabilities >Signing > Team - Add Your Team / Apple Developer Account here.
  10. SmartKitPro
  11. Add Following Capabilities according to Requirement of your Project & Respected Packages From Pubspec.yaml file.
    • Sign in with Apple

    • Apple Pay > Add Your merchant ID incase you want to use Apple Pay.

    • Associated Domains > add applinks of your Domain.

    • Background Modes > Location updates
Generate Release APK

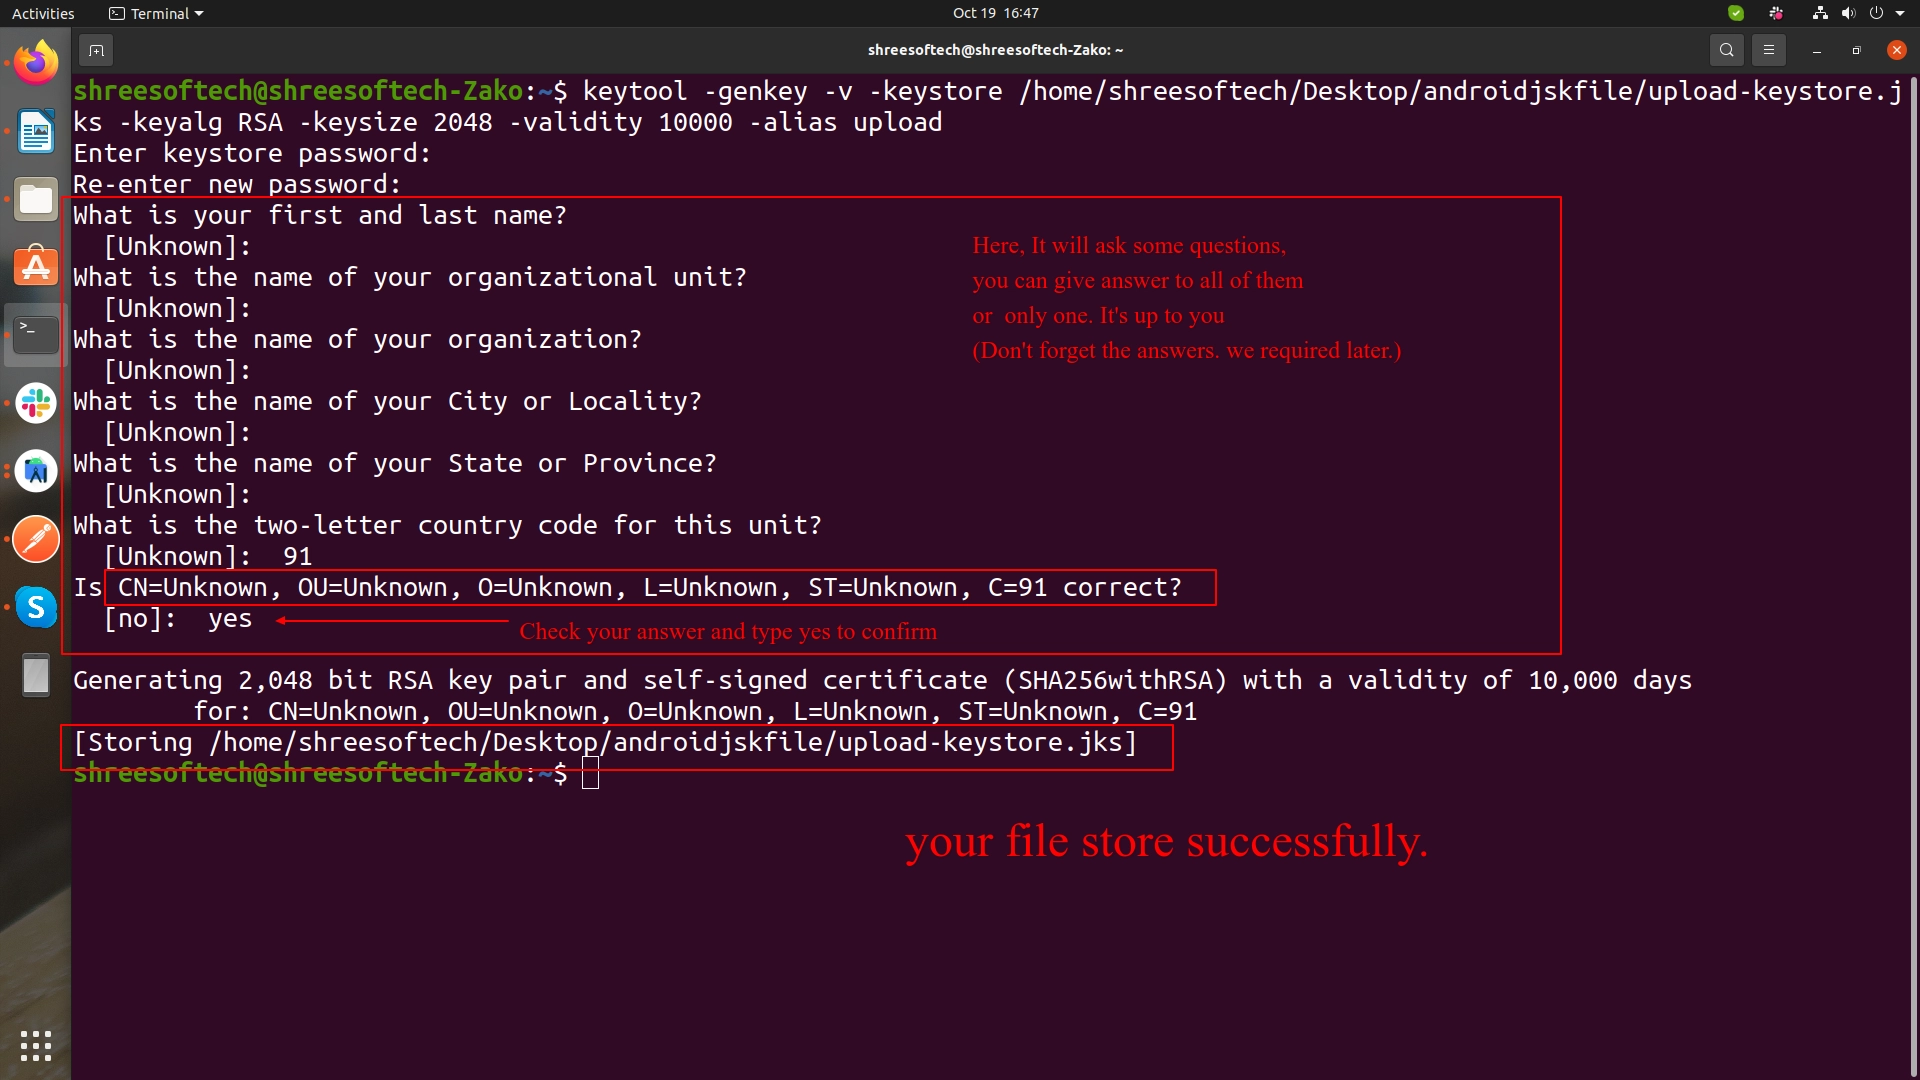
  1. Create an upload keystore
    Running the following at the command line:
    • On Mac/Linux, use the following command:

      keytool -genkey -v -keystore ~/upload-keystore.jks -keyalg RSA -keysize 2048 -validity 10000 -alias upload

    • On Windows, use the following command:

      keytool -genkey -v -keystore c:\Users\USER_NAME\upload-keystore.jks -storetype JKS -keyalg RSA -keysize 2048 -validity 10000 -alias upload
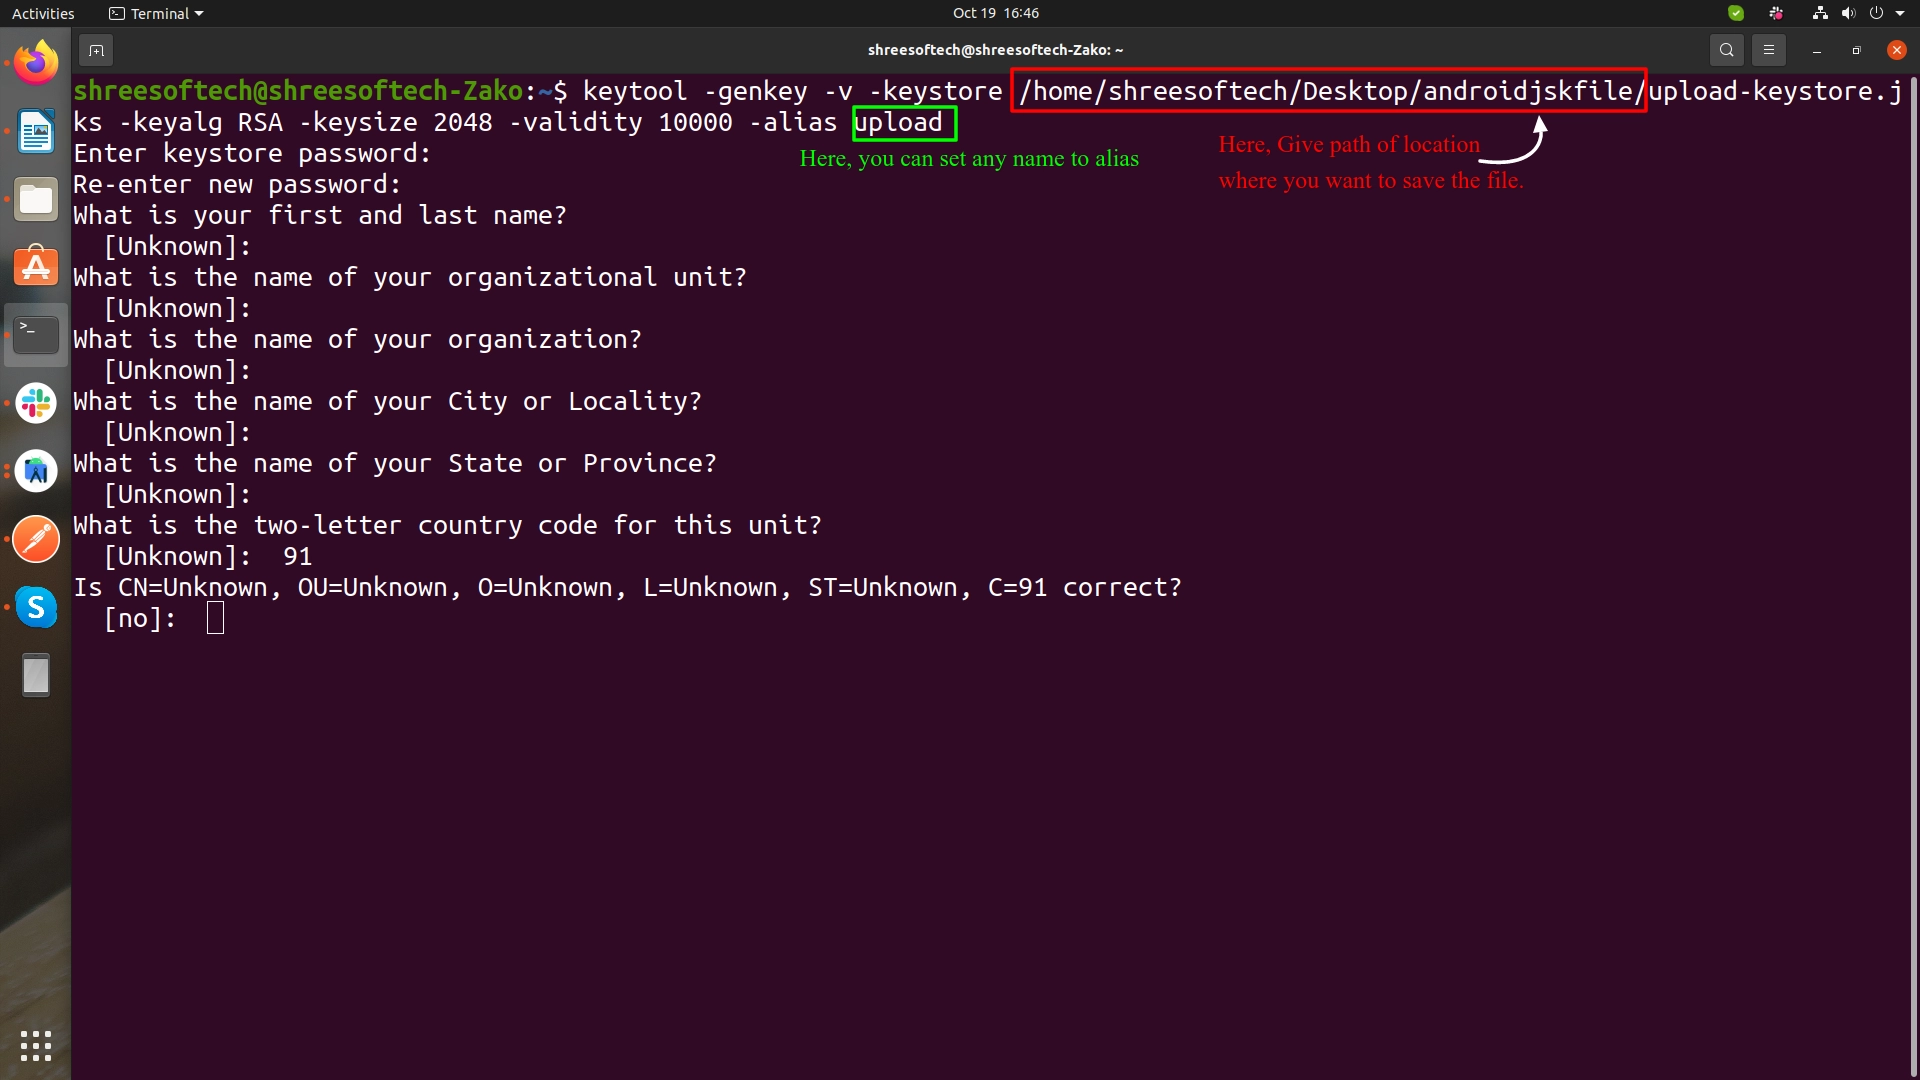
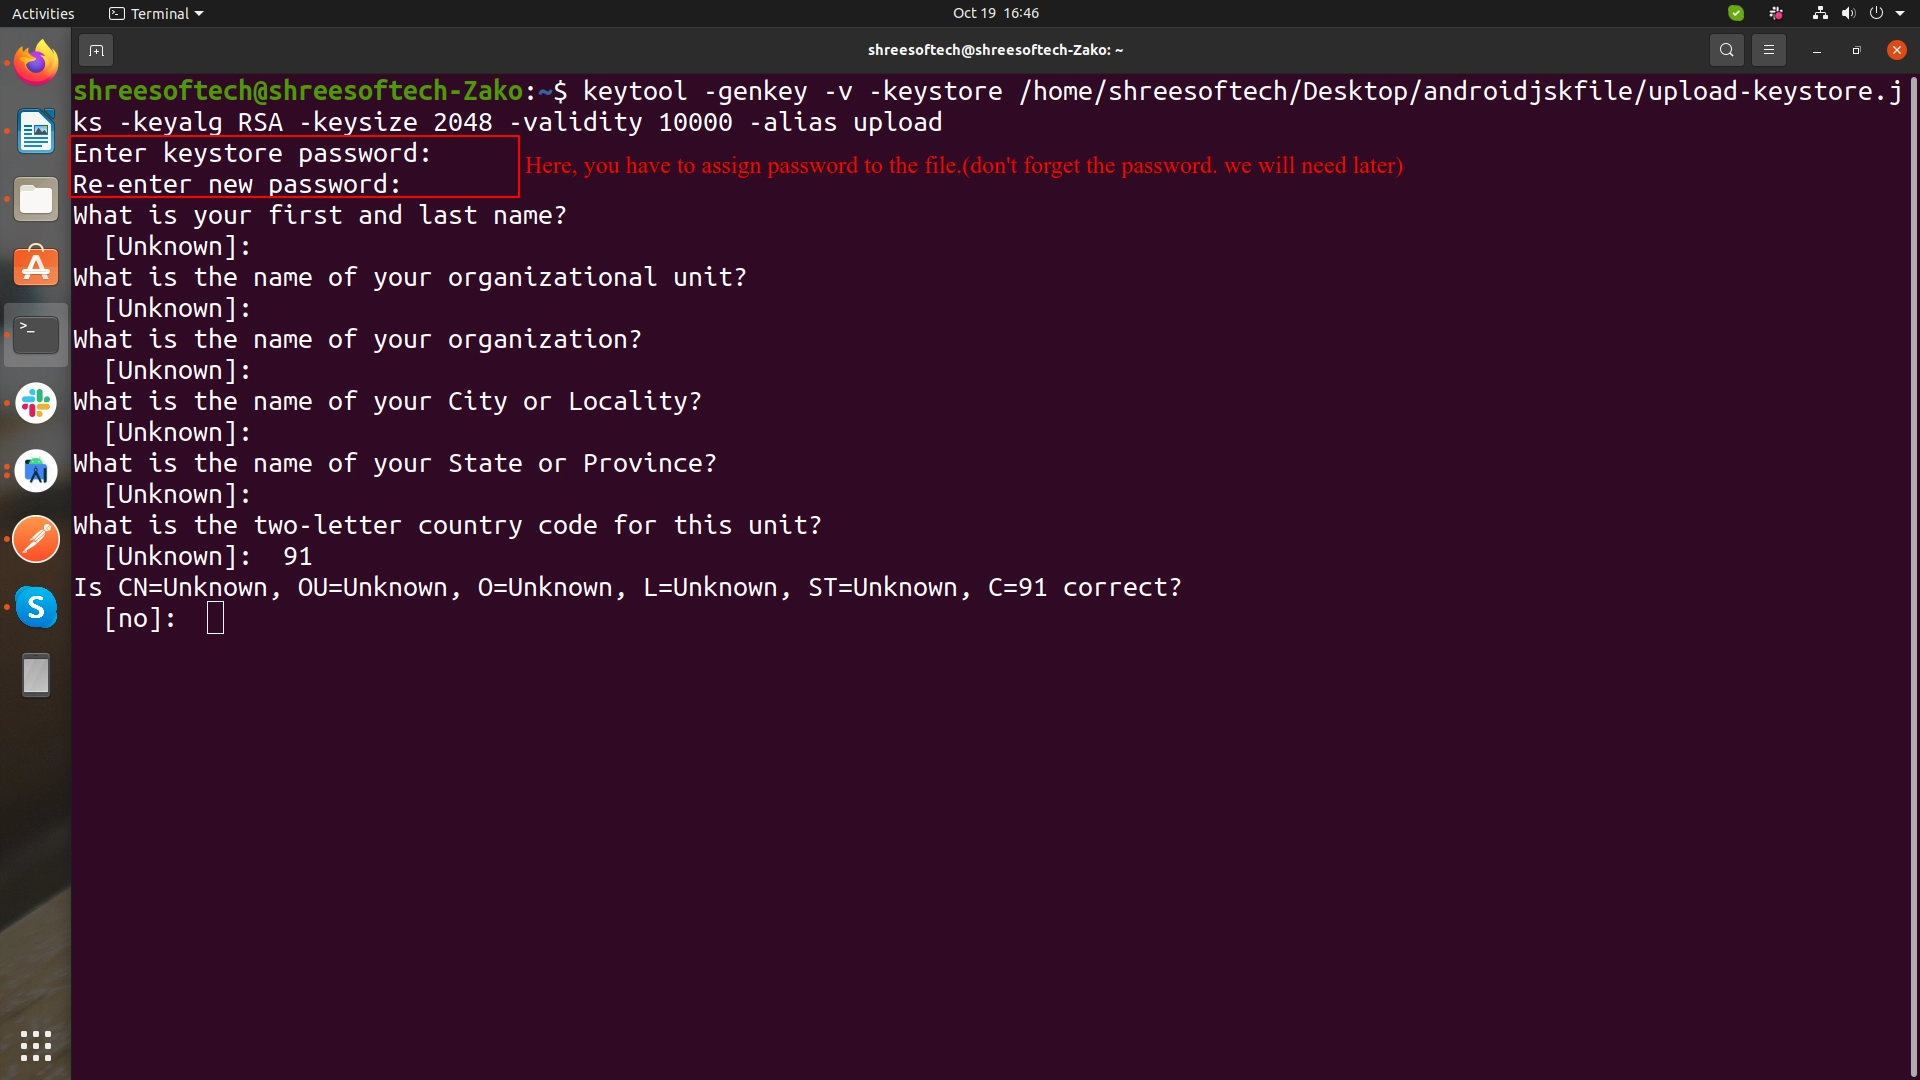
    eDemand

    eDemand

    eDemand

  2. Reference the keystore from the app

    Create a file named [project]/android/key.properties that contains a reference to your keystore:
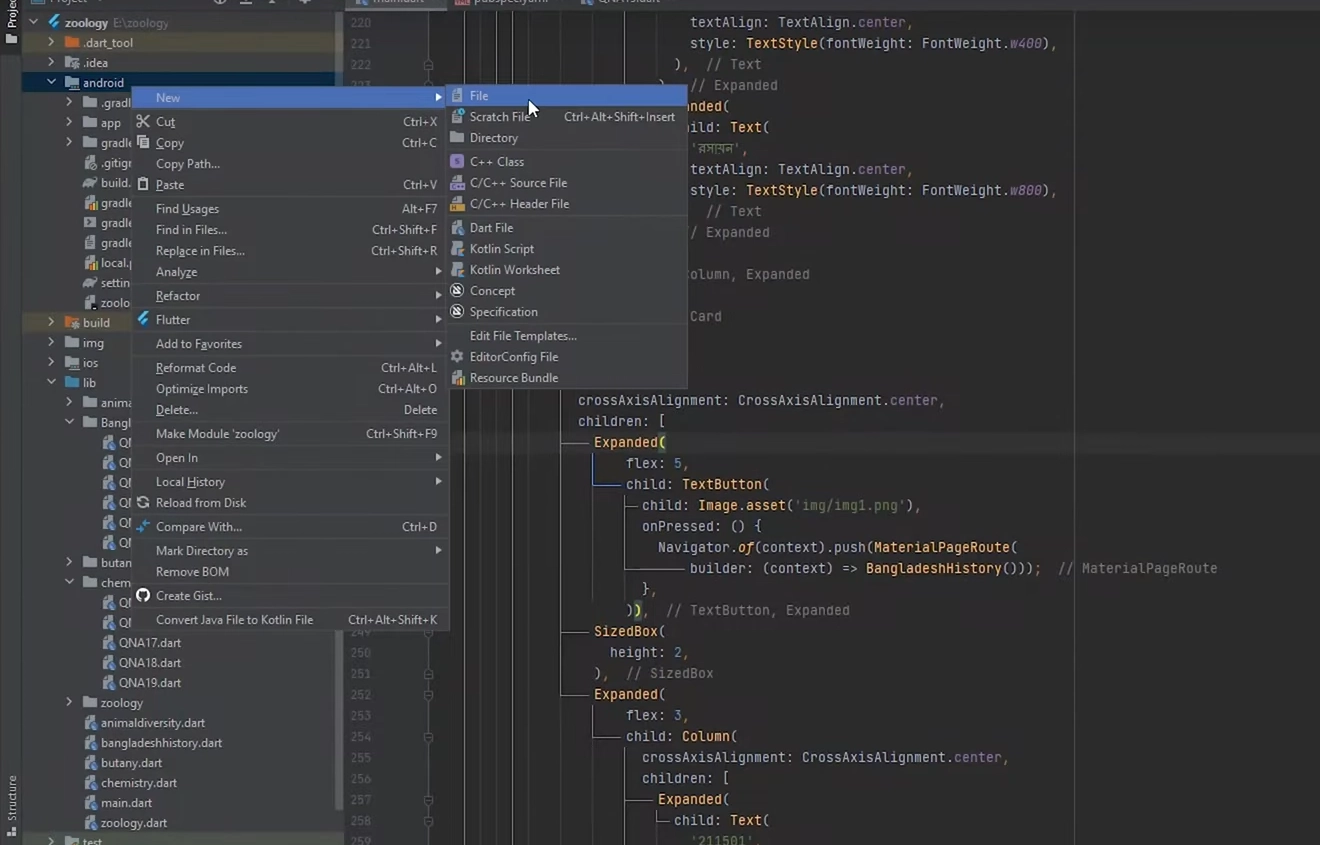
    eDemand

    Copy below code, Paste in to key.propertirs file and change as per shown in image.

    storePassword=
    keyPassword=
    keyAlias=upload
    storeFile=location of the key store file, such as /Users/user name/upload-keystore.jks
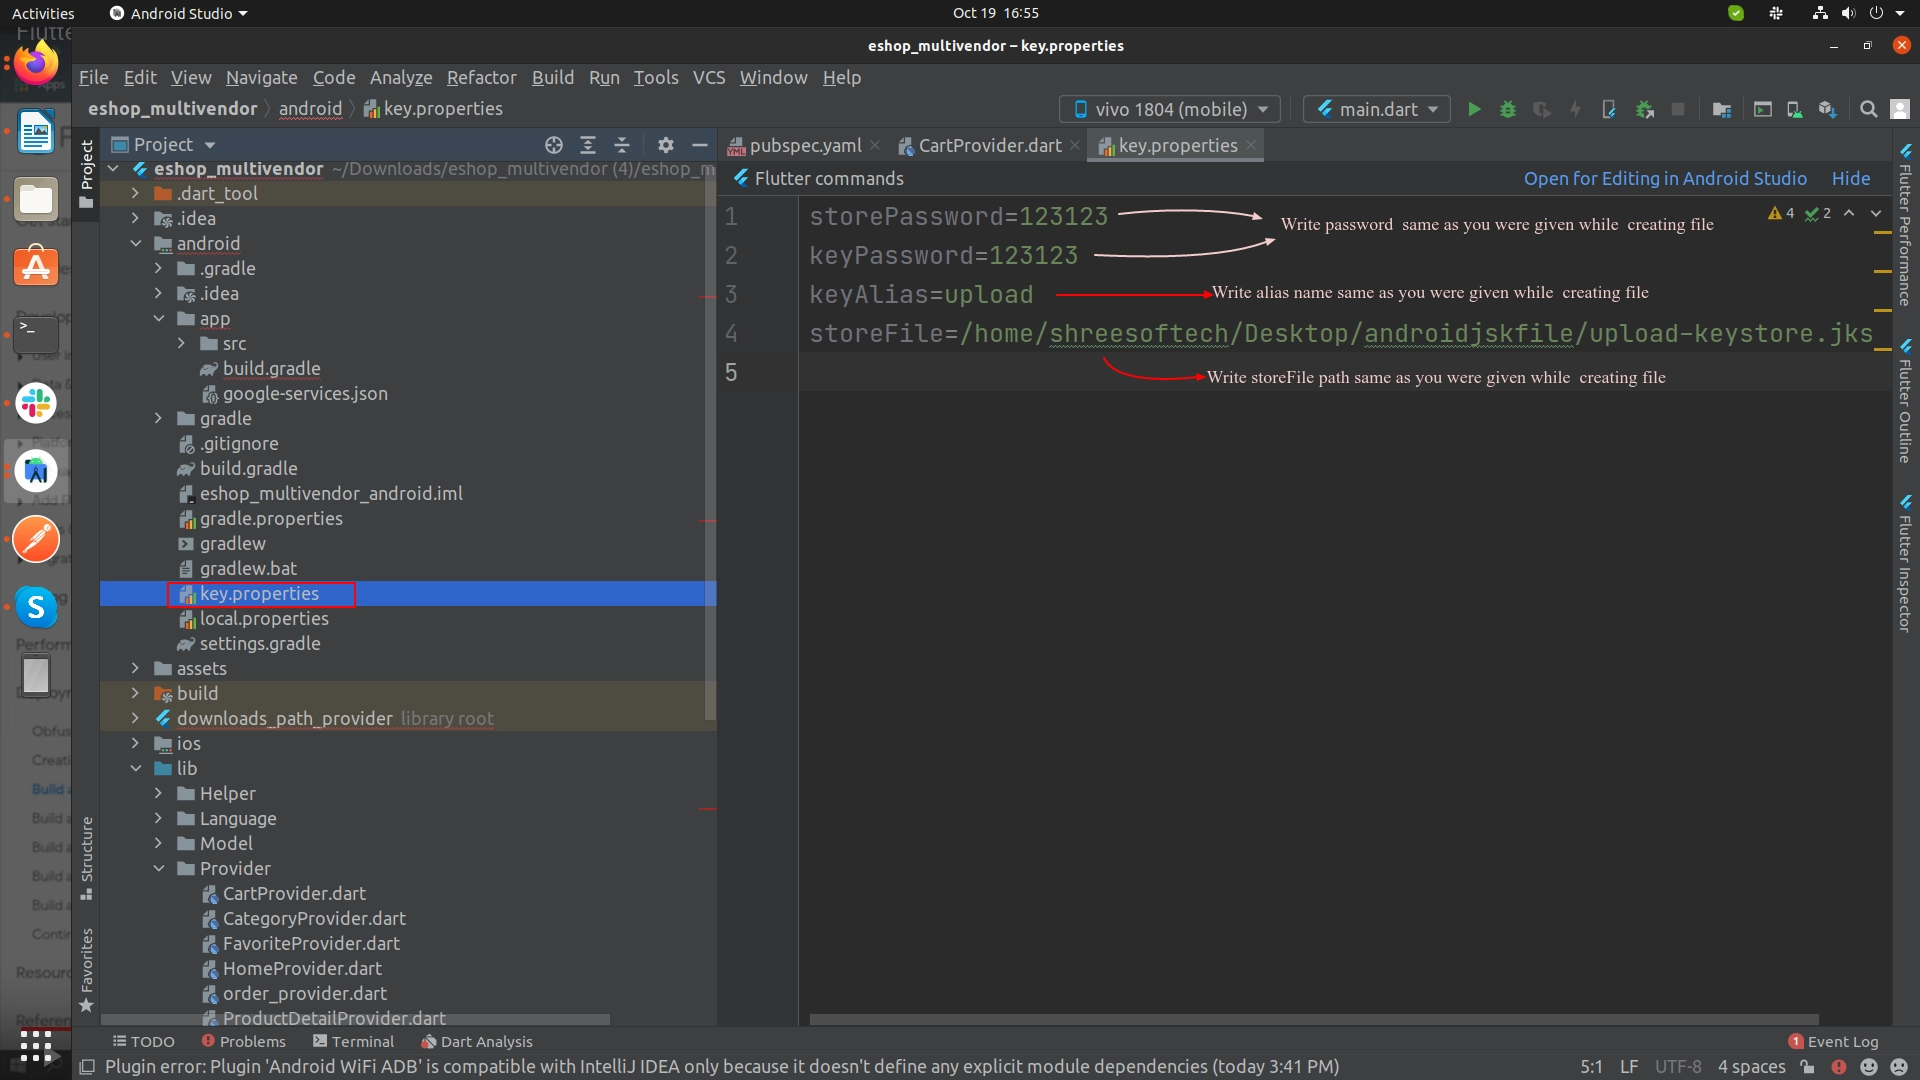
    eDemand

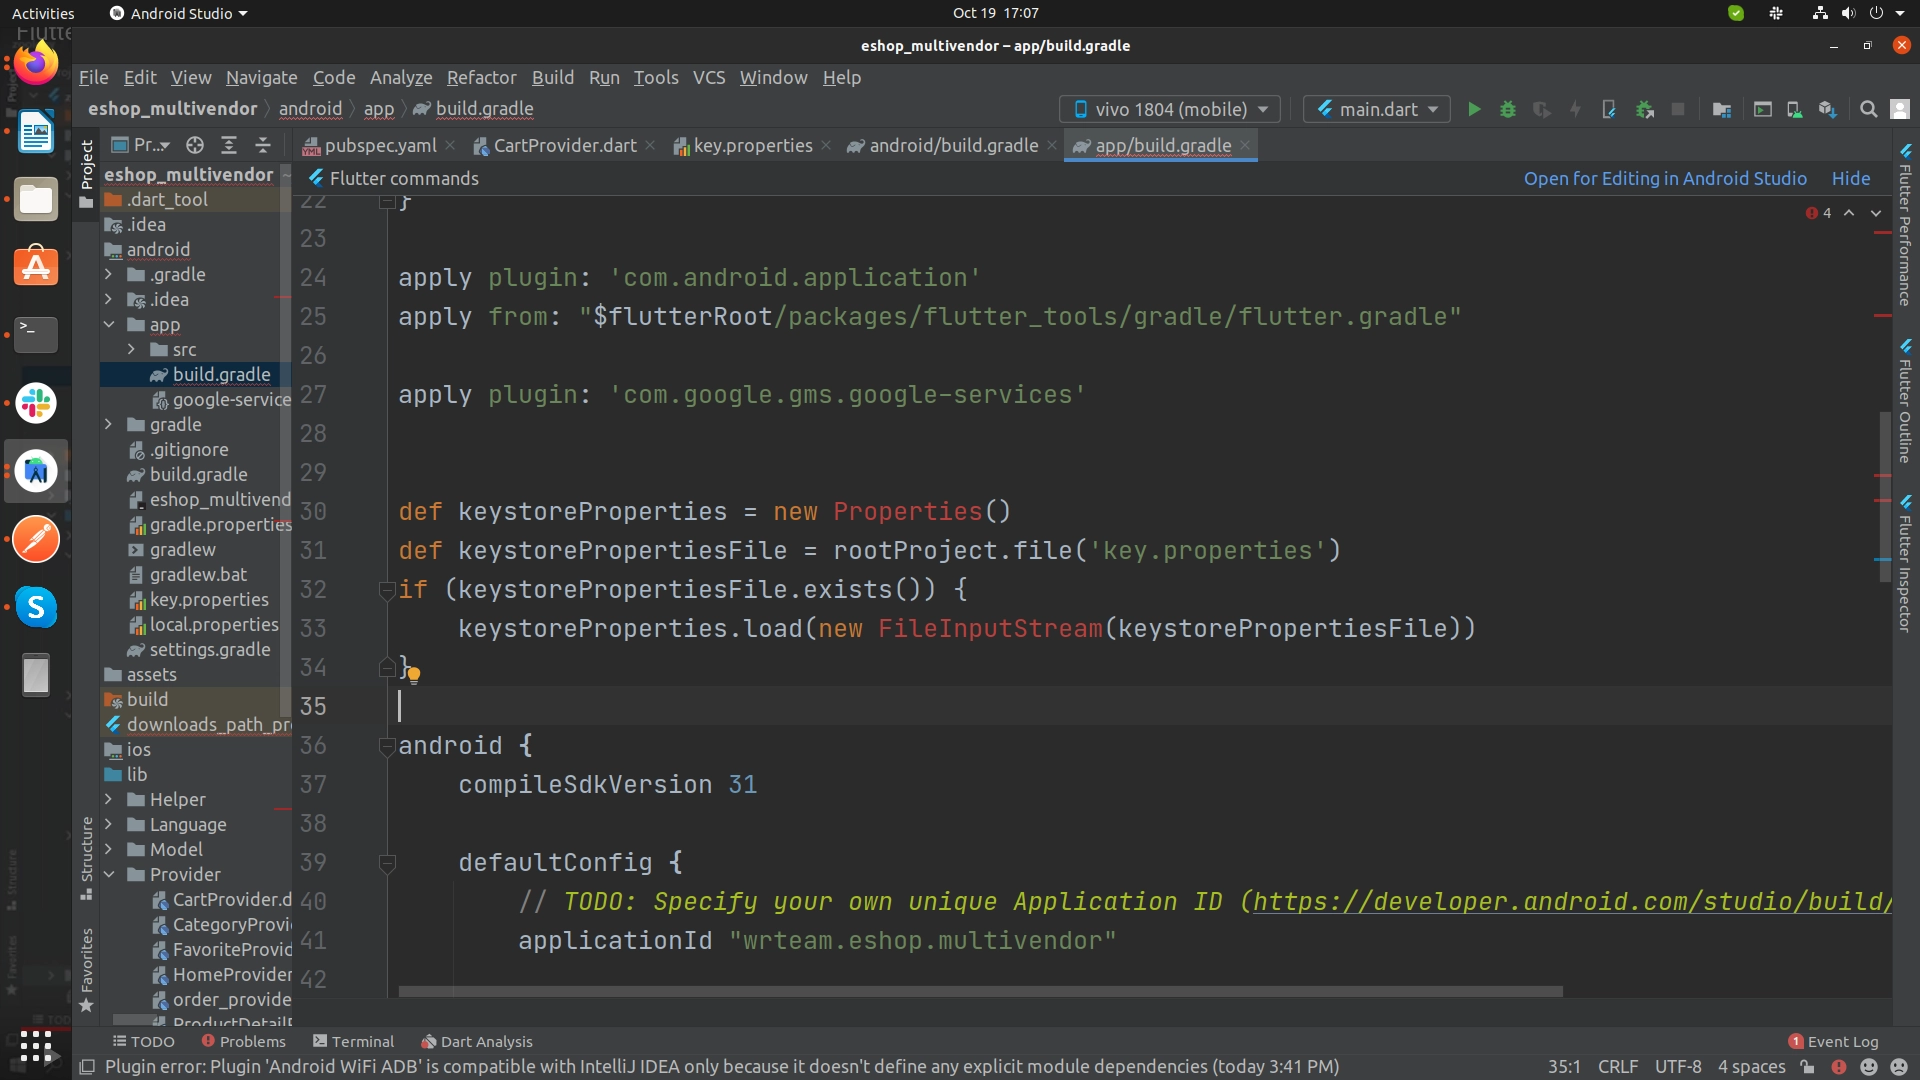
  3. Configure signing in gradle

    Configure gradle to use your upload key when building your app in release mode by editing the [project]/android/app/build.gradle file.
    • Add the below keystore information from your properties file before the android block:


      def keystoreProperties = new Properties()
      def keystorePropertiesFile = rootProject.file('key.properties')
      if (keystorePropertiesFile.exists()) {
      keystoreProperties.load(new FileInputStream(keystorePropertiesFile))
      }
      eDemand

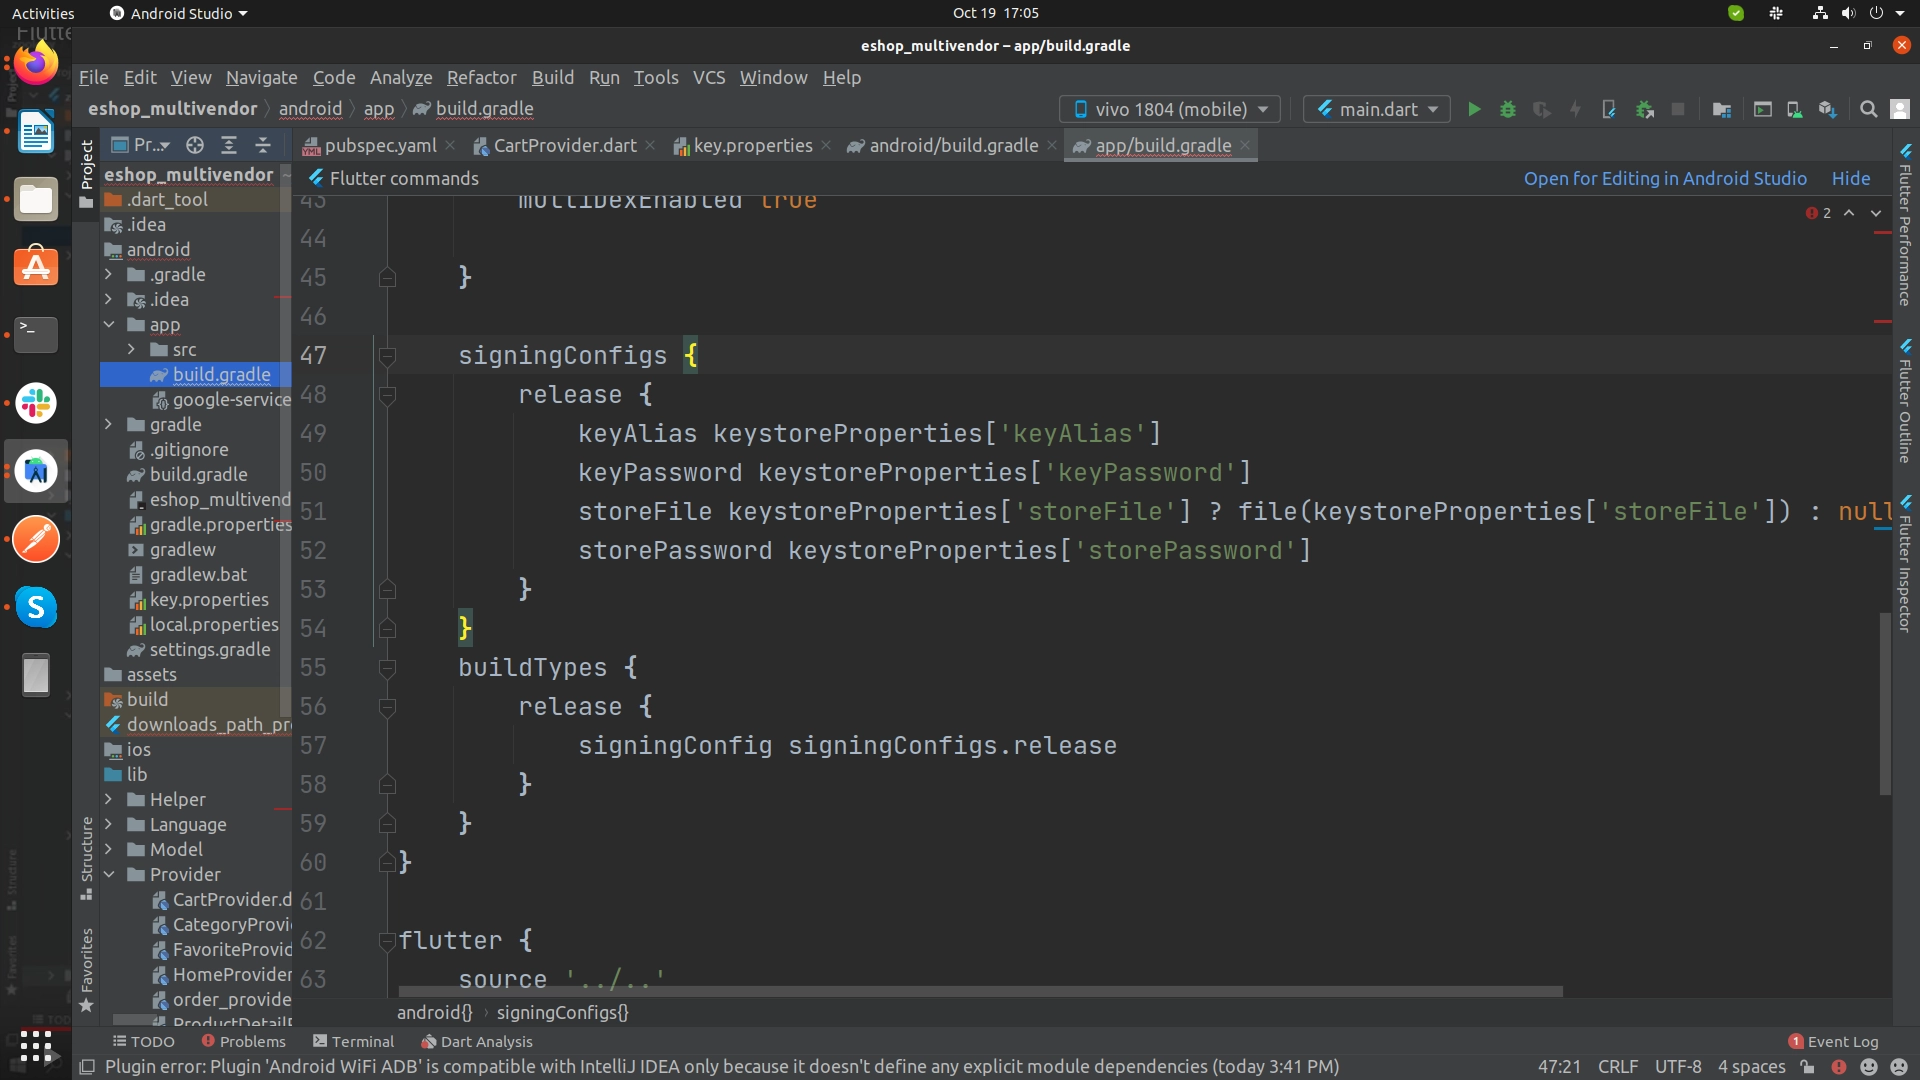
    • Find the buildTypes block:
      And replace it with the following signing configuration info:

      signingConfigs {
      release {
      keyAlias keystoreProperties['keyAlias']
      keyPassword keystoreProperties['keyPassword']
      storeFile keystoreProperties['storeFile'] ? file(keystoreProperties['storeFile']) : null
      storePassword keystoreProperties['storePassword']
      }
      }
      buildTypes {
      release {
      signingConfig signingConfigs.release
      }
      }
      eDemand


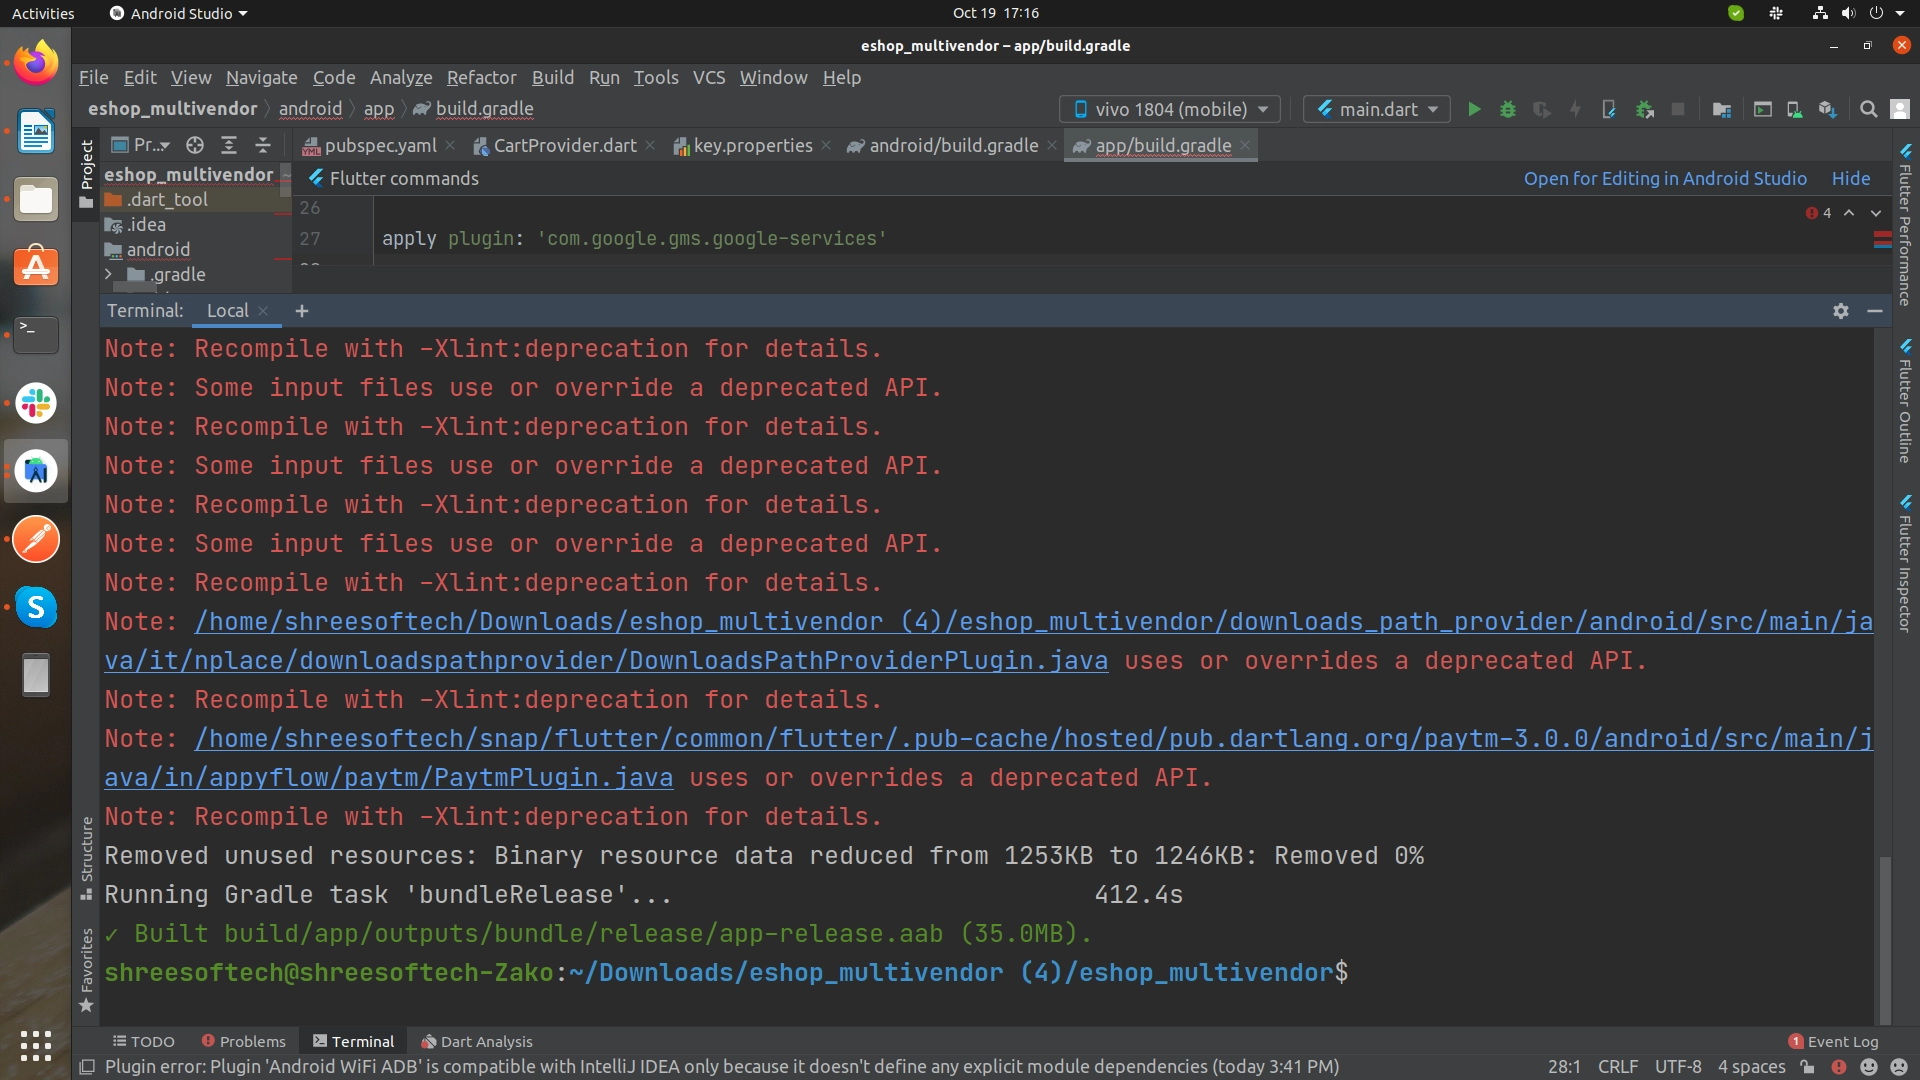
  4. Run following commands in Terminal as per your need:
    • To generate an APK
      flutter build apk
    • To generate an App Bundle
      flutter build appbundle
    • eDemand

Steps to Publish iOS App to App Store

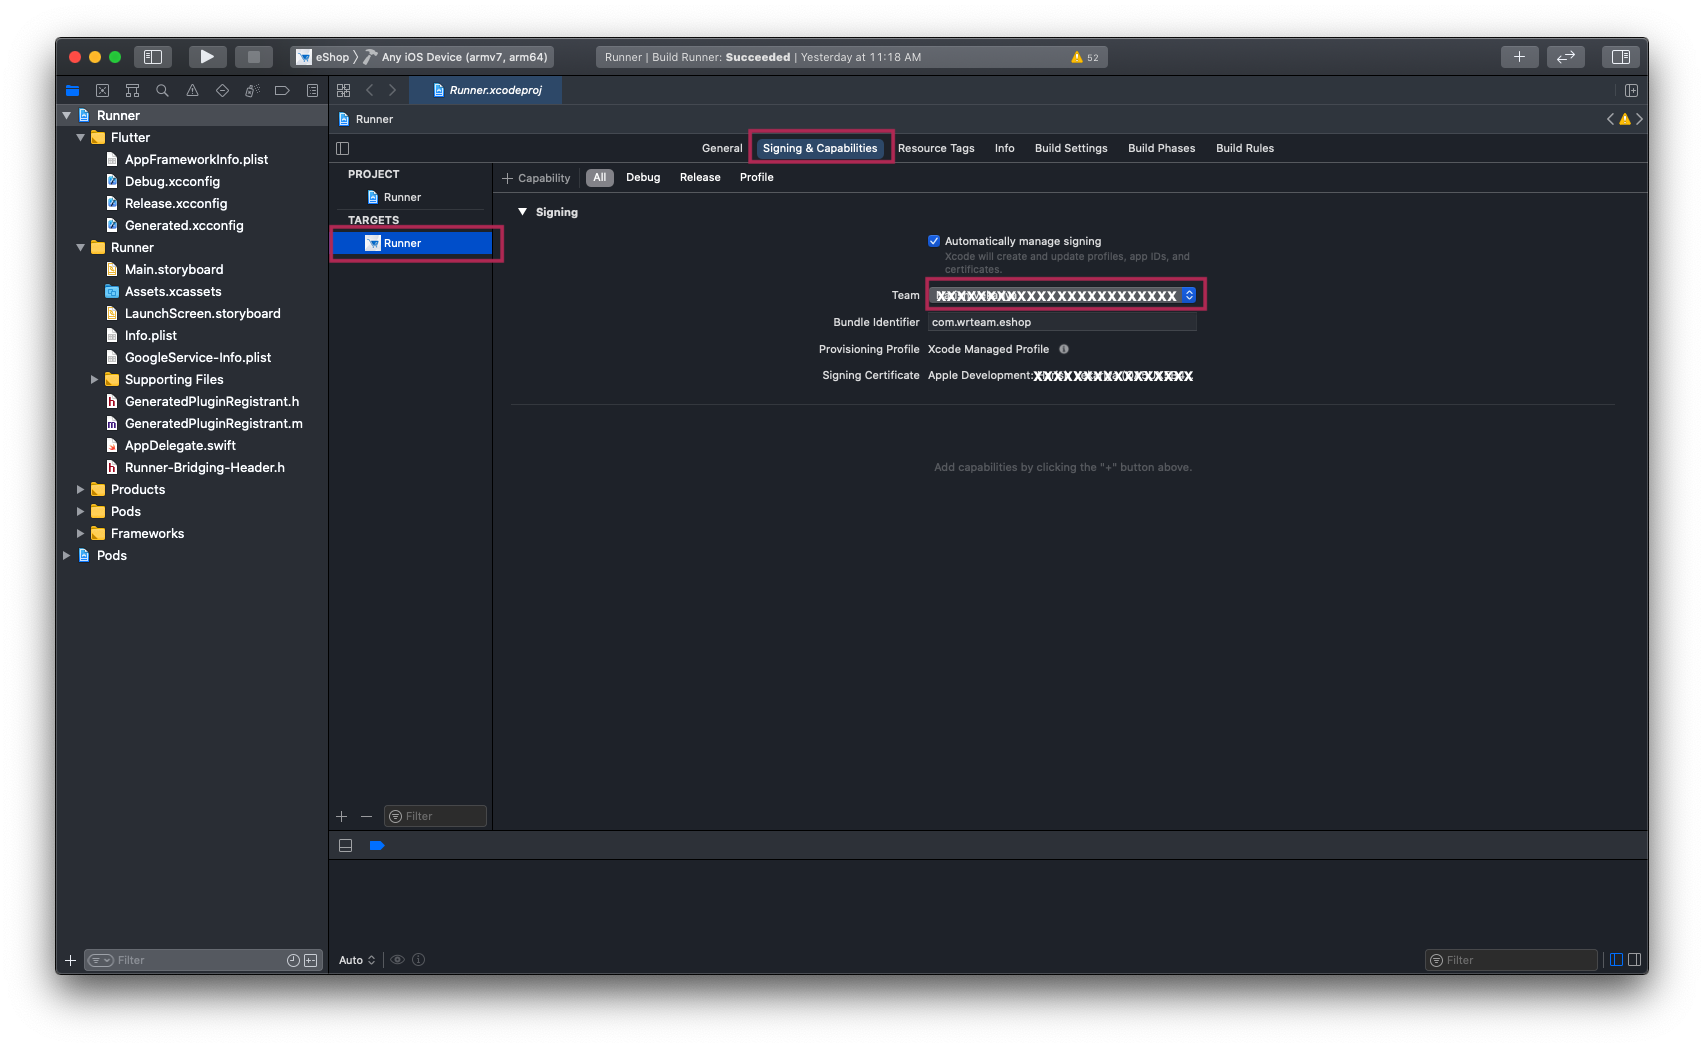
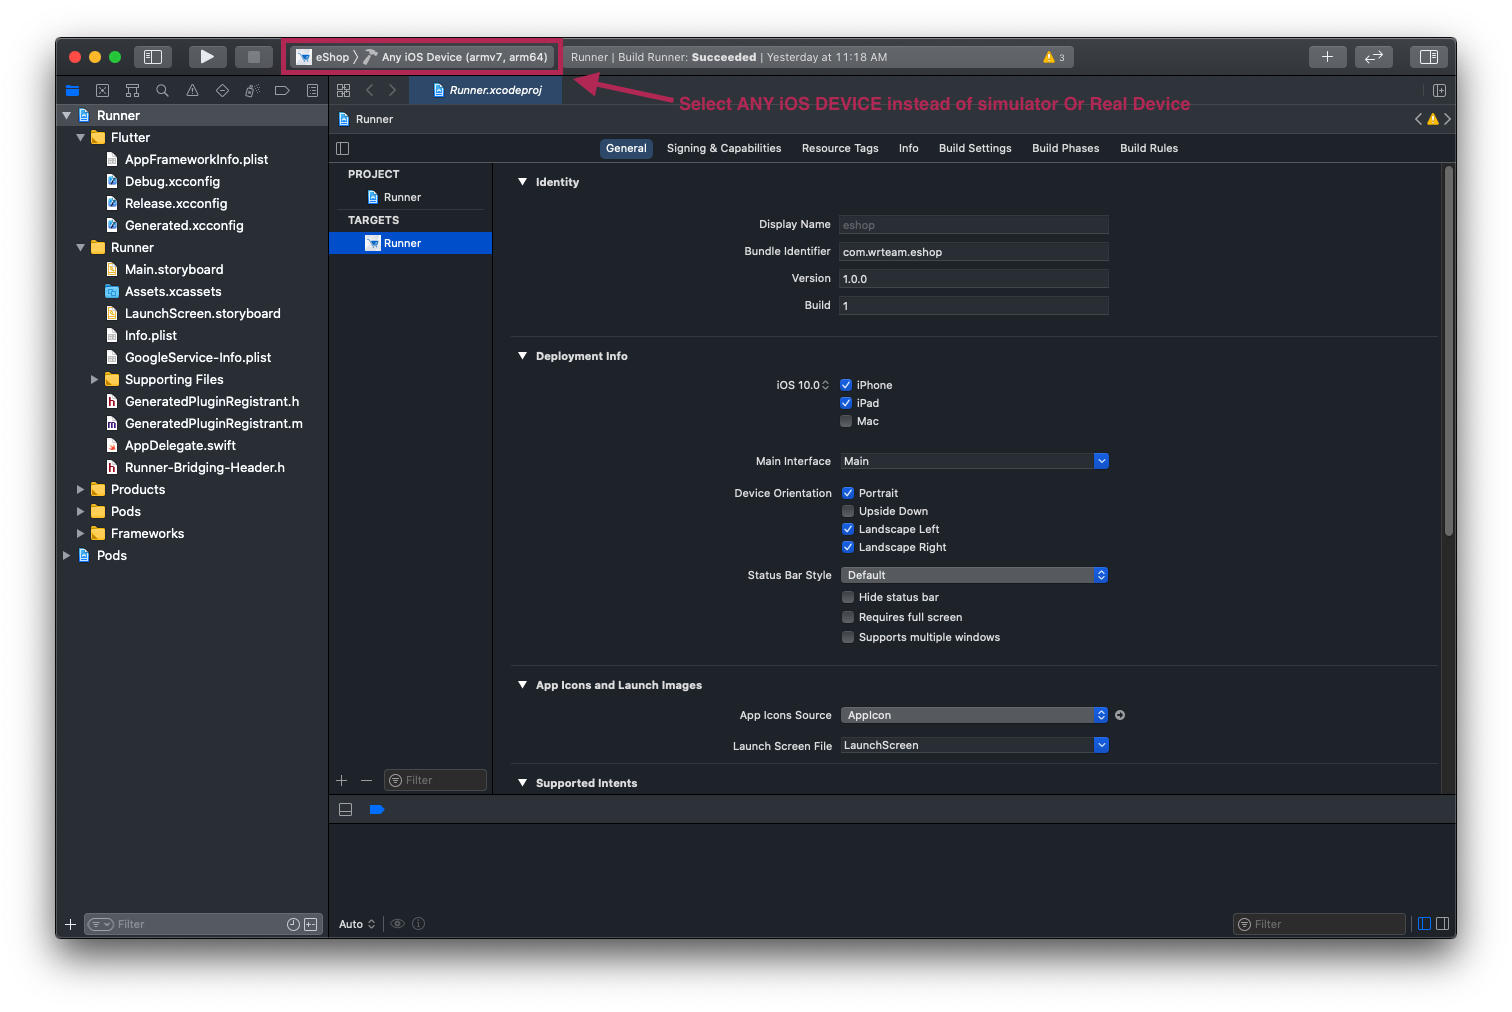
  1. Open your Project's Runner.xcworkspace file in Xcode, and Add your Team [Your Apple Developer ID] and also Insert GoogleService-Info.plist file [Downloaded From Firebase Project] inside folder named Runner.

  2. eBroker

  3. and then Select Any iOS Device (armv7,arm64) as shown in image below.

  4. eBroker

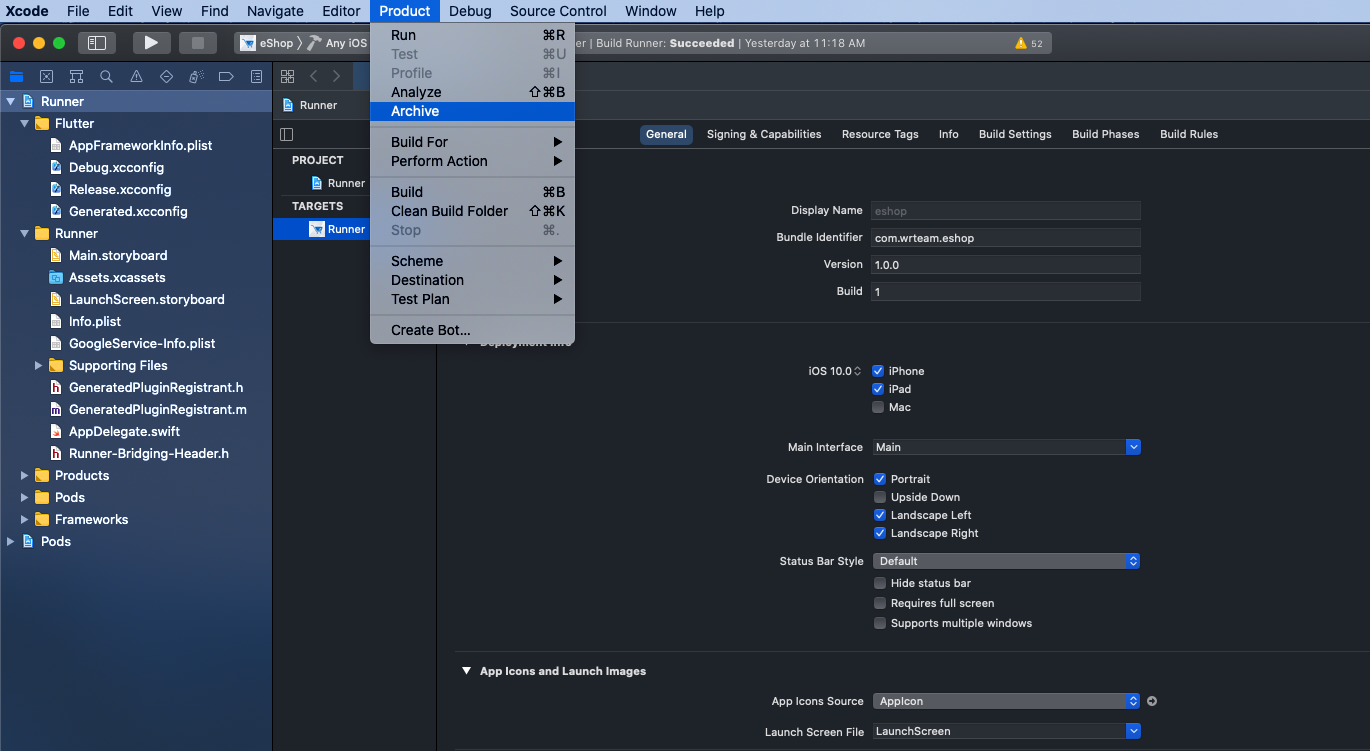
  5. After that Select Archive From Product Menu of Xcode as shown below.

  6. eBroker

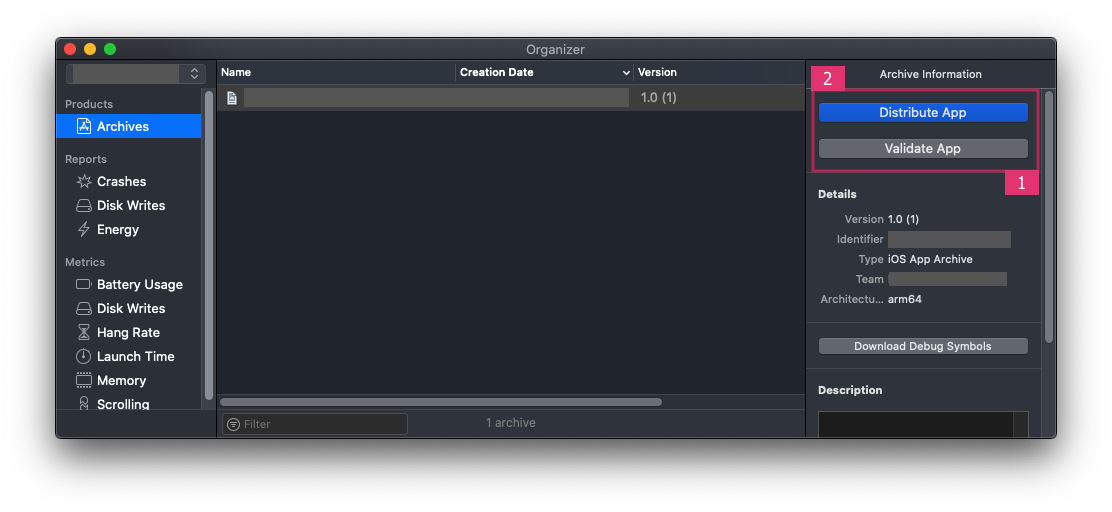
  7. Once Build / Archive Generated, pop up window will be shown. Validate app First, and After Successfull Validation of App, You Can Distribute App to AppStore.
  8. eBroker

  9. After SuccessFull Submission of Build File, it will be Reflected to your Apple Developer Account in which we have created app with same Bundle ID.
  10. Click here for Detailed Help
Firebase

Create Firebase Project for Application.

  • We will use Fireabse for Authentication,Notifications,
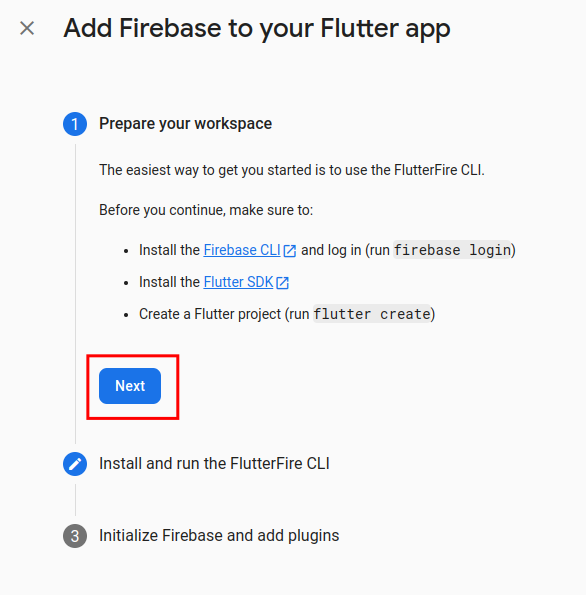
    • For create firebase app from flutter you must need to install firebase cli first.
    • To install firebase cli follow this https://firebase.google.com/docs/cli
    • After firebase cli install you can follow below steps

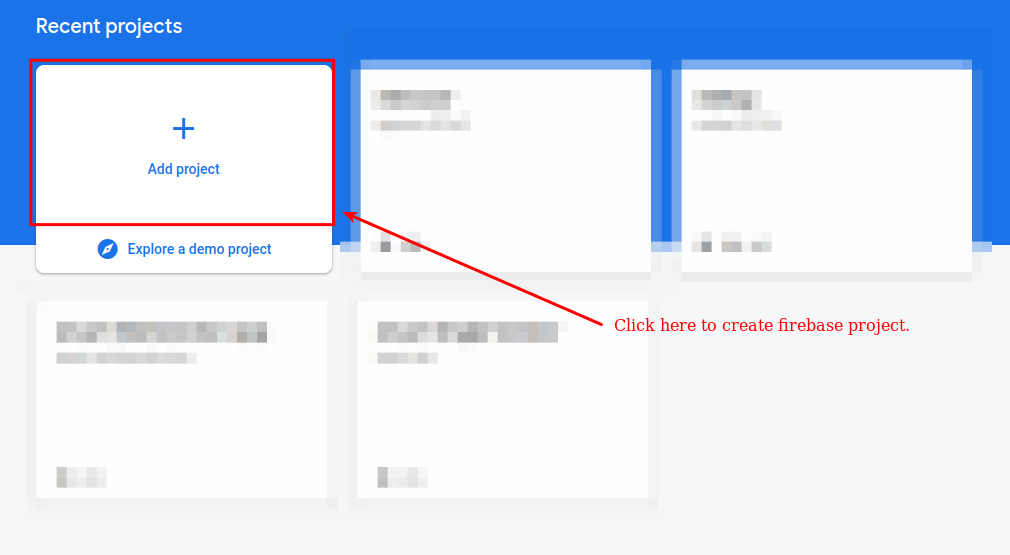
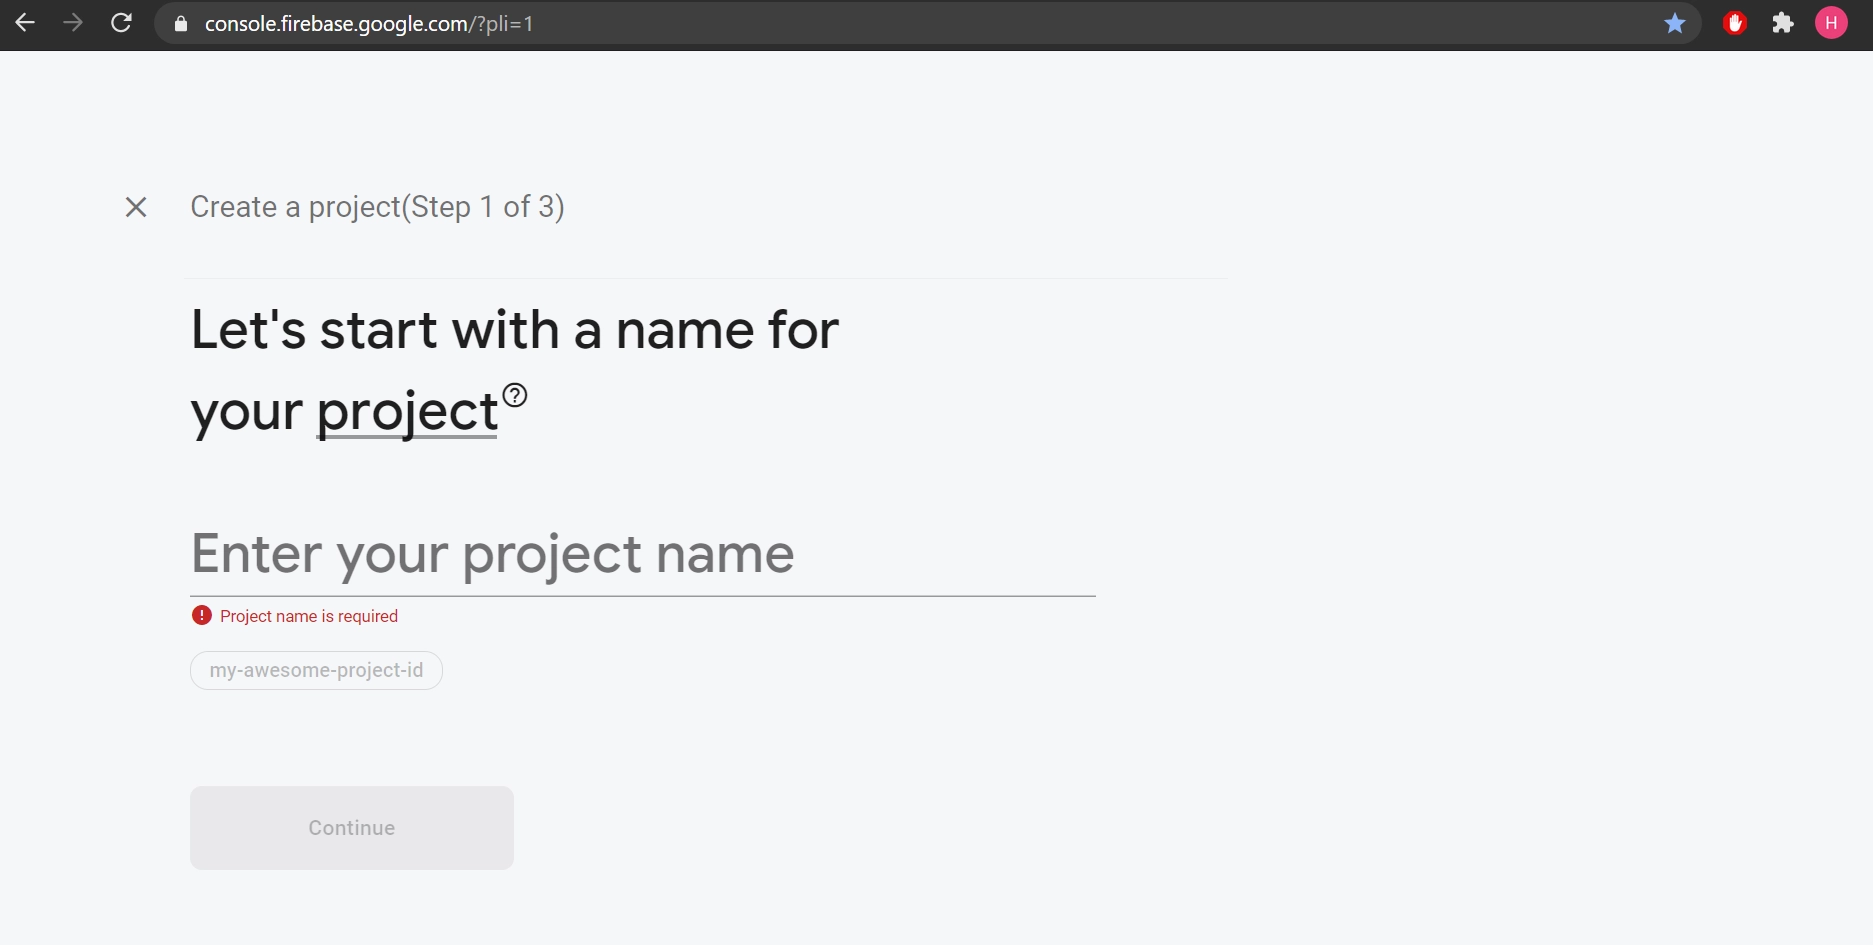
  • Create firebase app step 1
  • eBroker

  • Enter your project name here, and press continue,

  • eBroker

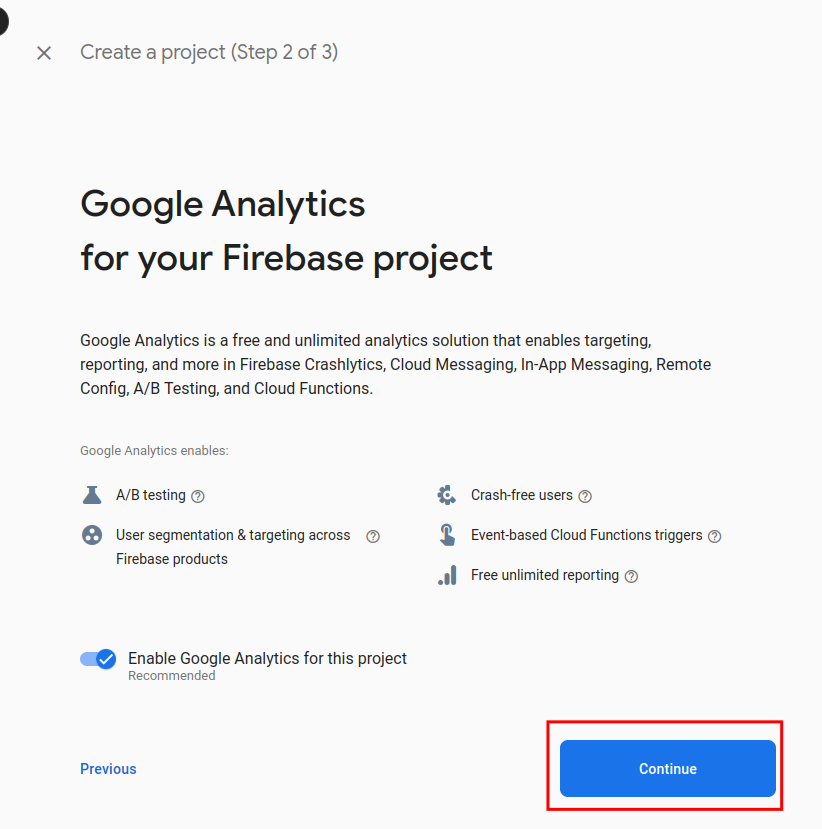
  • Press continue

  • eBroker

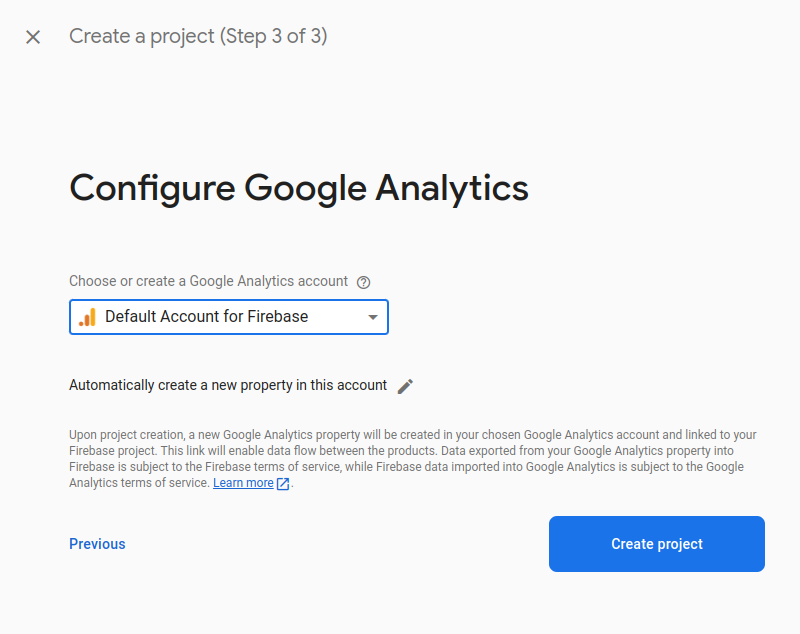
  • Press create project

  • eBroker

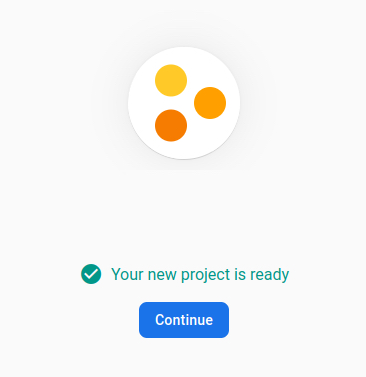
  • Press continue

  • eBroker

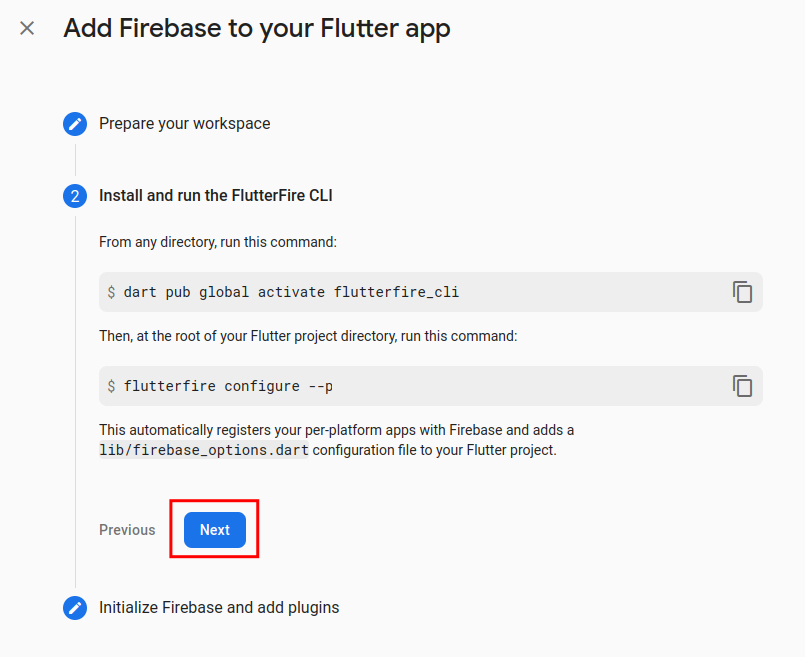
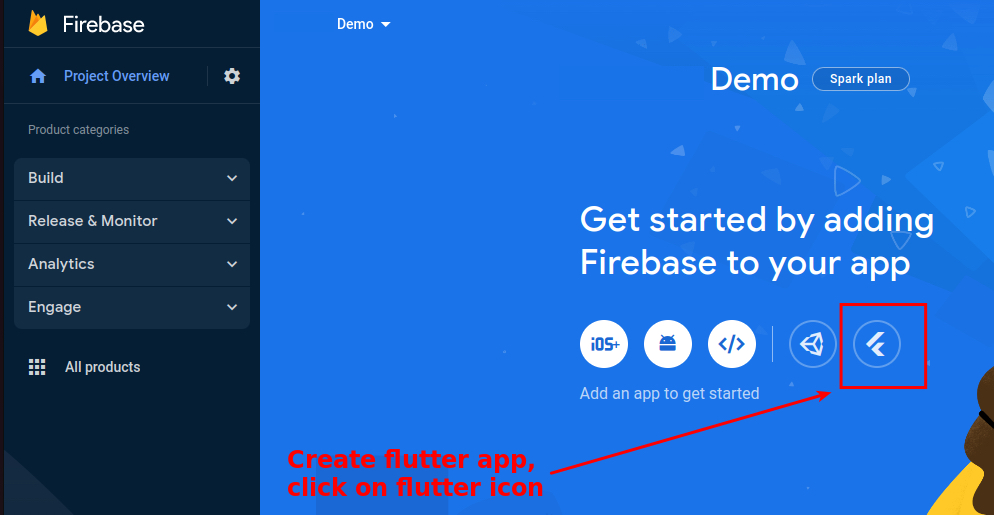
  • Create flutter app (Follow below image)

  • eBroker

  • Press next

  • eBroker
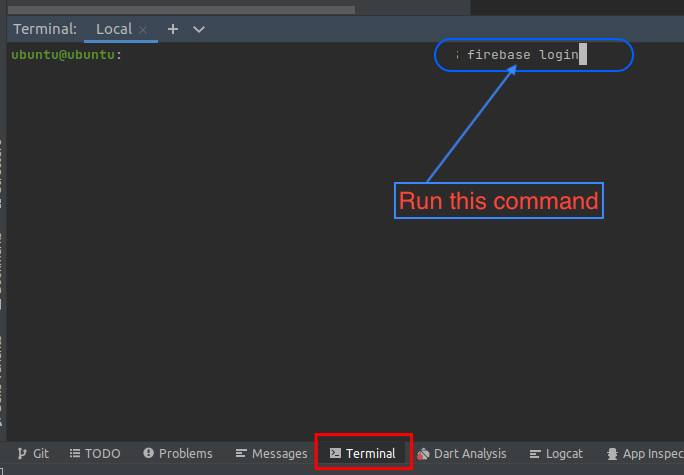
  • Now to to android studio terminall and run "firebase login" command in terminal, and login to firebase from browser.
    • Allow Firebase to collect CLI and Emulator Suite usage and error reporting information? set "YES" and press enter
  • eBroker


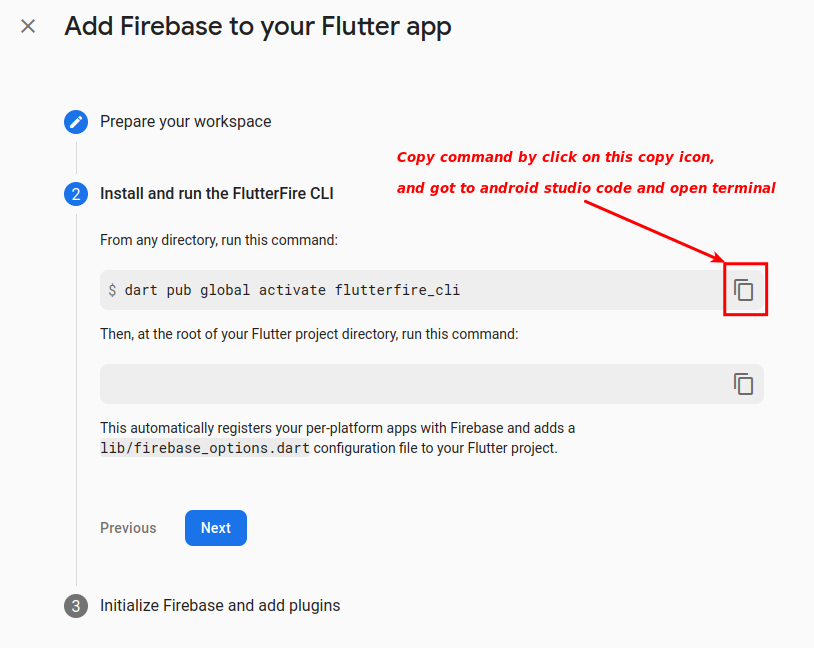
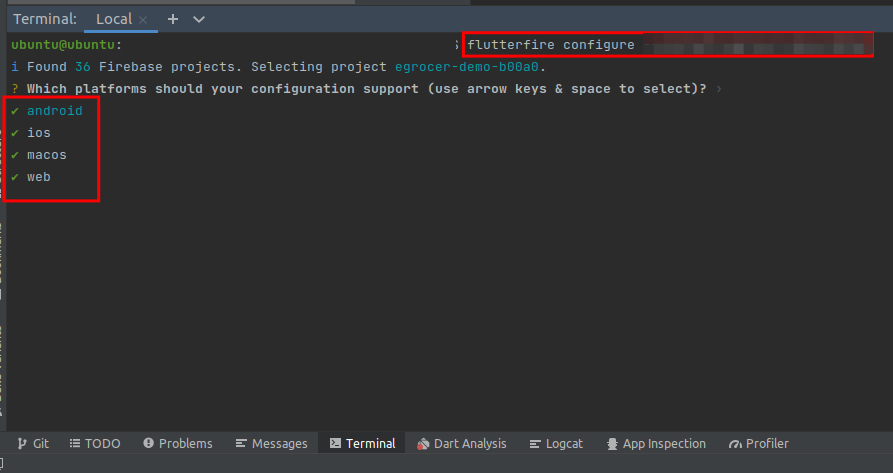
  • Now you need to run command accoring to below image in android studio terminal
  • eBroker

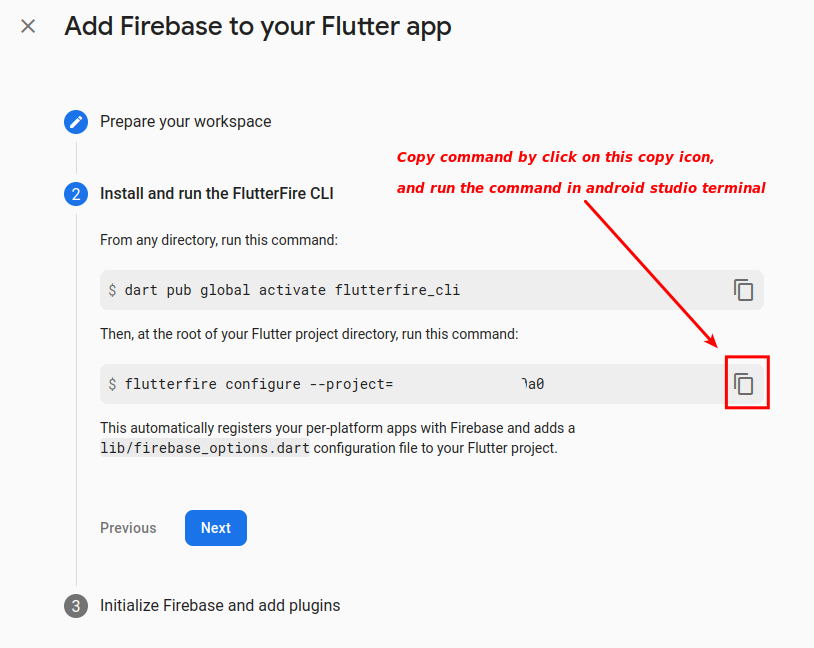
  • Now you need to run 2nd command accoring to below image in android studio terminal as well

  • eBroker

  • Once show this kind of output press "Enter" in terminal

  • eBroker

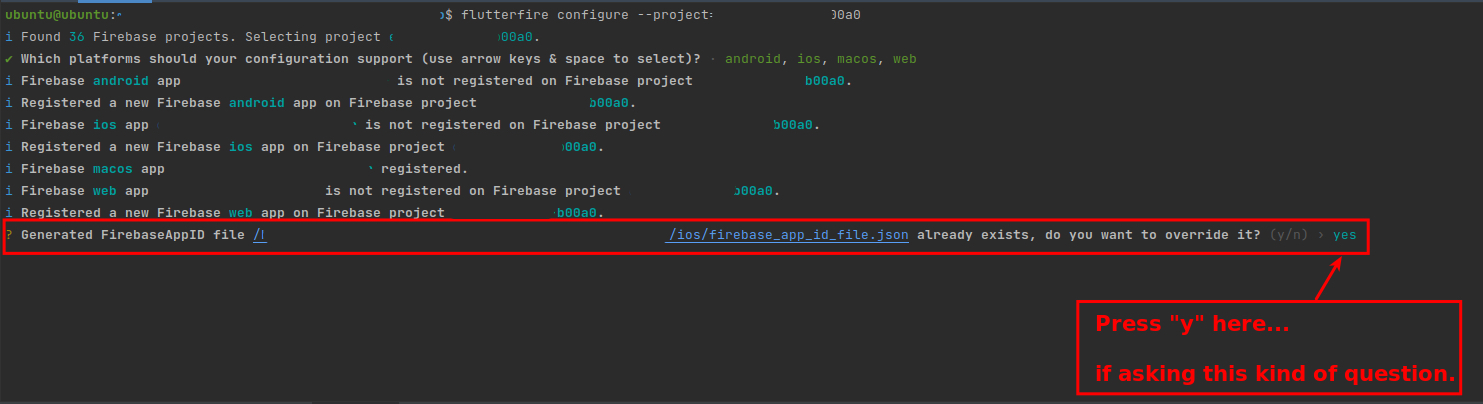
  • Once again show this kind of output press "y" in terminal

  • eBroker

  • Press continue

  • eBroker

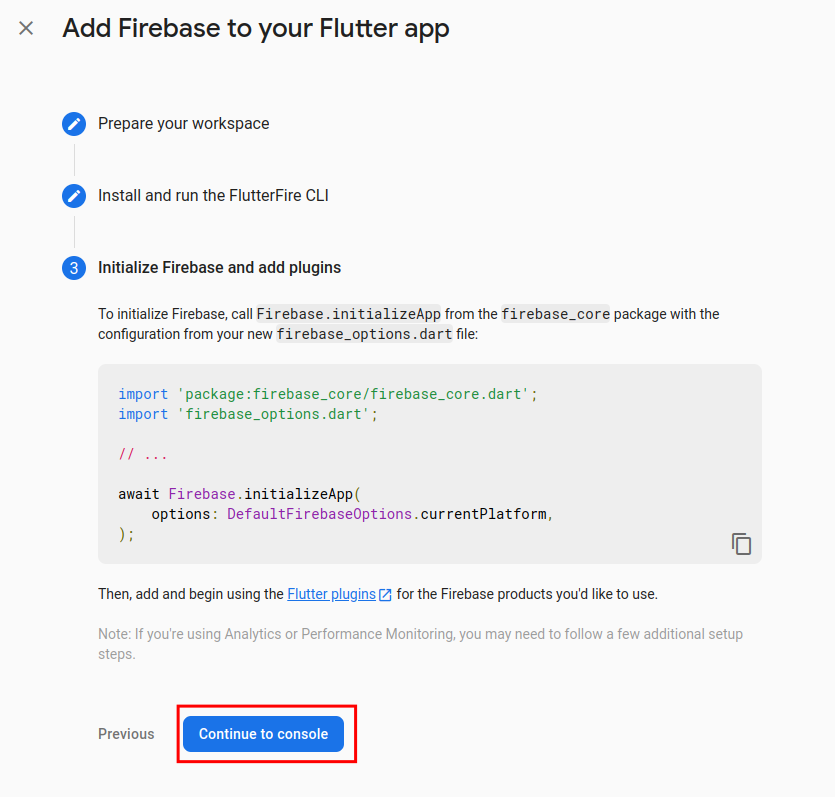
  • Press continue to console

  • eBroker

  • Your firebase setup is done.

  • How to enable Firebase Phone Authentication(OTP).

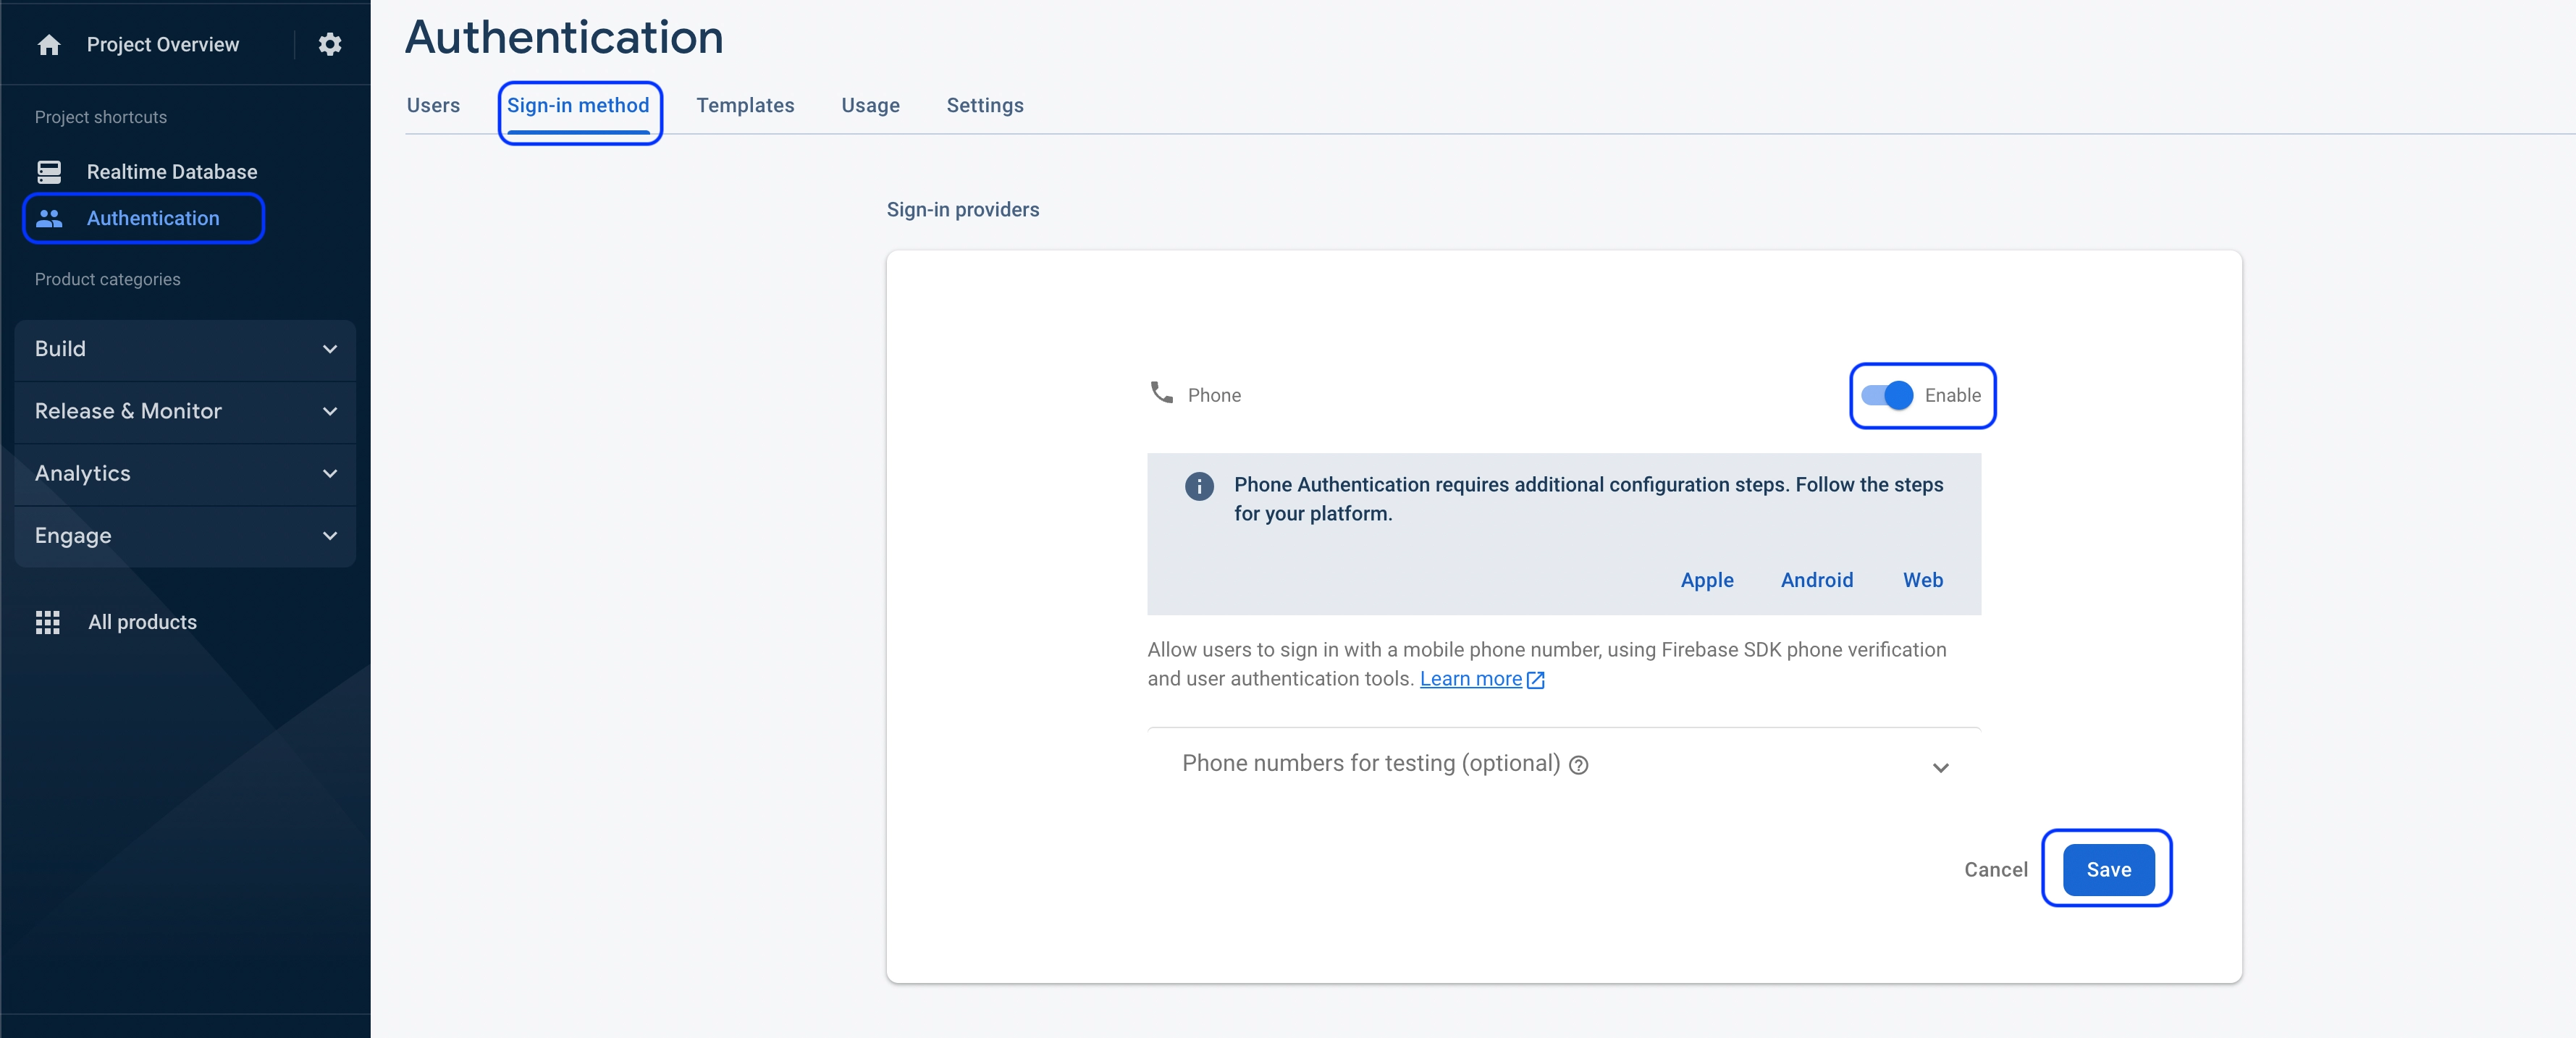
    1. Open your firebase console.
    2. Go to Authentication and open Sign-in method.
    3. Enable Phone Sign-in method and save.
    4. eBroker
    5. Now, we have to add sha1 and sha256 key in firebase, for that perform below given step
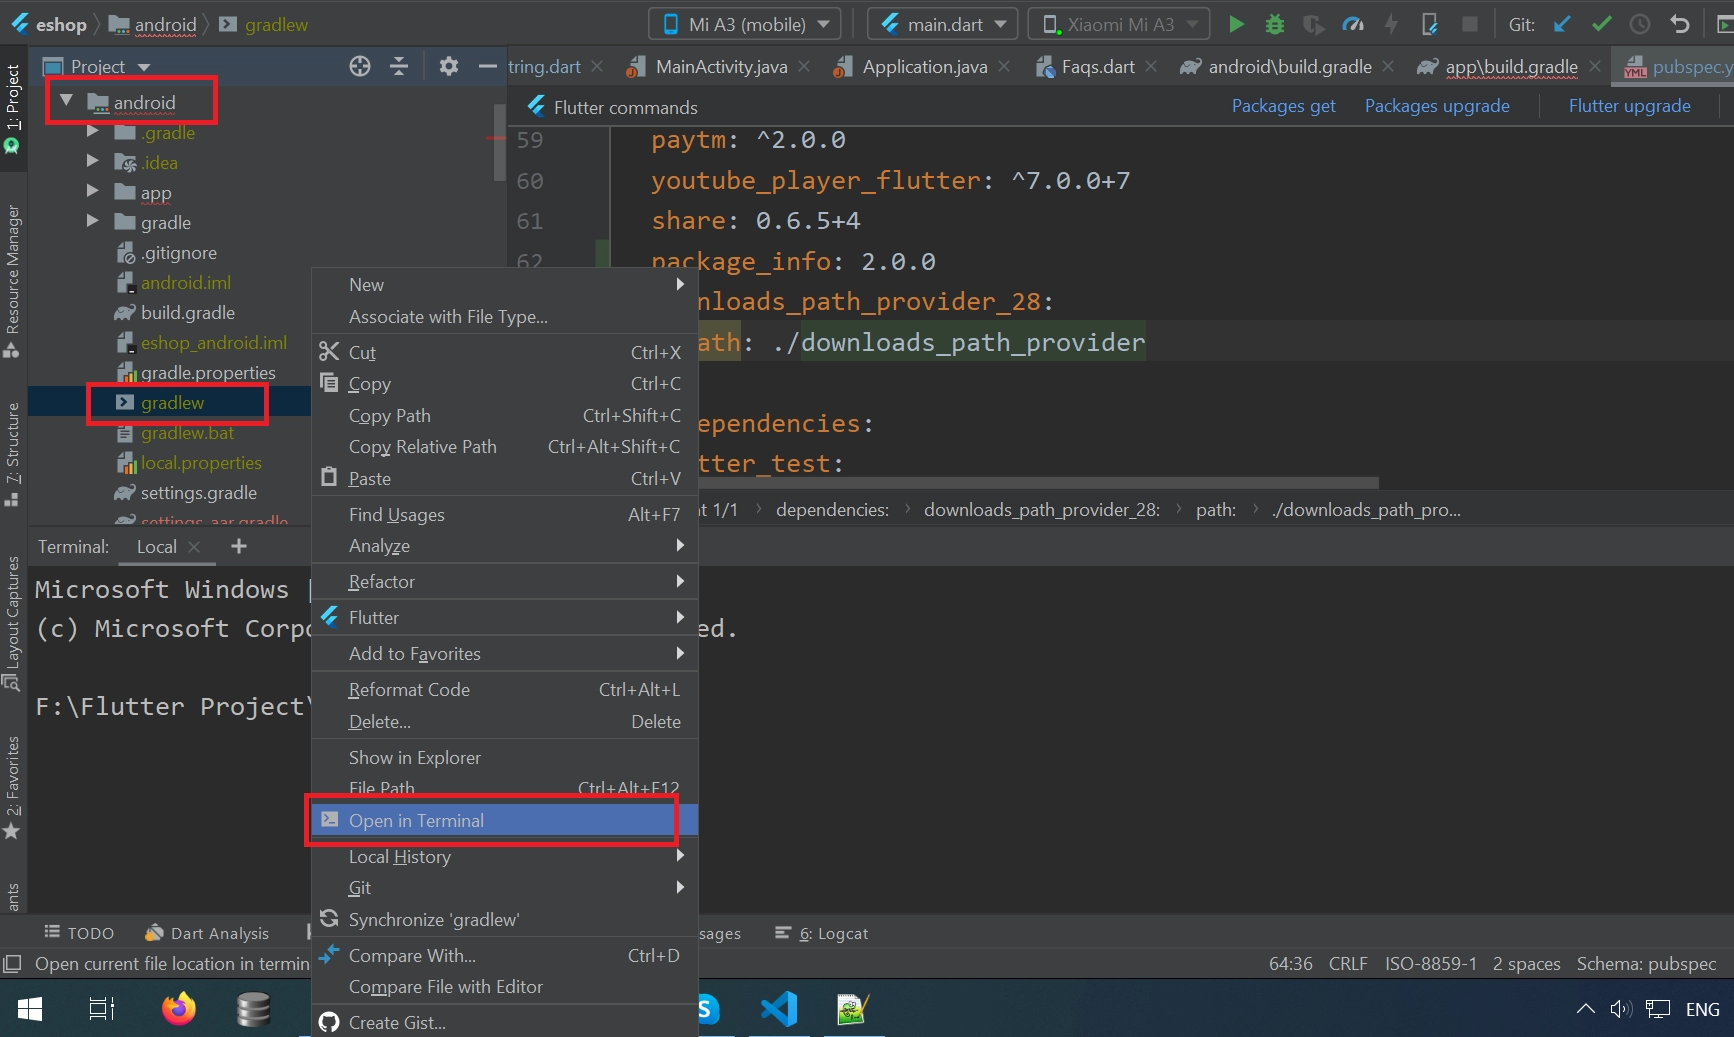
      • Go to the android folder. Right click gradlew file and select Open in Terminal as shown in below image.
      • eBroker
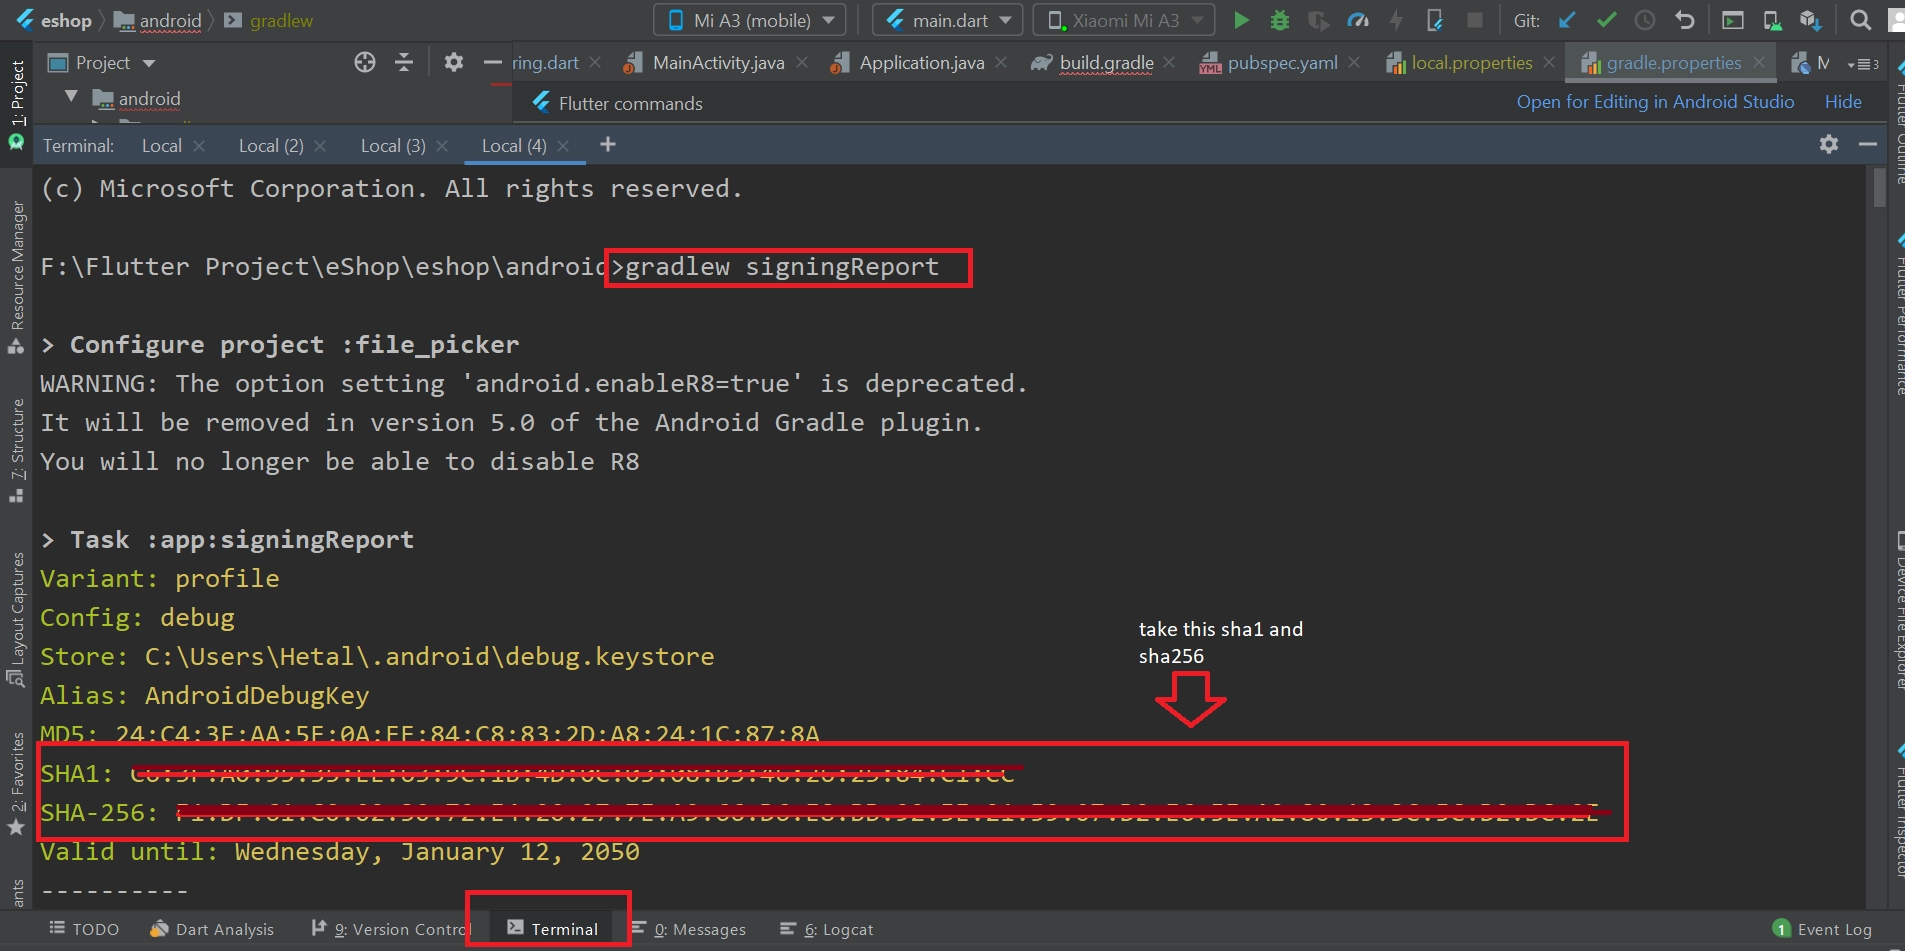
      • Go to the terminal view and paste- gradlew signingReport as shown in below
      • for mac it should be ./gradlew signingReport
      • eBroker

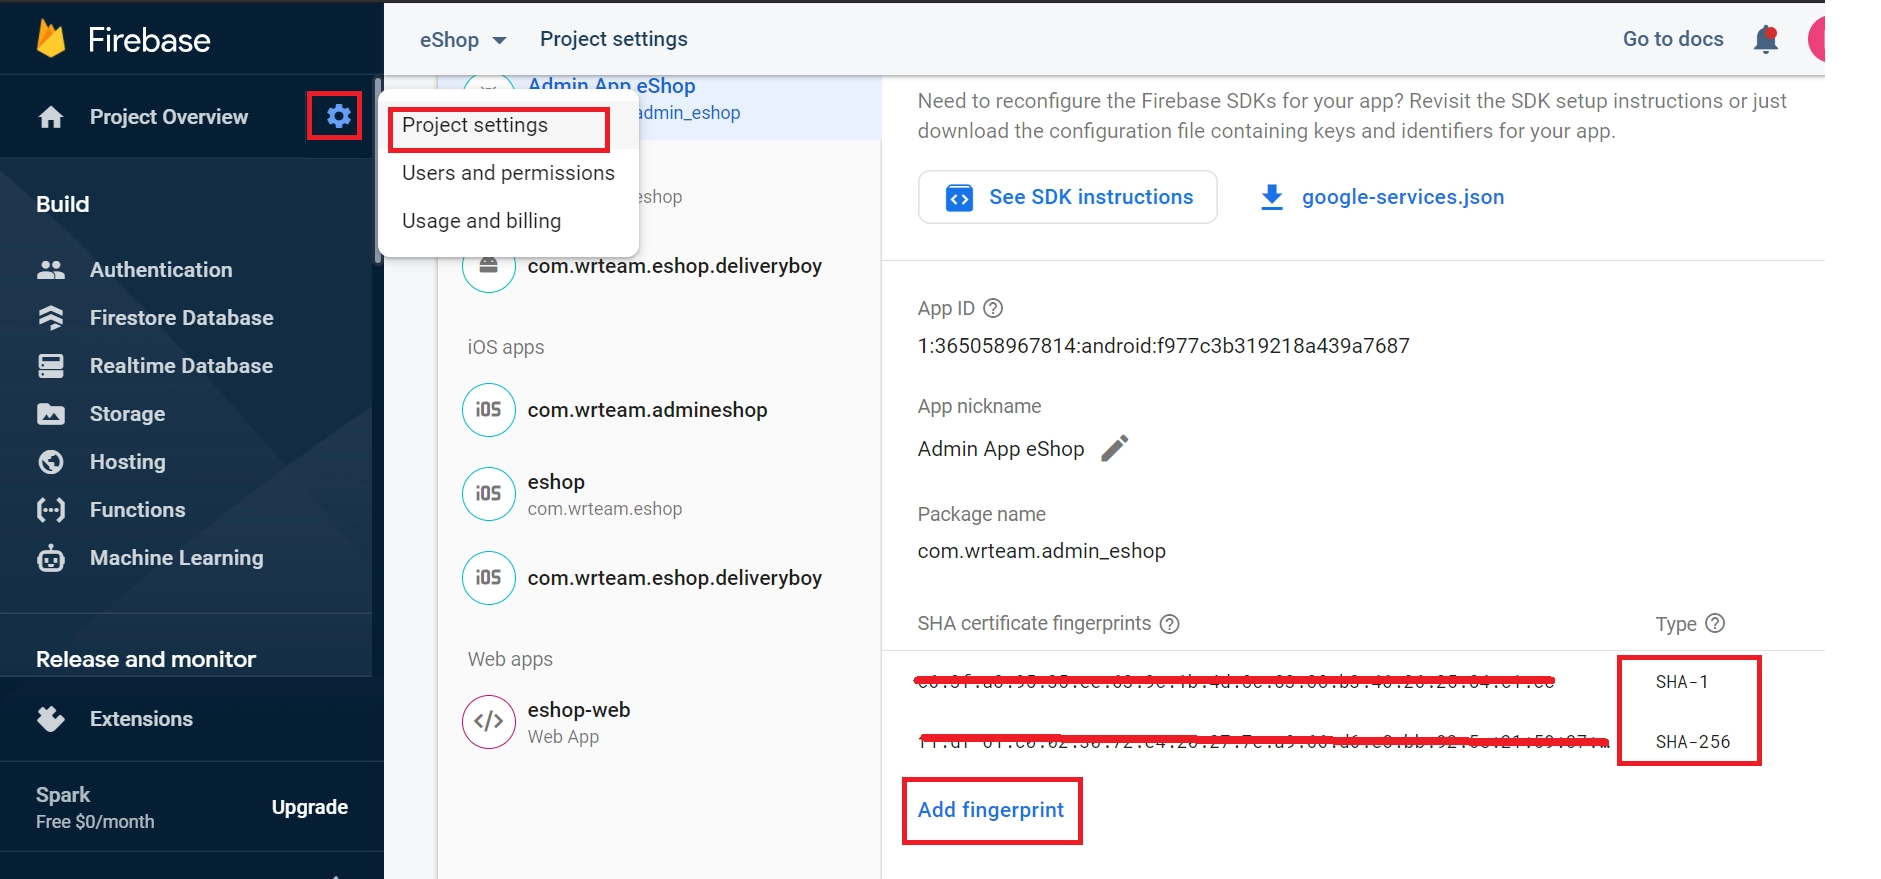
    6. now take debug sha and sha256 will print copy that and add it in firebase console.and also add sha-256 to firebase console.

    7. eBroker

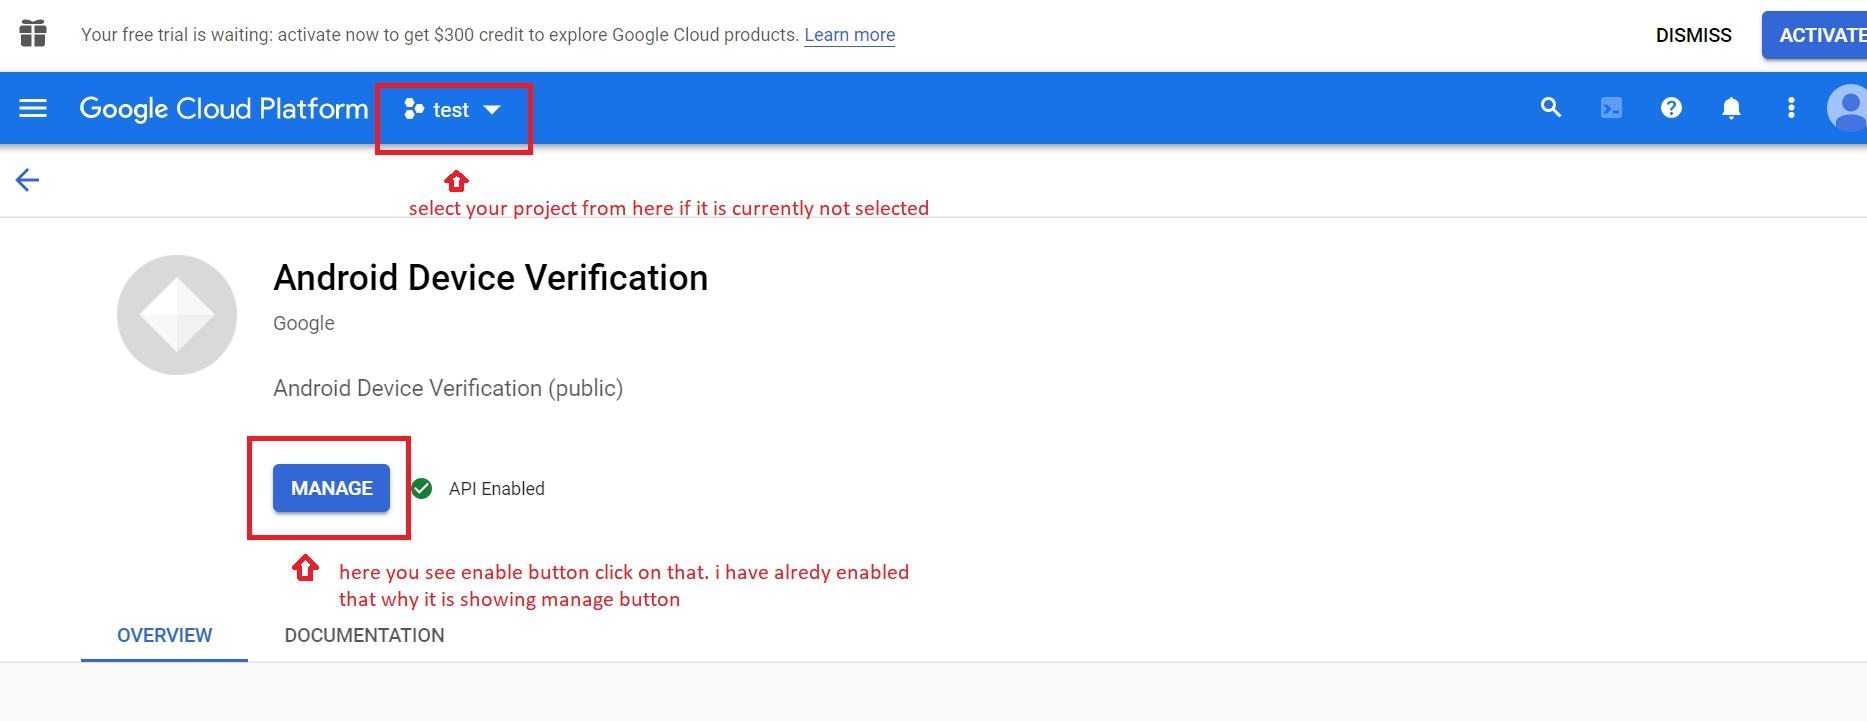
    8. now enable SafetyNet for use with Firebase Authentication.In the Google Cloud Console, enable the Android DeviceCheck API for your project.first make sure your correct project is selected then press enable button.

    9. eBroker

    Remember:

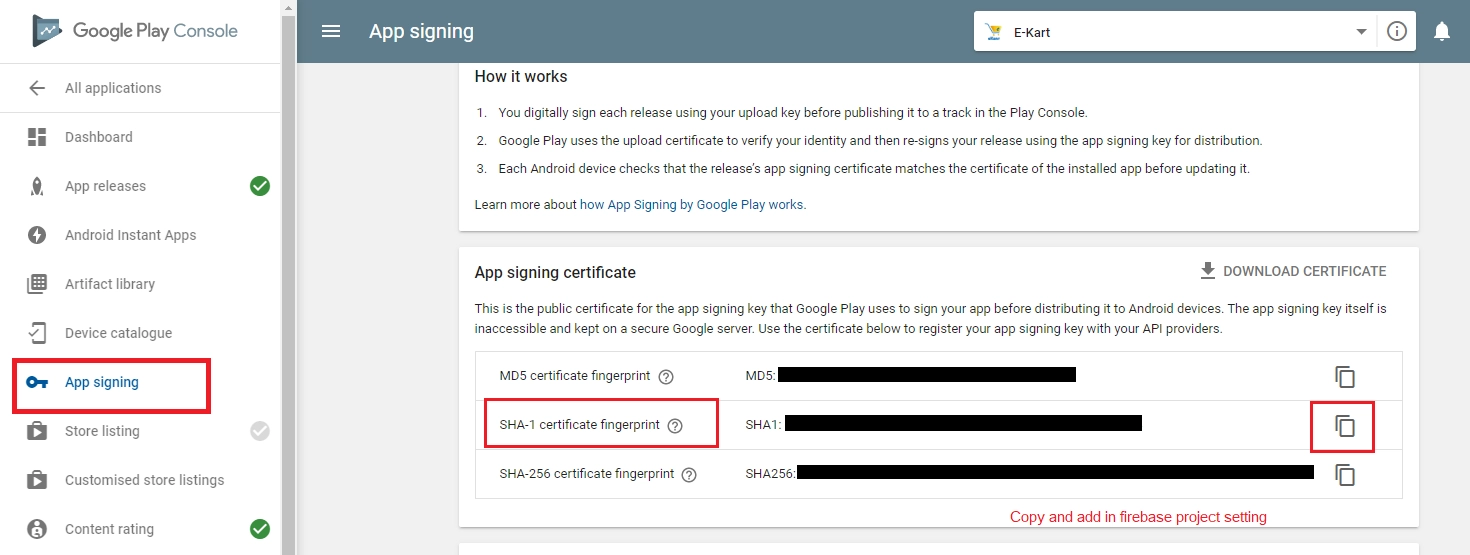
    1. When we are releasing apk then we need to add release sha in firebase panel otherwise otp will not work.
    2. after release you can get sha from play console here
    3. eBroker
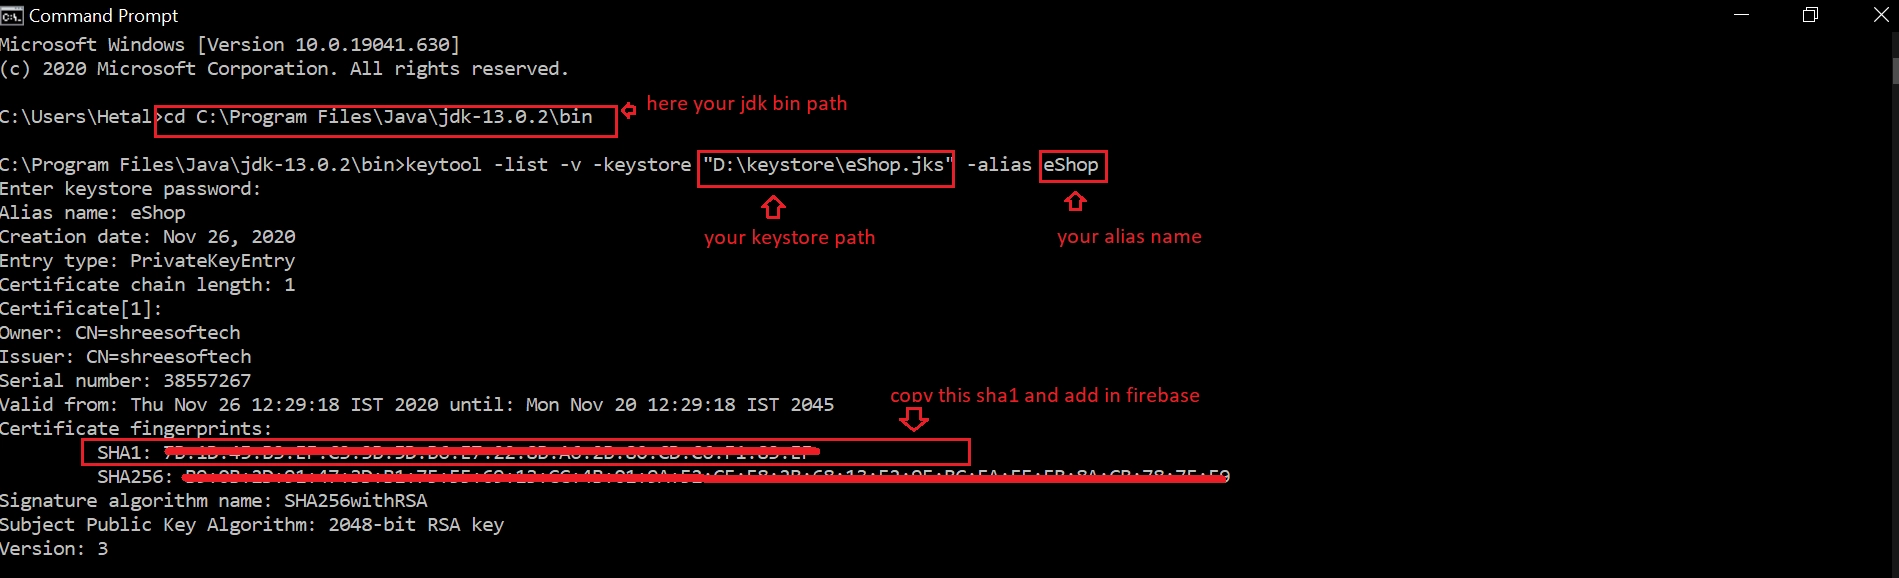
    4. or another way you can also get release sha from below given command in cmd
    5. go to run and type cmd
    6. here first go to java jdk bin path
    7. then here edit this command and replace your keystore path and alias in this command keytool -list -v -keystore "D:\keystore\eBroker.jks" -alias eBroker
    8. then it will ask for password.enter and then it will show your release SHA
    9. eBroker
    10. for ios you need to set following.
    11. Add custom URL schemes to your Xcode project:

      • Open your project configuration: double-click the project name in the left tree view. Select your app from the TARGETS section, then select the Info tab, and expand the URL Types section.
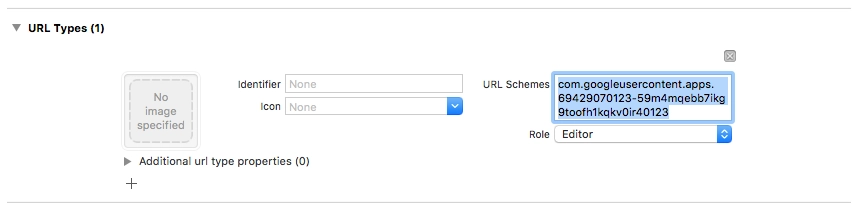
      • Click the + button, and add a URL scheme for your reversed client ID. To find this value, open the GoogleService-Info.plist configuration file, and look for the REVERSED_CLIENT_ID key. Copy the value of that key, and paste it into the URL Schemes box on the configuration page. Leave the other fields blank.
      • When completed, your config should look something similar to the following (but with your application-specific values):
      • eBroker

    How to enable Firebase Notifications

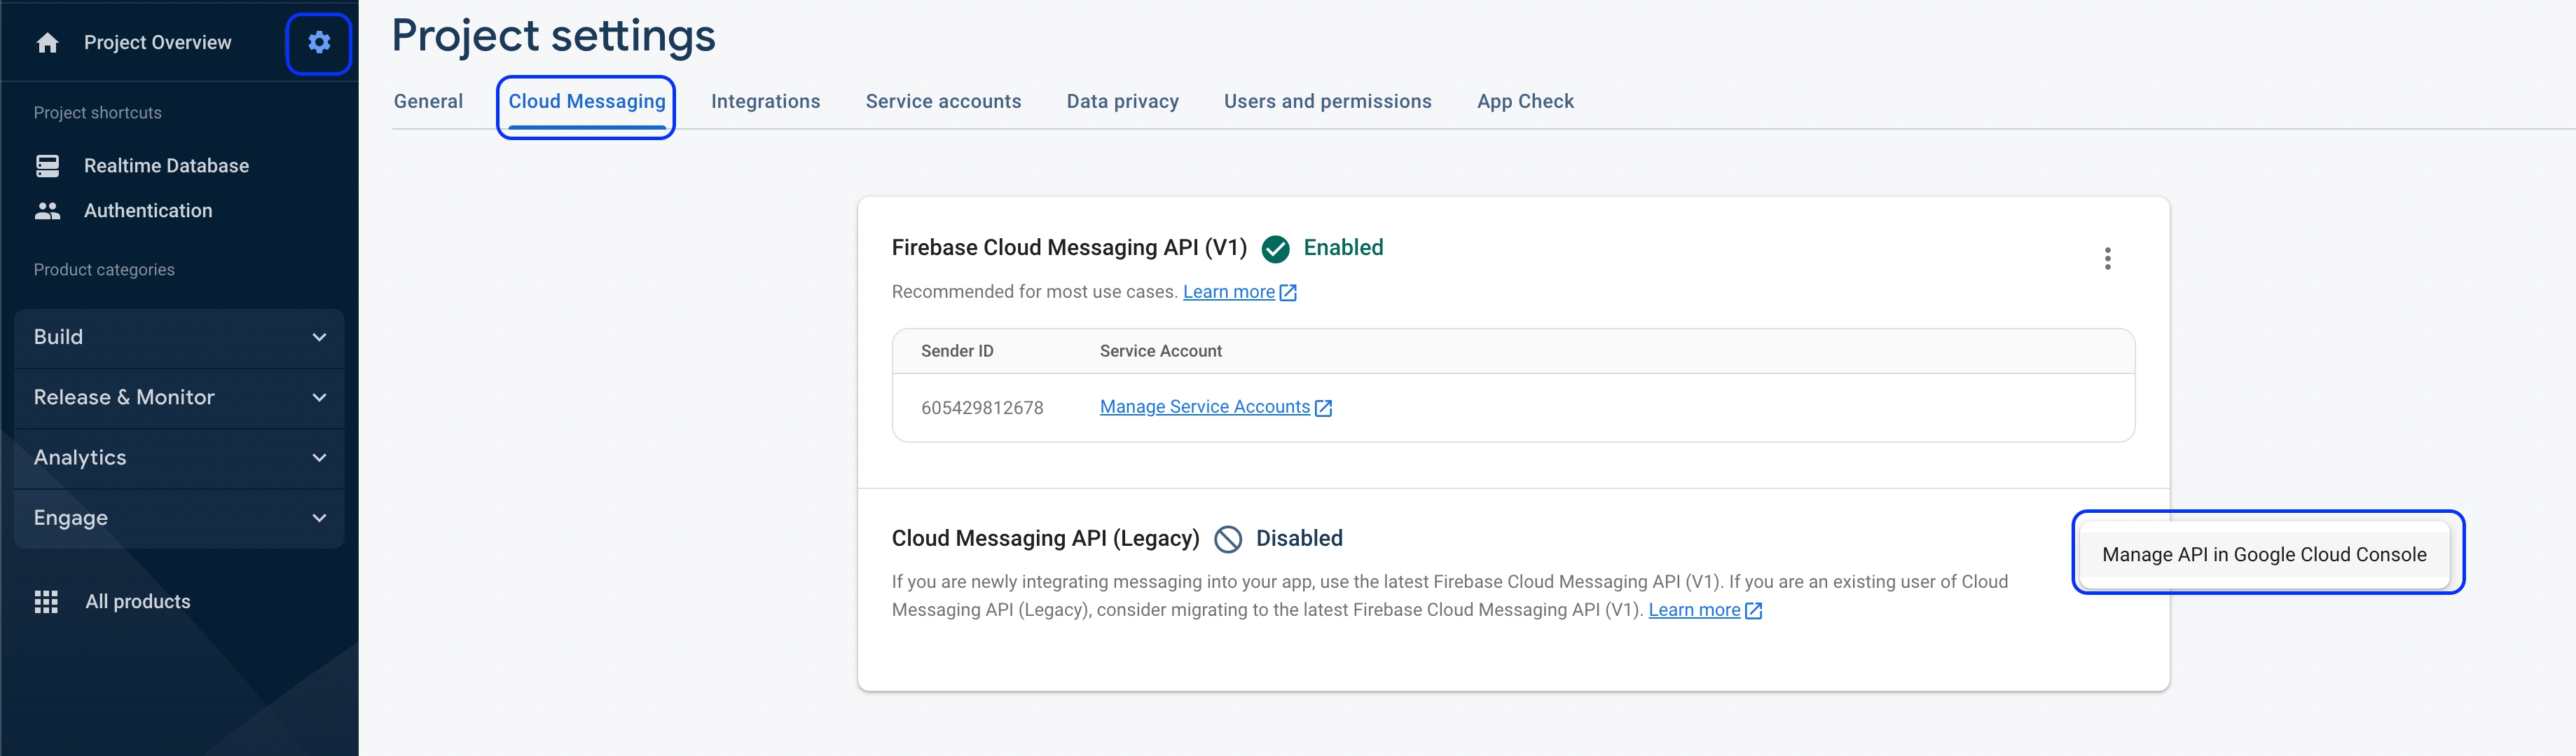
    1. Get server key from your firebase project and set in panel.

    2. Go to Project Settings -> Cloud Messaging -> Manage API on Google cloud Console

    3. eBroker

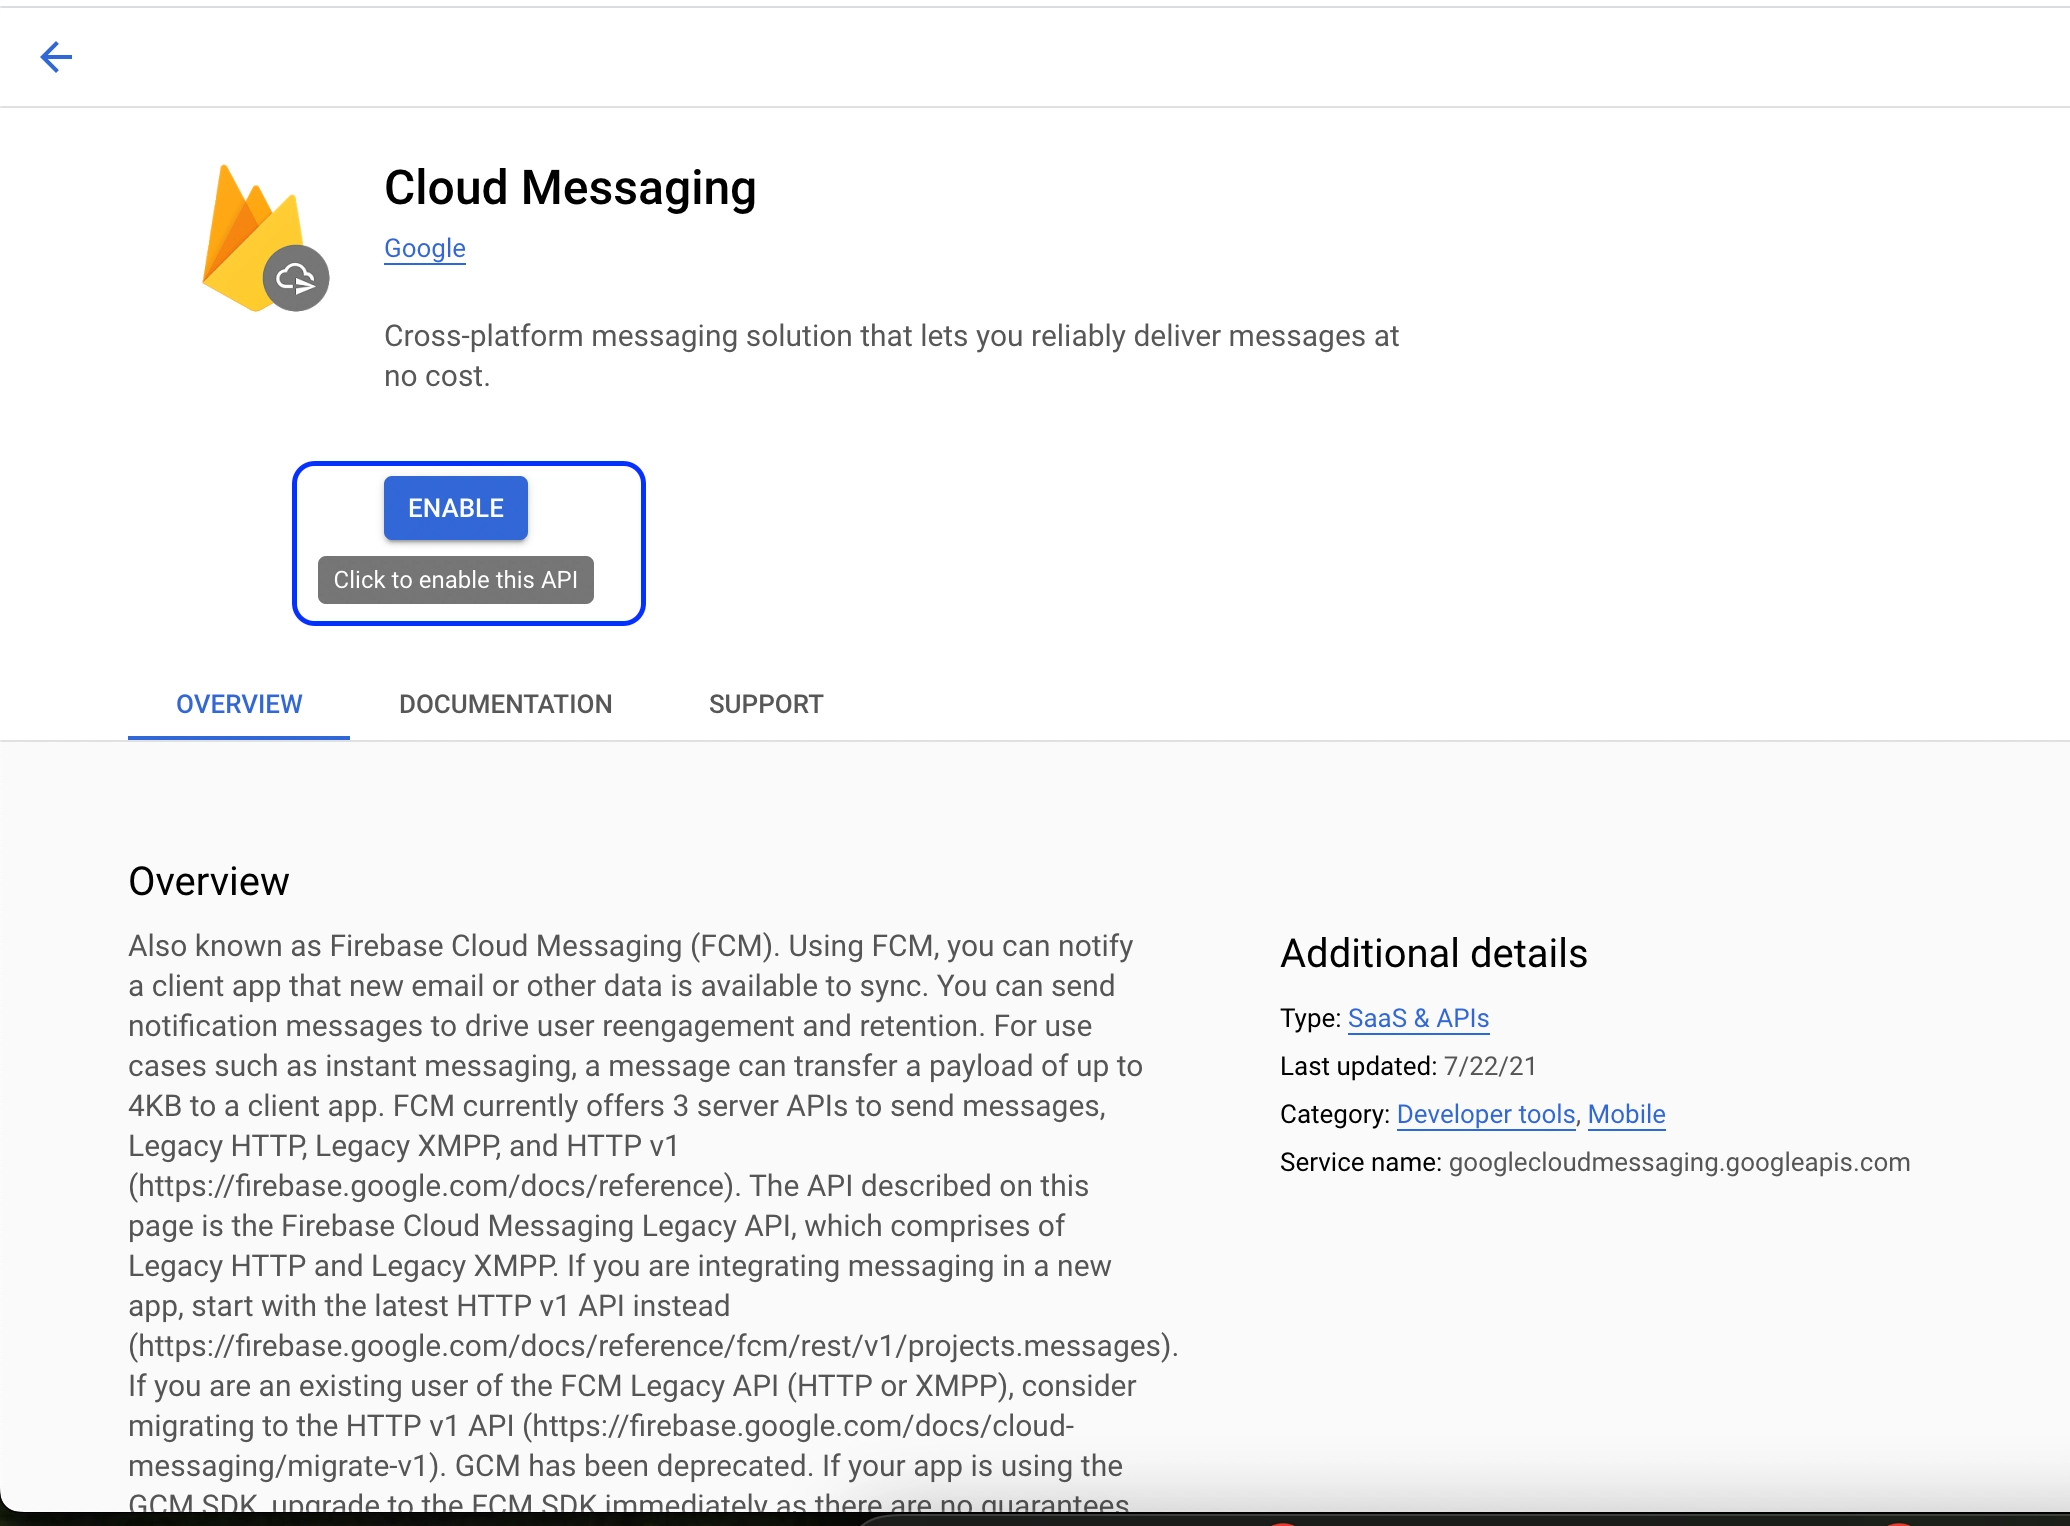
    4. Now enable the API

    5. eBroker

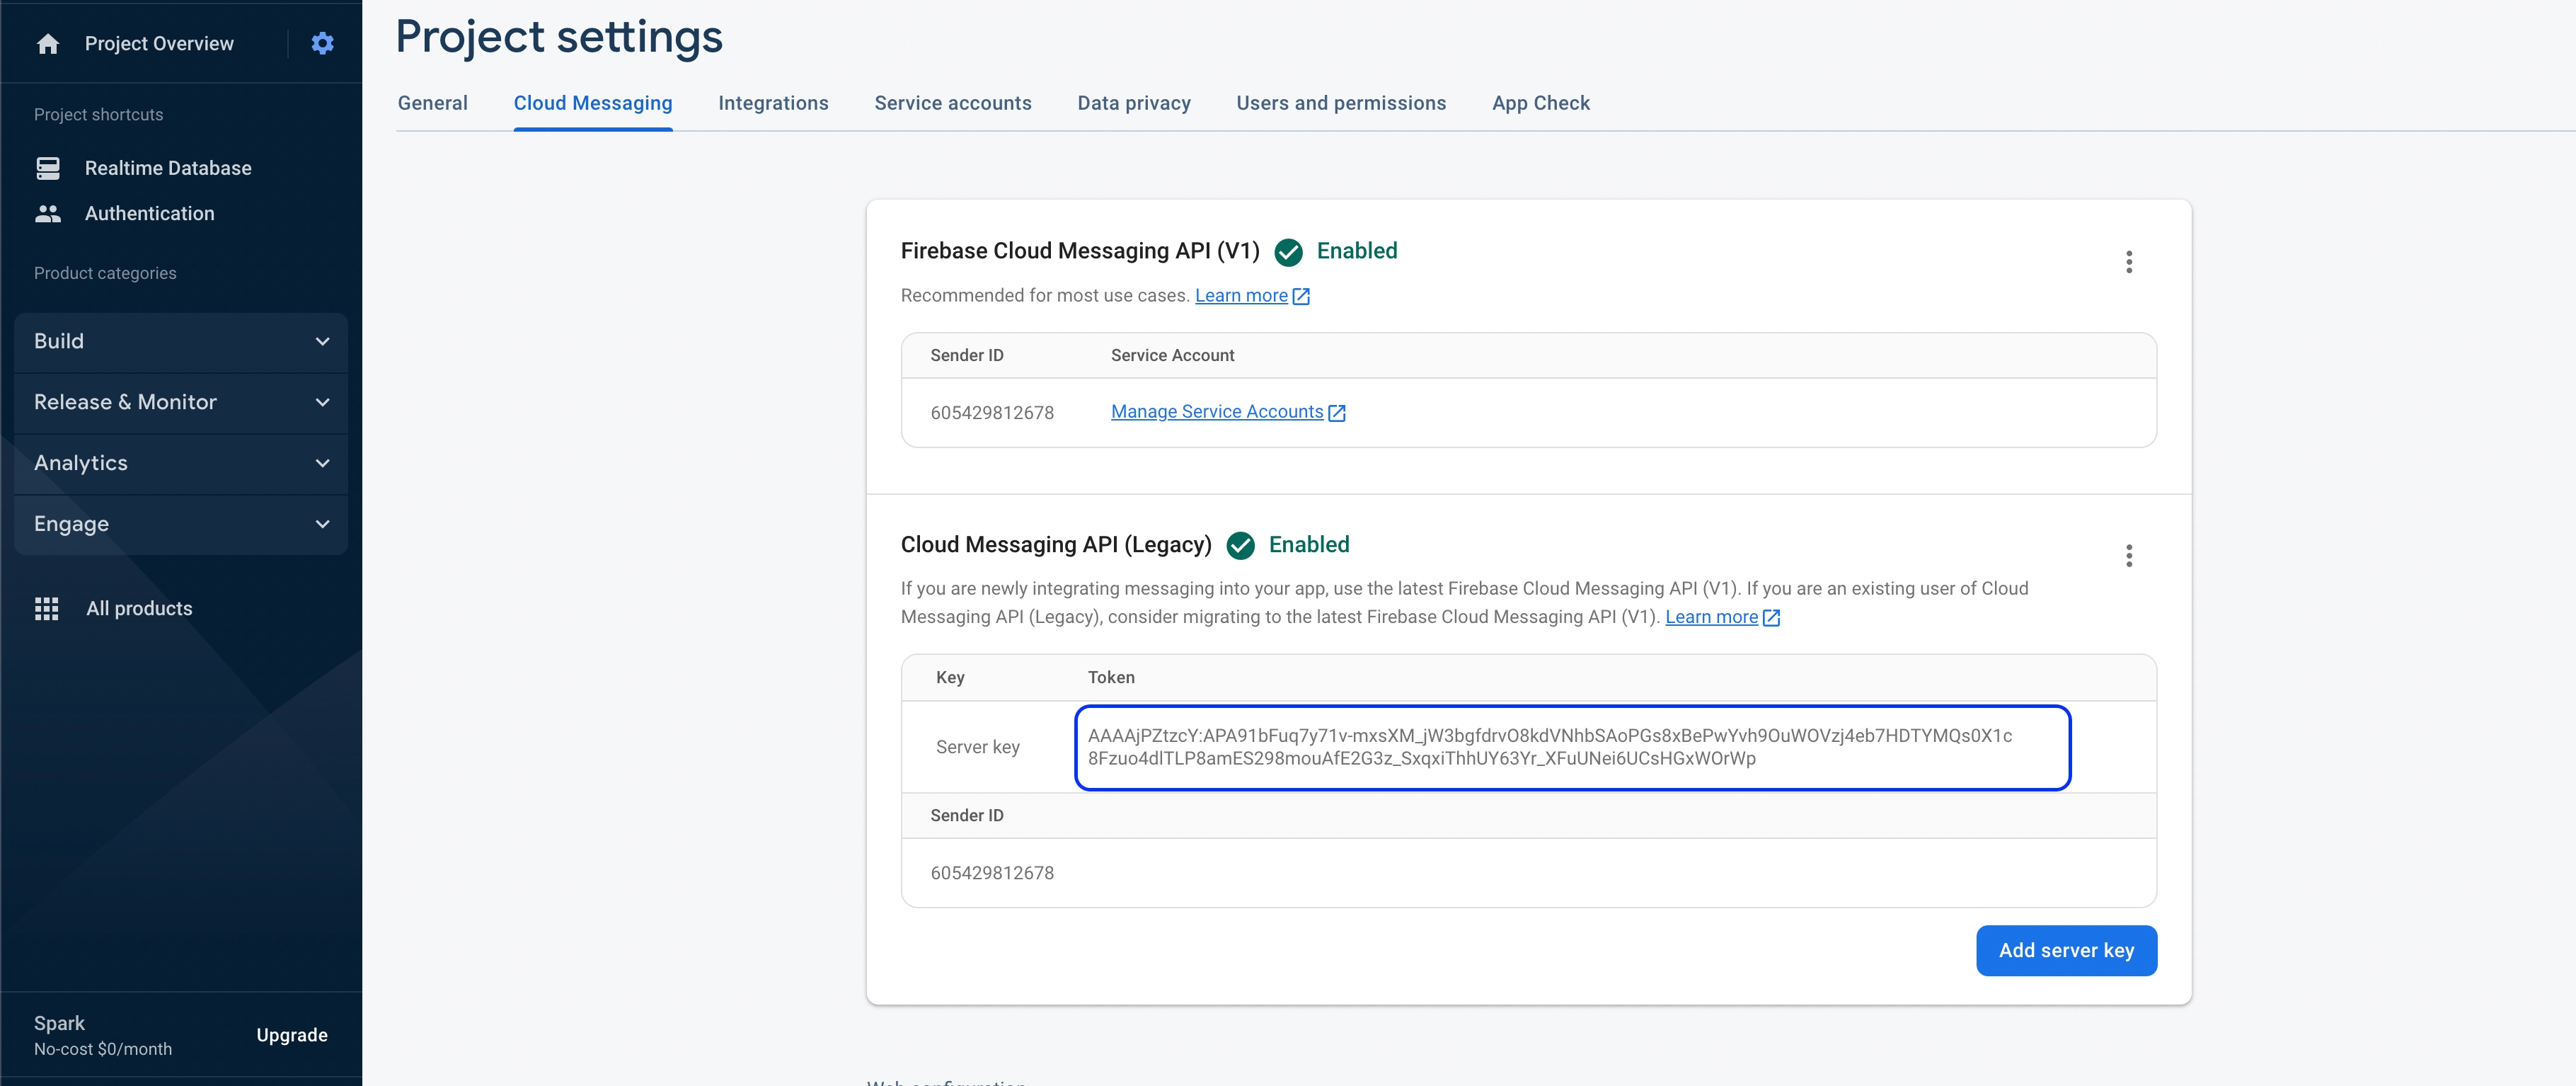
    6. Copy Server Key

    7. eBroker
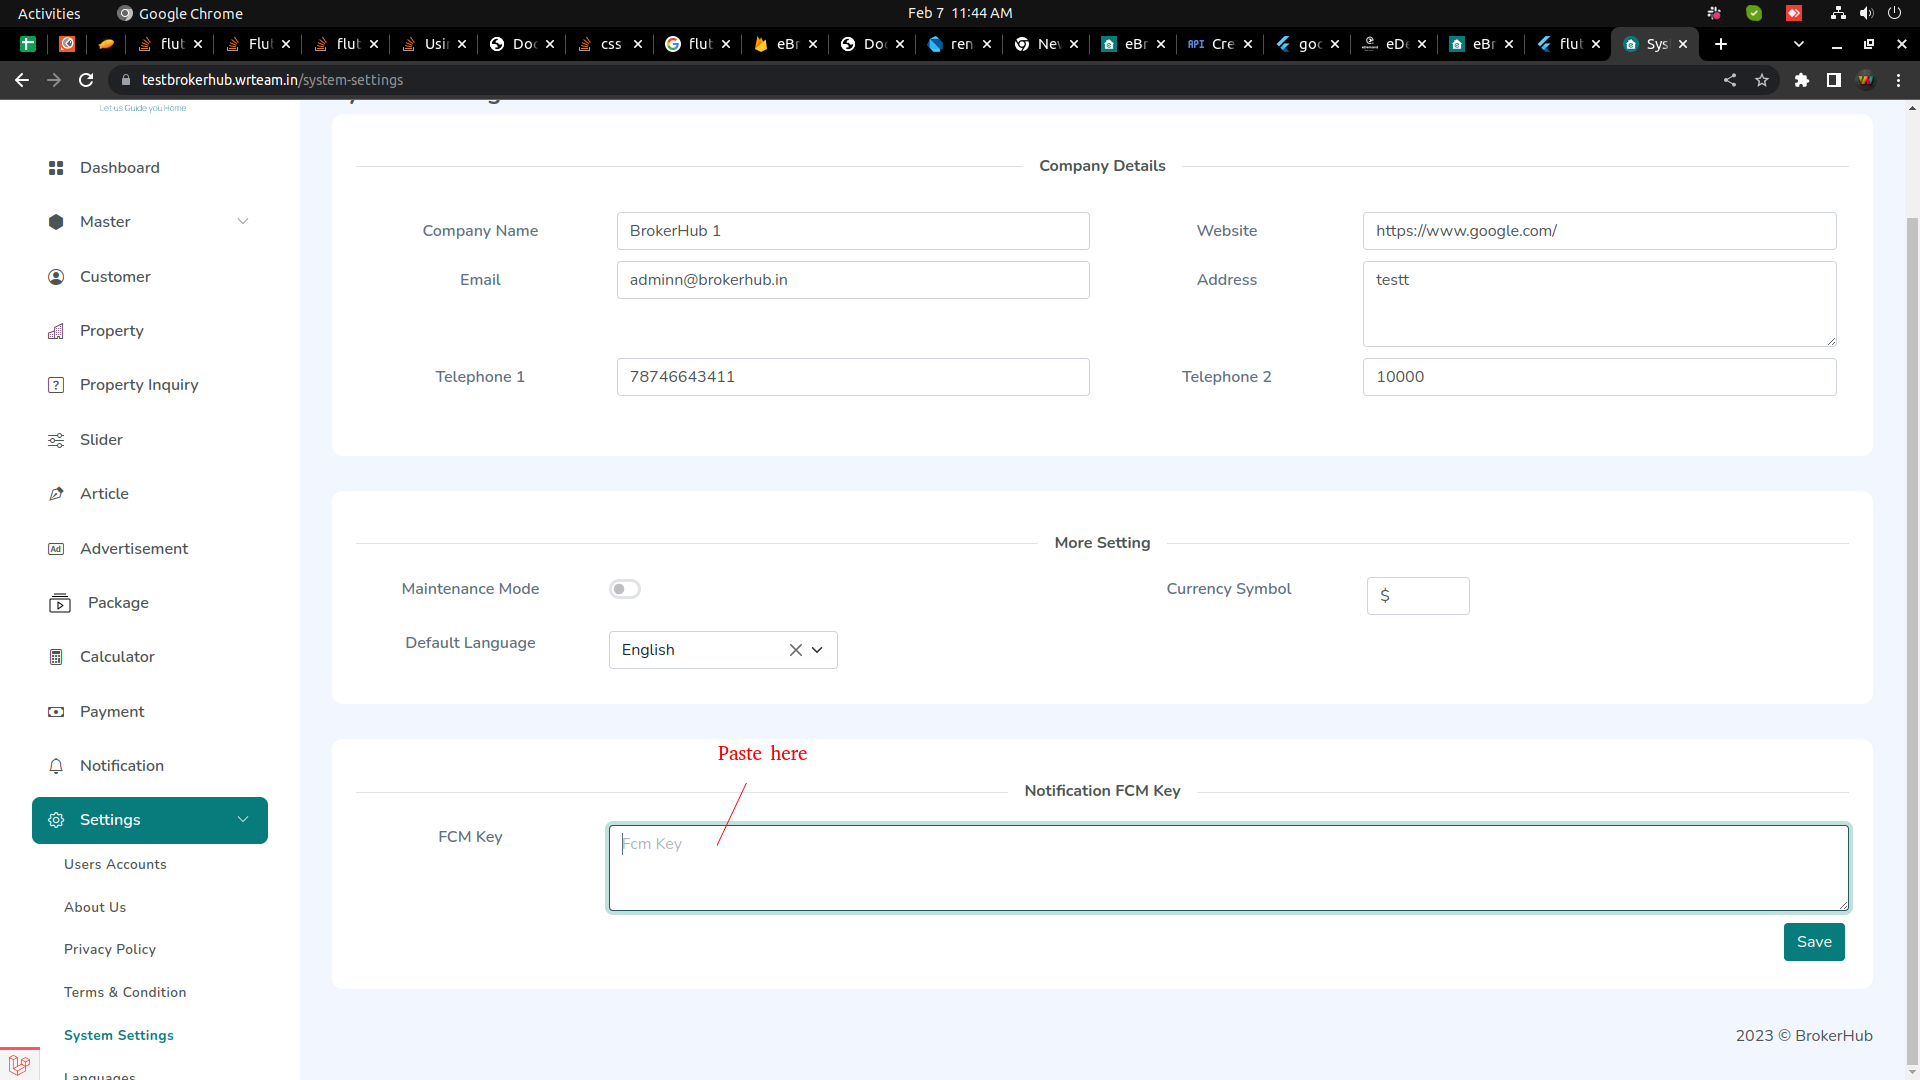
    8. now add in admin panel

    9. eBroker


    1. for ios your need to perform below given step
    2. In Xcode, open the project.
    3. In the Project Navigator (the left-hand menu), select the project icon that represents your app.
    4. In the top-left corner of the right-hand pane in Xcode, select your app's target.
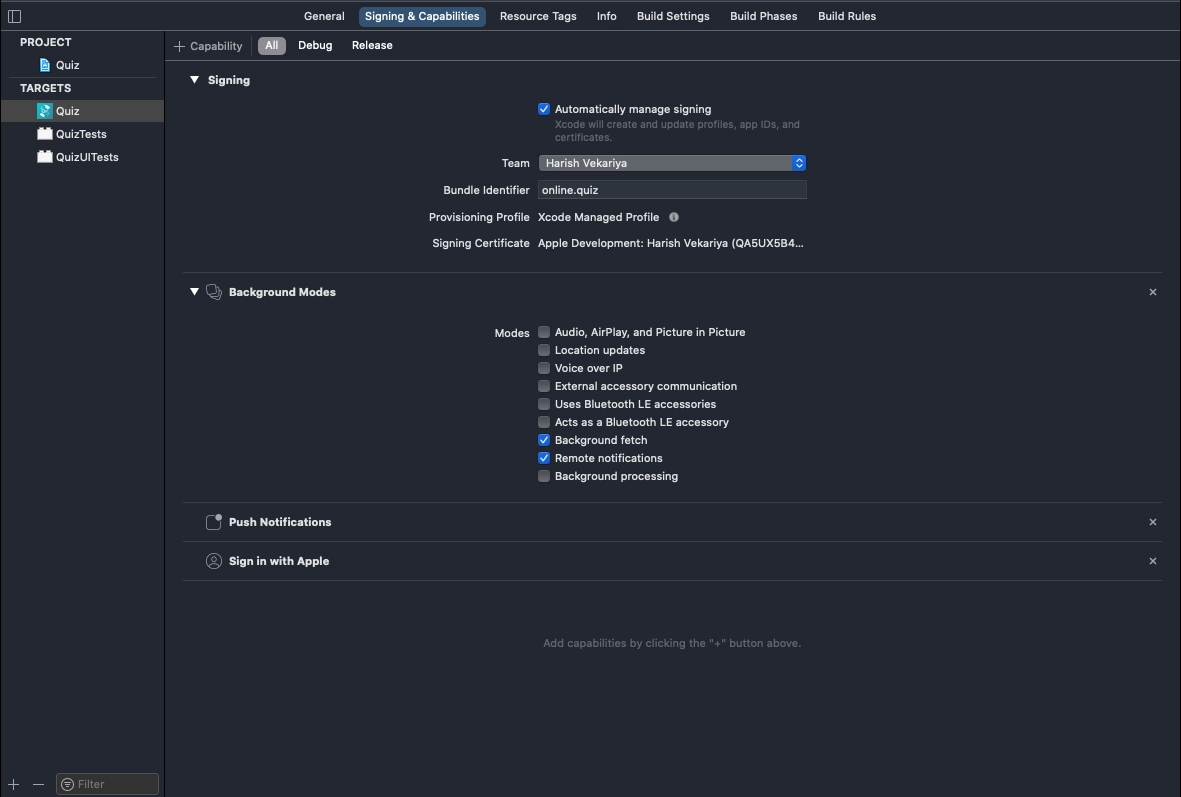
    5. Navigate to the Capabilities tab.
    6. Enable Push Notifications.
    7. Check Remote Notifications and Background Fetch from Enabling Background Modes.

    8. eBroker

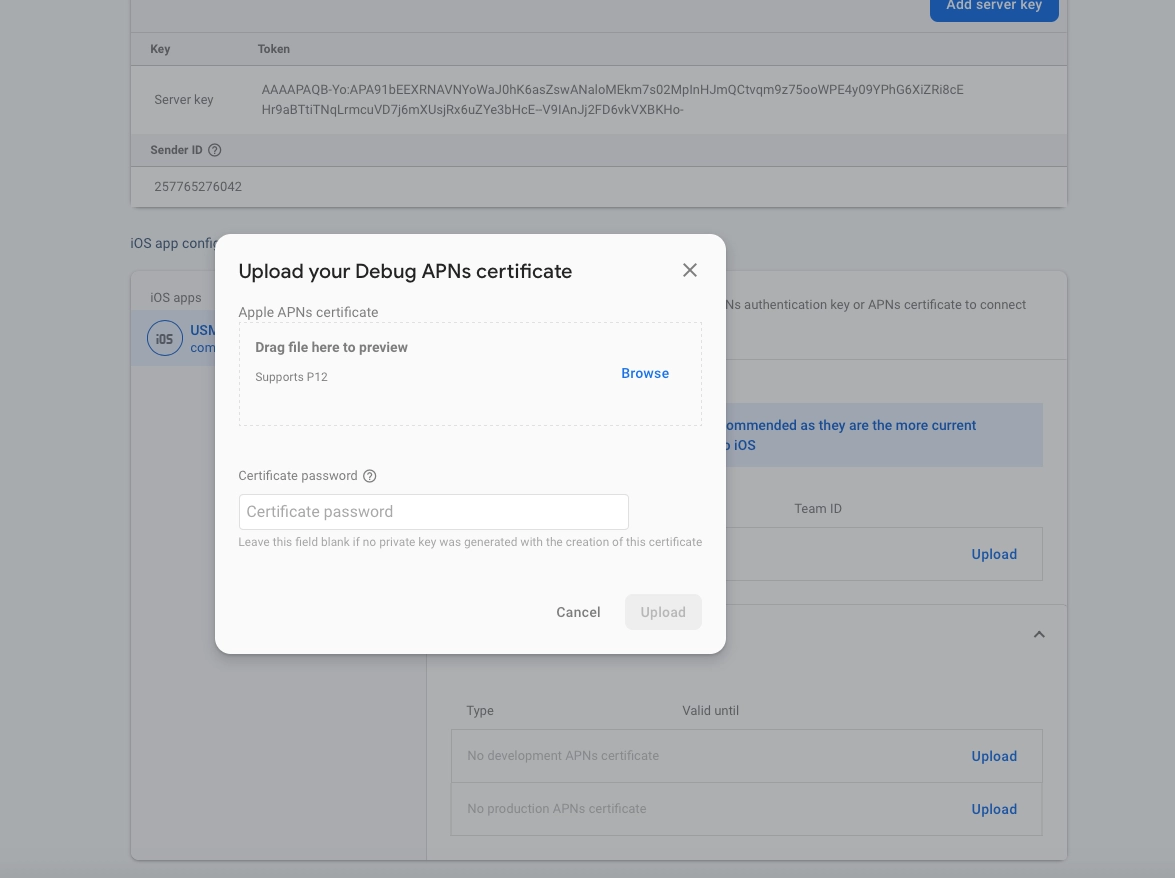
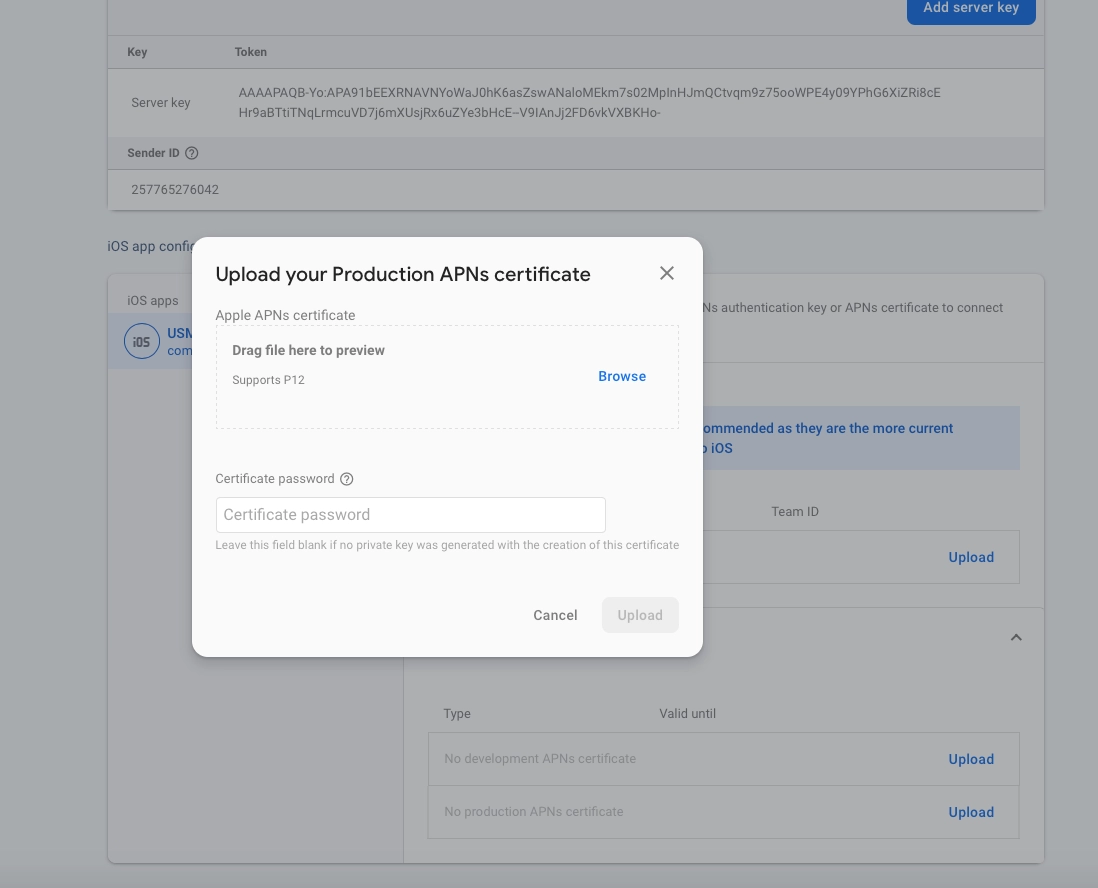
    9. APNs (Apple's Push Notification service) currently supports two types of connections: token-based (.p8) and certificate-based (.p12).you can follow either one of them

    10. For Token-based (.p8).

    11. Log in to the Apple Developer Portal.
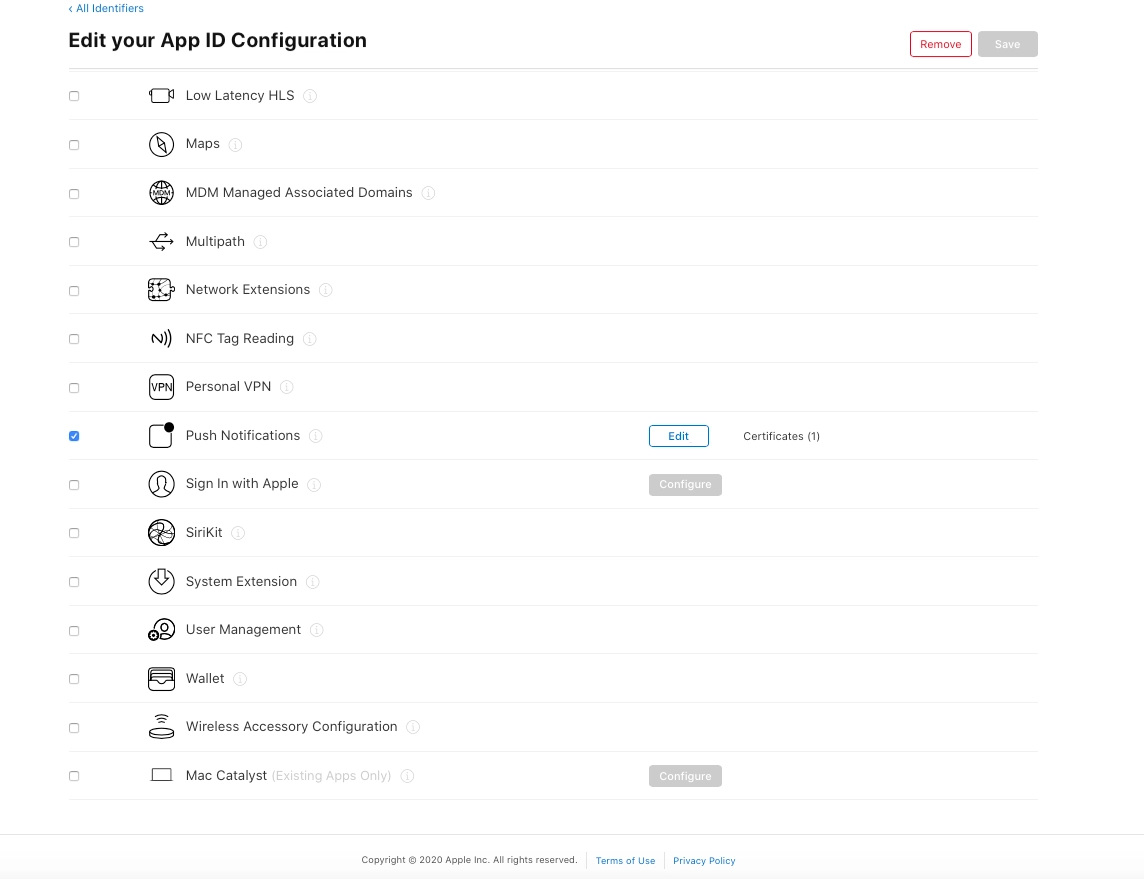
    12. Navigate to Certificates, IDs & Profiles > Identifiers > App IDs and click the App ID associated with your app.
    13. On the screen for your App ID, check Capabilities > Push Notifications.

    14. eBroker

      eBroker

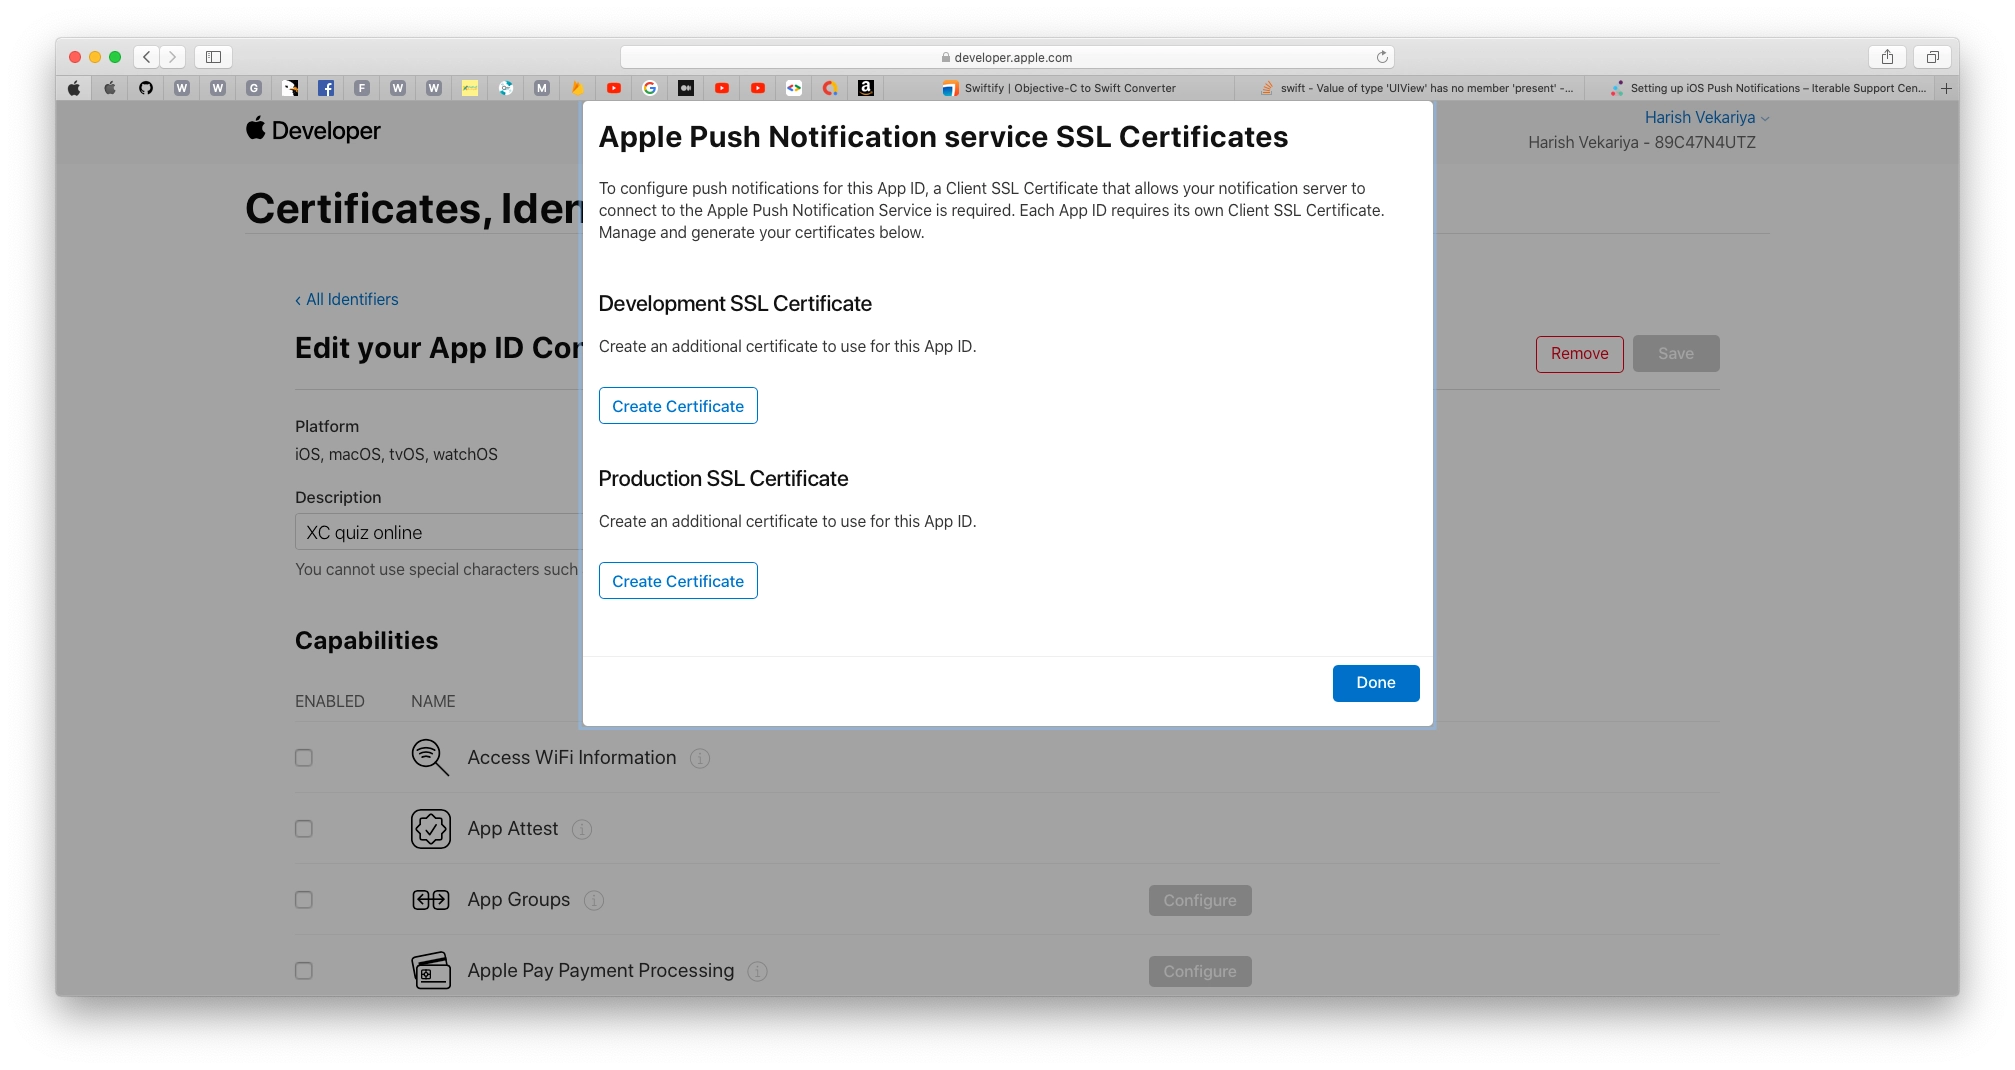
    15. Select App ID in next page & click continue.
    16. And then create Development SSL Certificate & Production SSL Certificate by adding CSR certificate. follow Apple's Create a certificate signing request instructions.
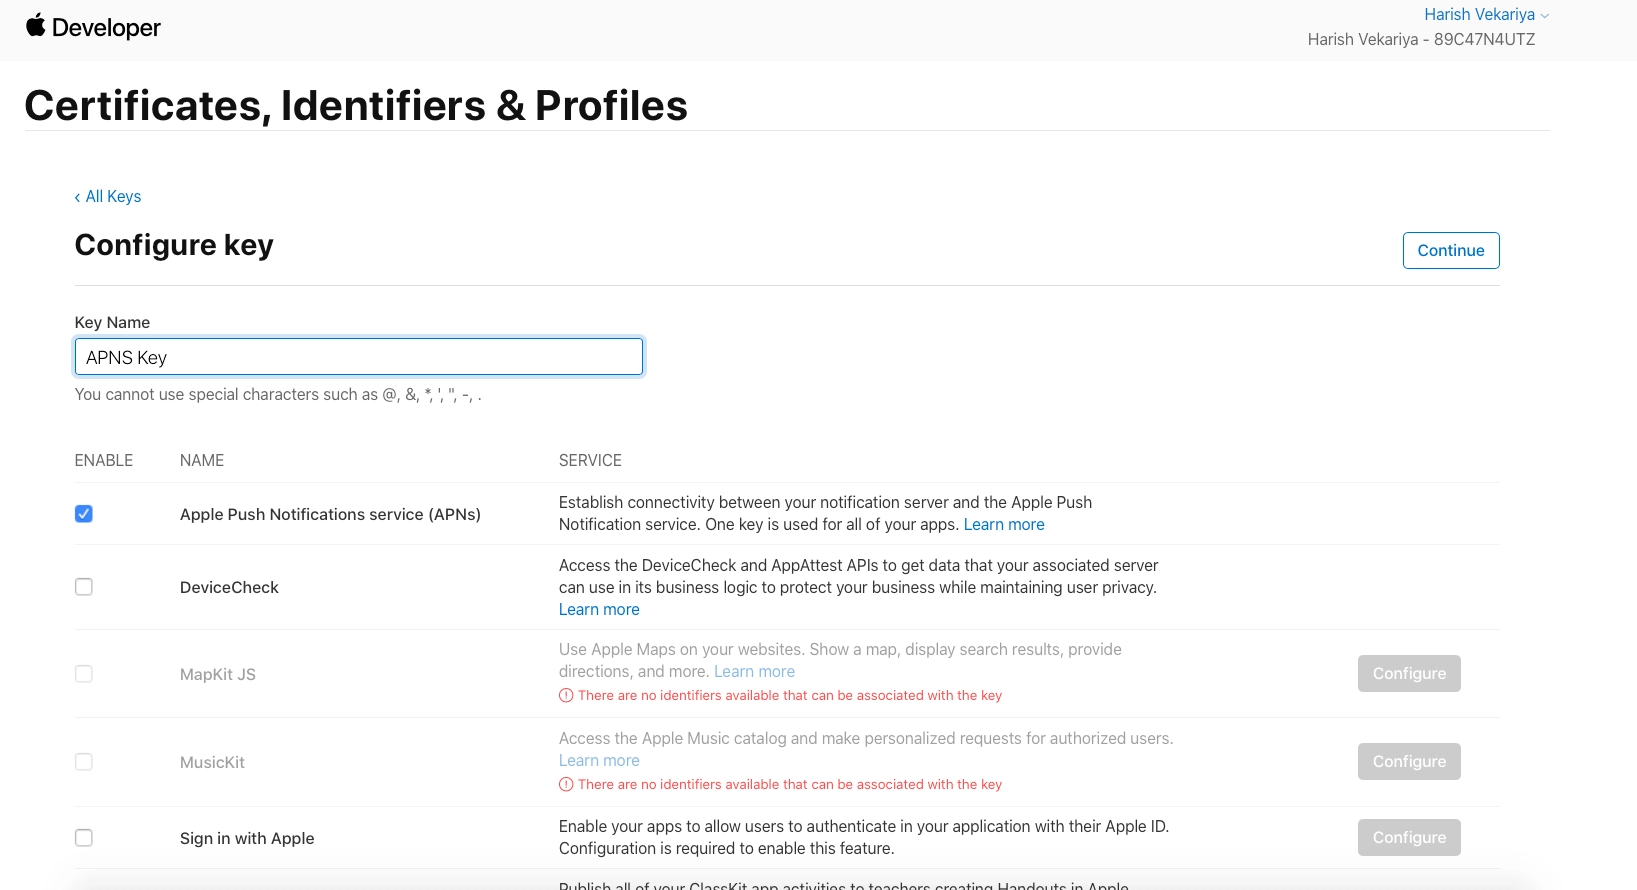
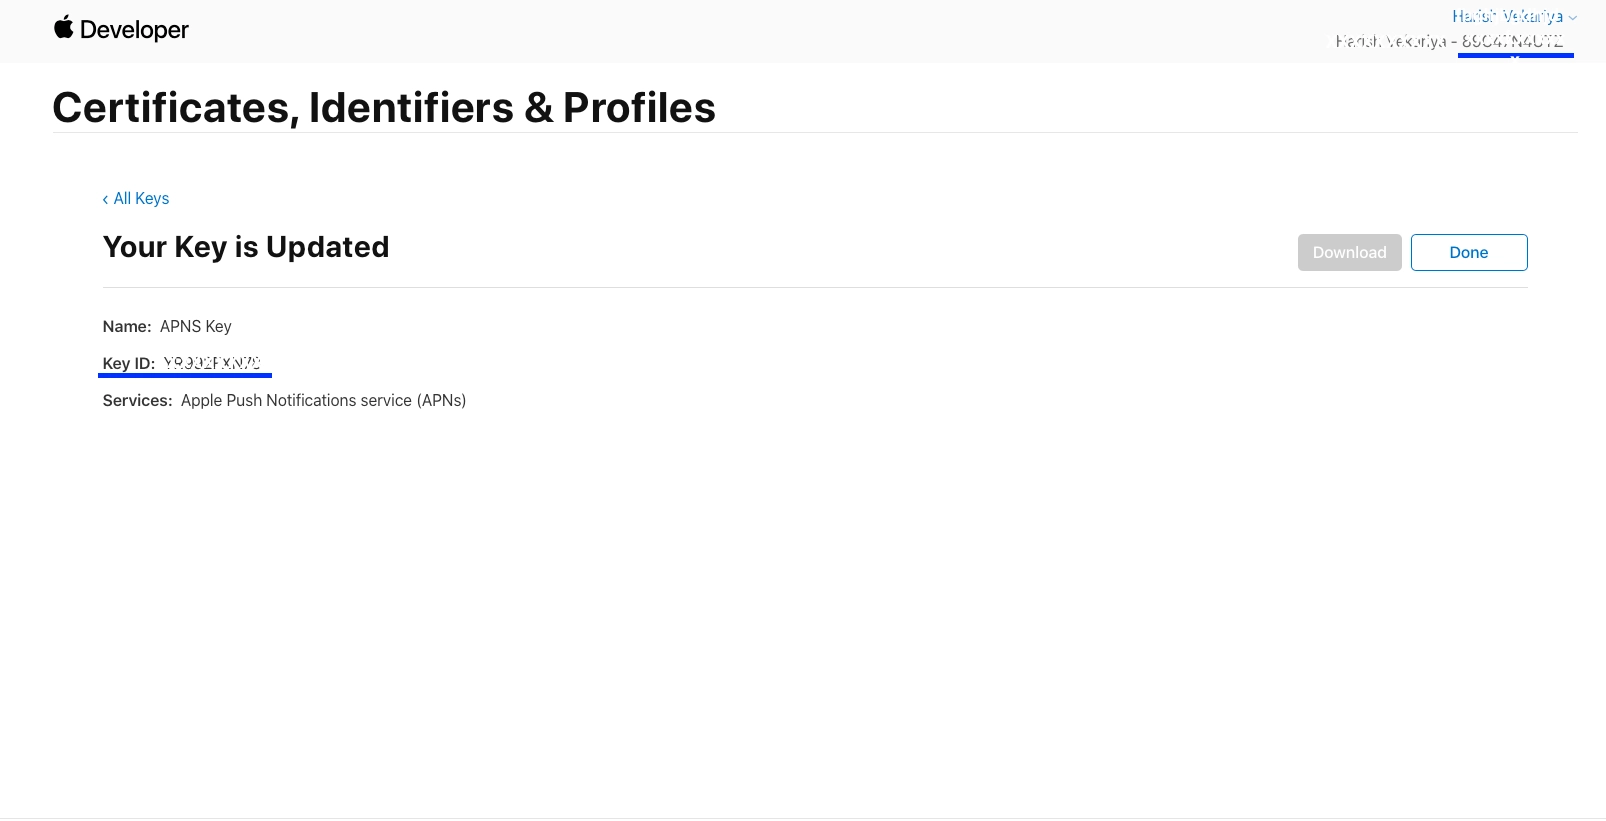
    17. Navigate to Certificates, IDs & Profiles > Keys Section and add a Universal key for Notifications,which you can use for more than one apps as well.
    18. >
      eBroker

    19. Just save and Download & keep it safe, as it will be downloaded only once.

    20. eBroker

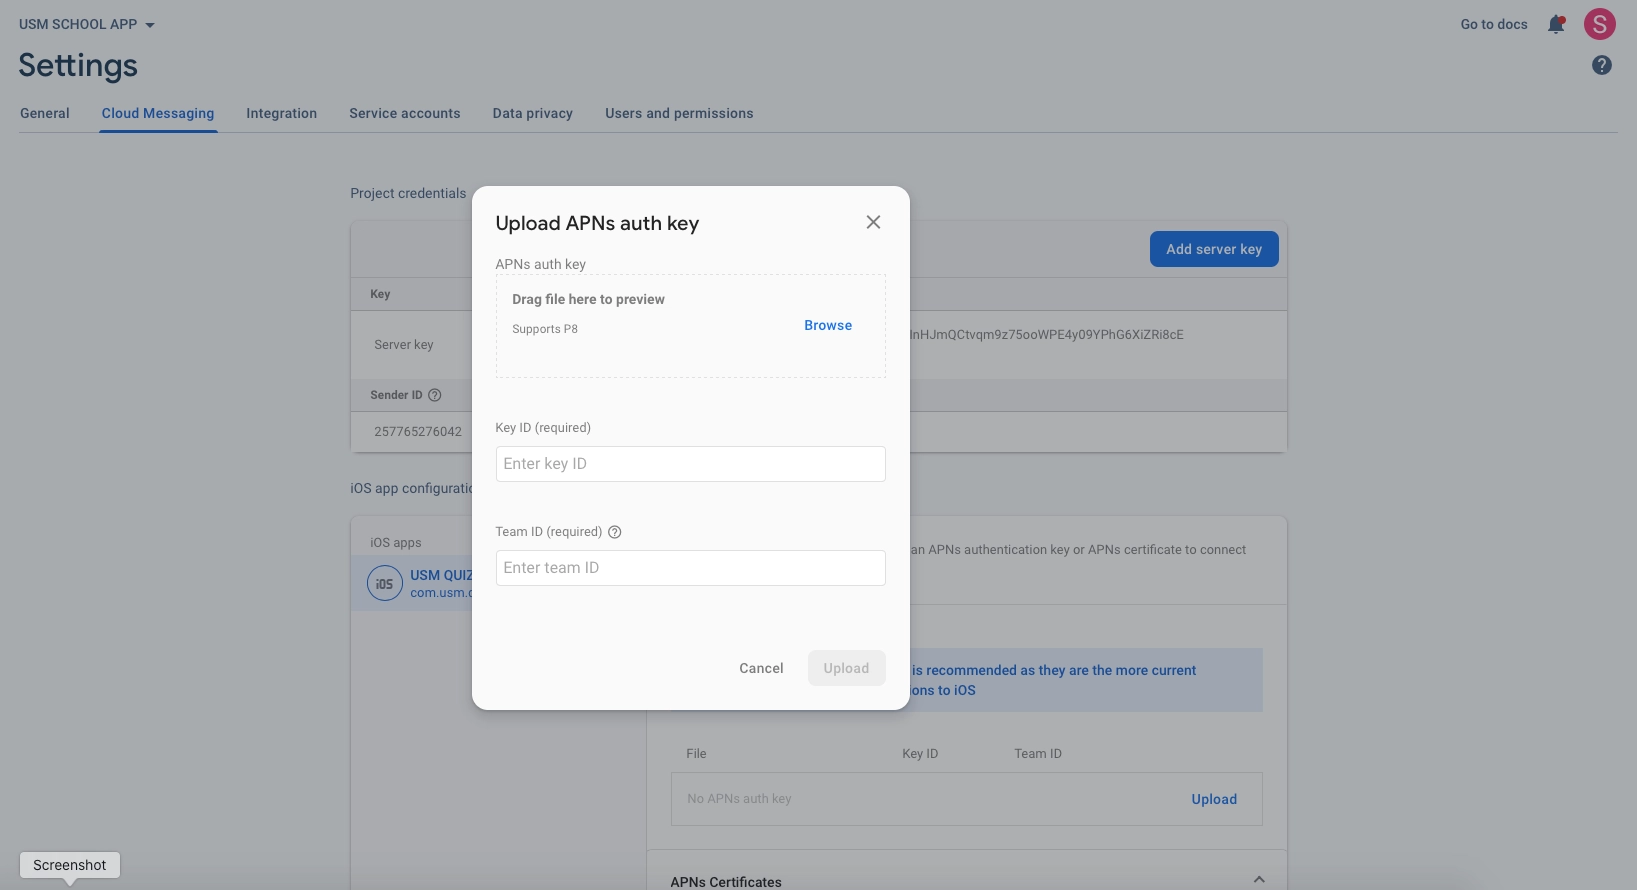
    21. Then go to Firebase and add this .p8 file along with Your Key ID and Team ID.

    22. eBroker

      FOR certificate-based (.p12) :


    23. Log in to the Apple Developer Portal.
    24. Navigate to Certificates, IDs & Profiles > Identifiers > App IDs and click the App ID associated with your app.
    25. On the screen for your App ID, check Capabilities > Push Notifications.
    26. Click Save and respond to the Modify App Capabilities dialog box that appears.
    27. To create the certificate, we will use to communicate with Apple when sending push notifications:
      • In a new browser tab, follow Apple's Create a certificate signing request instructions.
      • In the Apple Developer Portal, navigate back to your App ID.
      • Click Capabilities > Push Notifications > Configure.
      • Click one of the following buttons:
        • Development SSL Certificate > Create Certificate (for testing push notifications while developing an iOS app)
        • Production SSL Certificate > Create Certificate (for sending push notifications in production)
      • Click Choose File and select the certificate signing request you created above.
      • Click Continue.
      • Click Download to download the certificate.
      • Use this file to export a .p12 file in the next step.
    28. Navigate in the Apple Developer Portal to Certificates, IDs & Profiles > Provisioning Profiles.
    29. Click the provisioning profile you'd like to edit.
    30. Edit the provisioning profile as necessary, and click Save.
    31. Click Download, and double-click the downloaded provisioning profile to install it.
    32. Make sure your Xcode project is configured to use the provisioning profile as necessary.Next, export the downloaded certificate (.cer file) as a .p12 file that can be uploaded to firebase:
      • On your Mac, double-click the .cer file to open it in Keychain Access.
      • In Keychain Access, in the lower-left corner, select Category > Certificates.
      • Select the certificate to export.
      • Choose File > Export Items.
      • Enter a name in the Save As field.
      • Accept the default .p12 file format and click Save. Respond to the prompts, and enter a password for the file if necessary.
      • Keep track of this file, since you'll upload it to firebase in a later step.

      • eBroker

        eBroker

    App Settings


    How to change App Name?

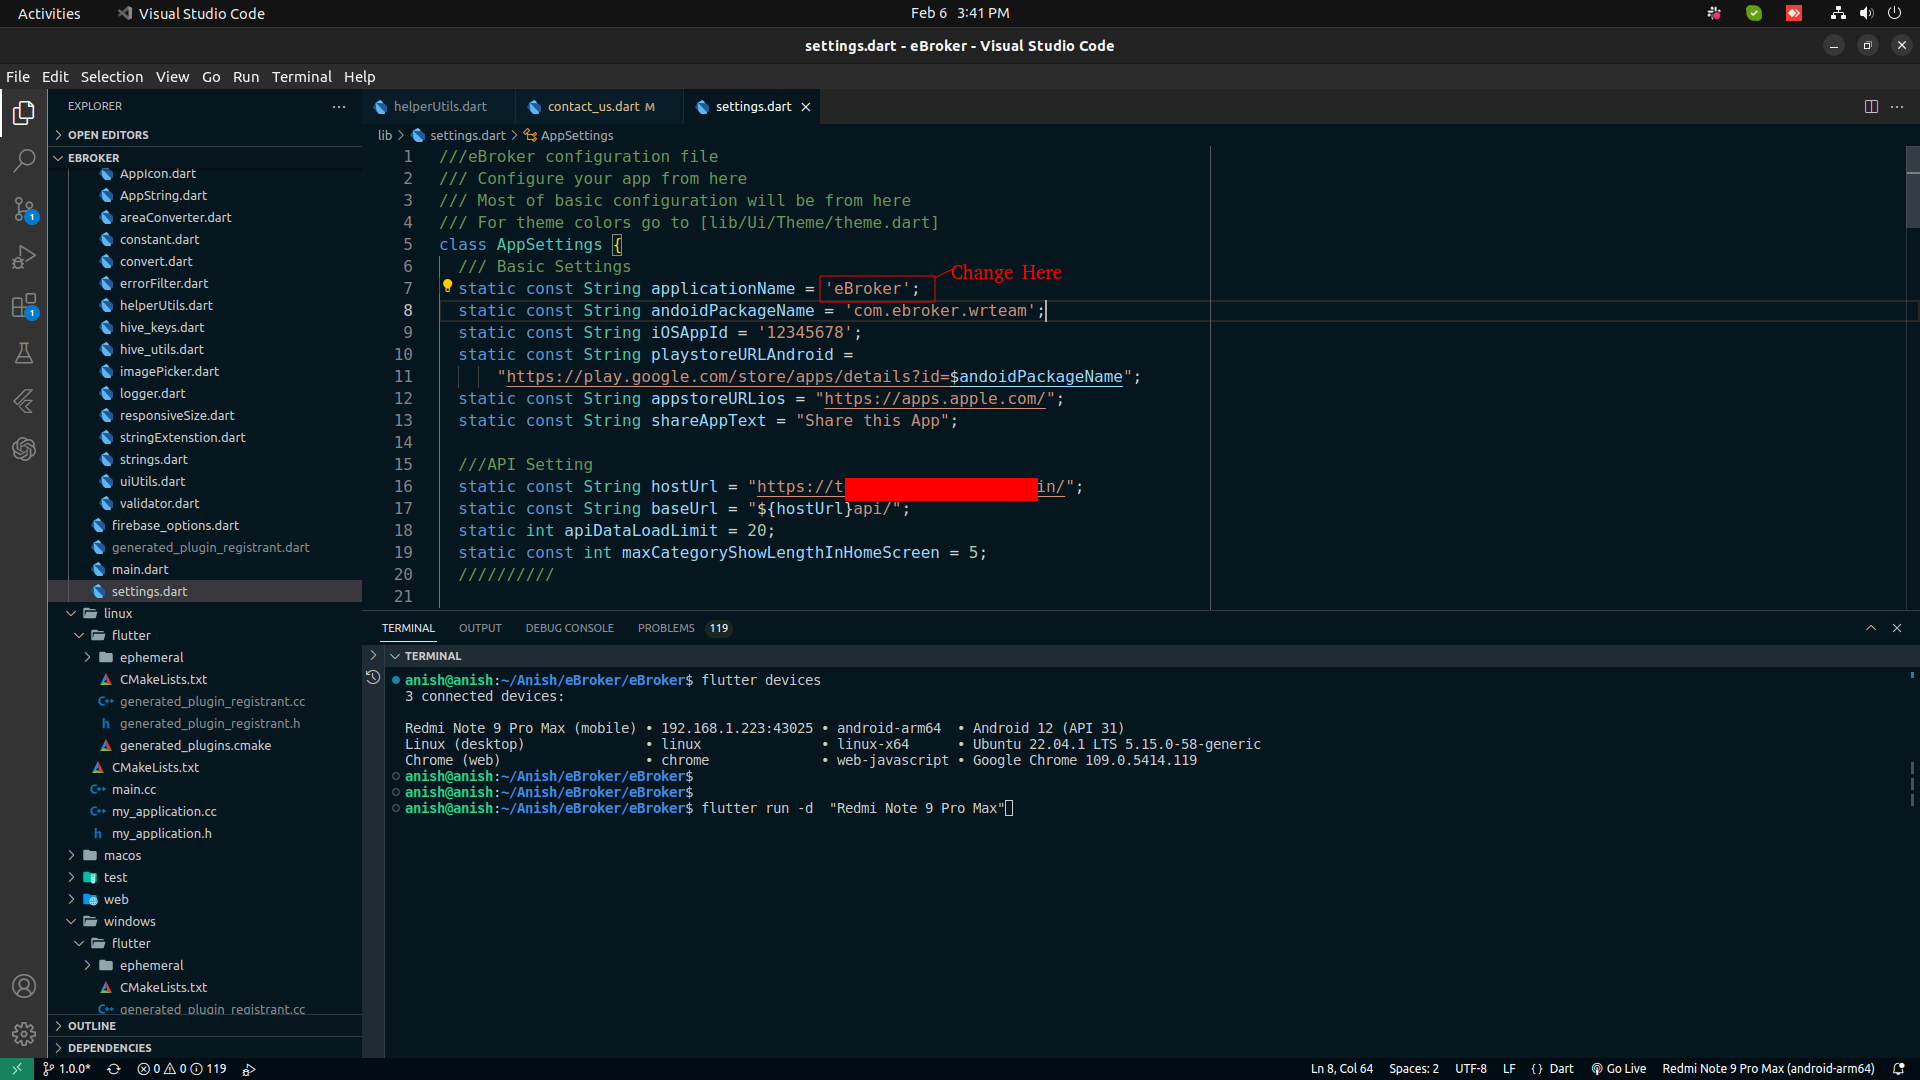
    • Go to settings.dart file from helper folder. (lib->settings.dart)

    Now execute this command line by line in your terminal

    flutter pub global activate rename

    flutter pub global run rename --appname "Your app name"

    Note:first go to your project's root folder


    How to change App Package Name?

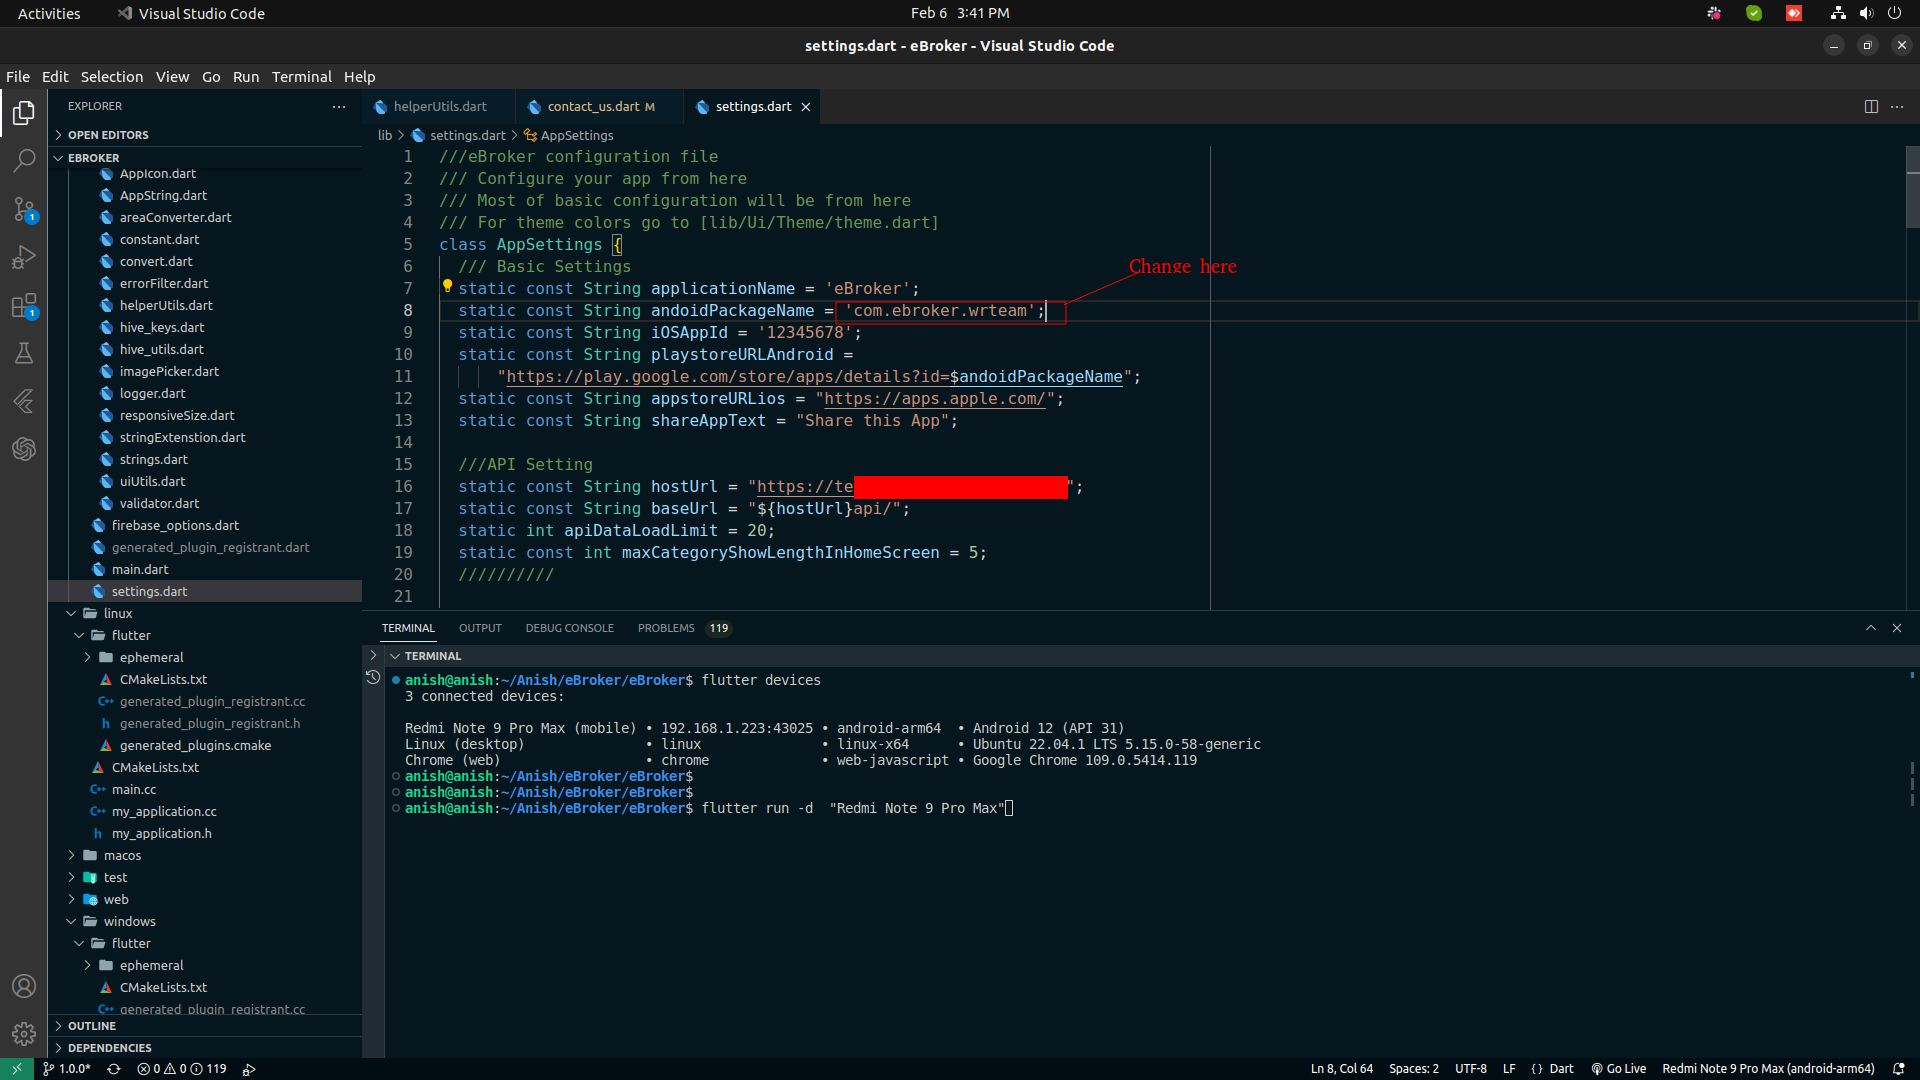
    • Again Go to settings.dart file from helper folder. (lib->settings.dart)


    Execute this command in terminal and write your package name after --bundleId

    flutter pub global run rename --bundleId com.example.app


    How to change App Version?


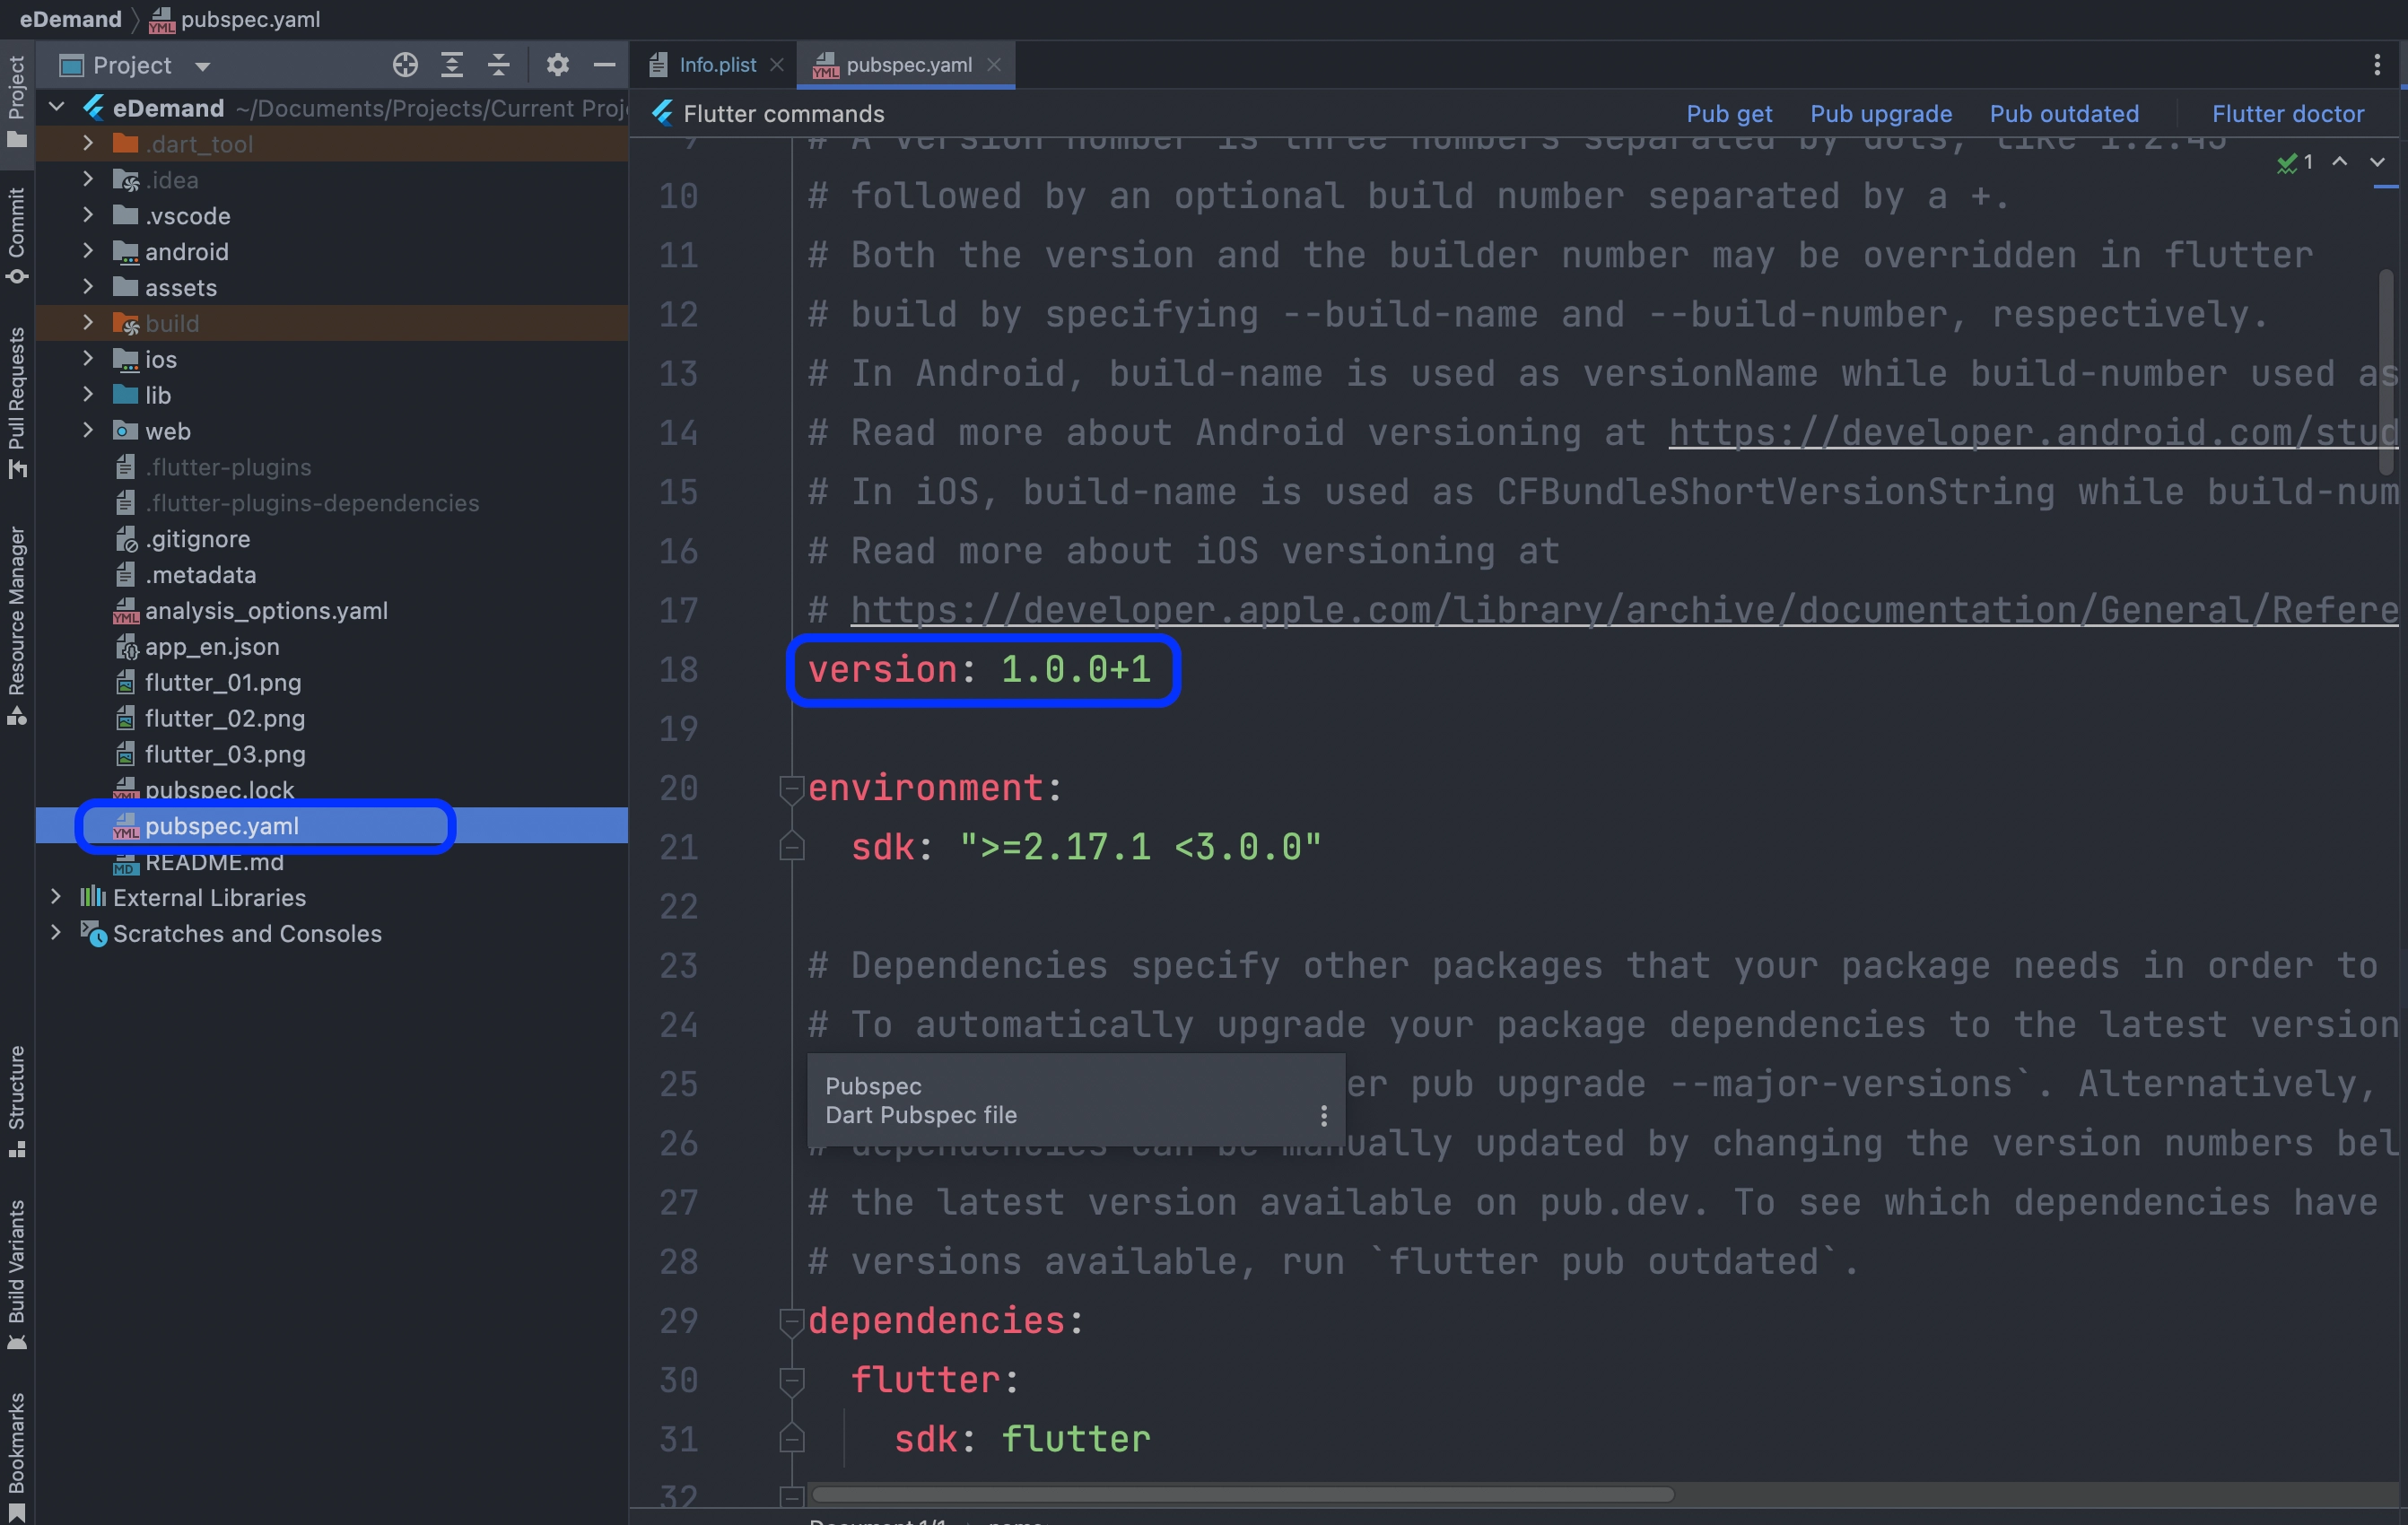
    1. go to pubspec.yaml
    2. EX.Update version:A.B.C+X in pubspec.yaml.
    3. For Android:
    4. A.B.C represents the versionName such as 1.0.0. X (the number after the +) represents the versionCode such as 1, 2, 3, etc.
    5. Do not forget to execute flutter packages get, flutter build or flutter run after this step


    6. For iOS
    7. A.B.C represents the CFBundleShortVersionString such as 1.0.0. X (the number after the +) represents the CFBundleVersion such as 1, 2, 3, etc.
    8. Do not forget to execute flutter packages get, flutter build or flutter run after this step


    How to change App's fonts?


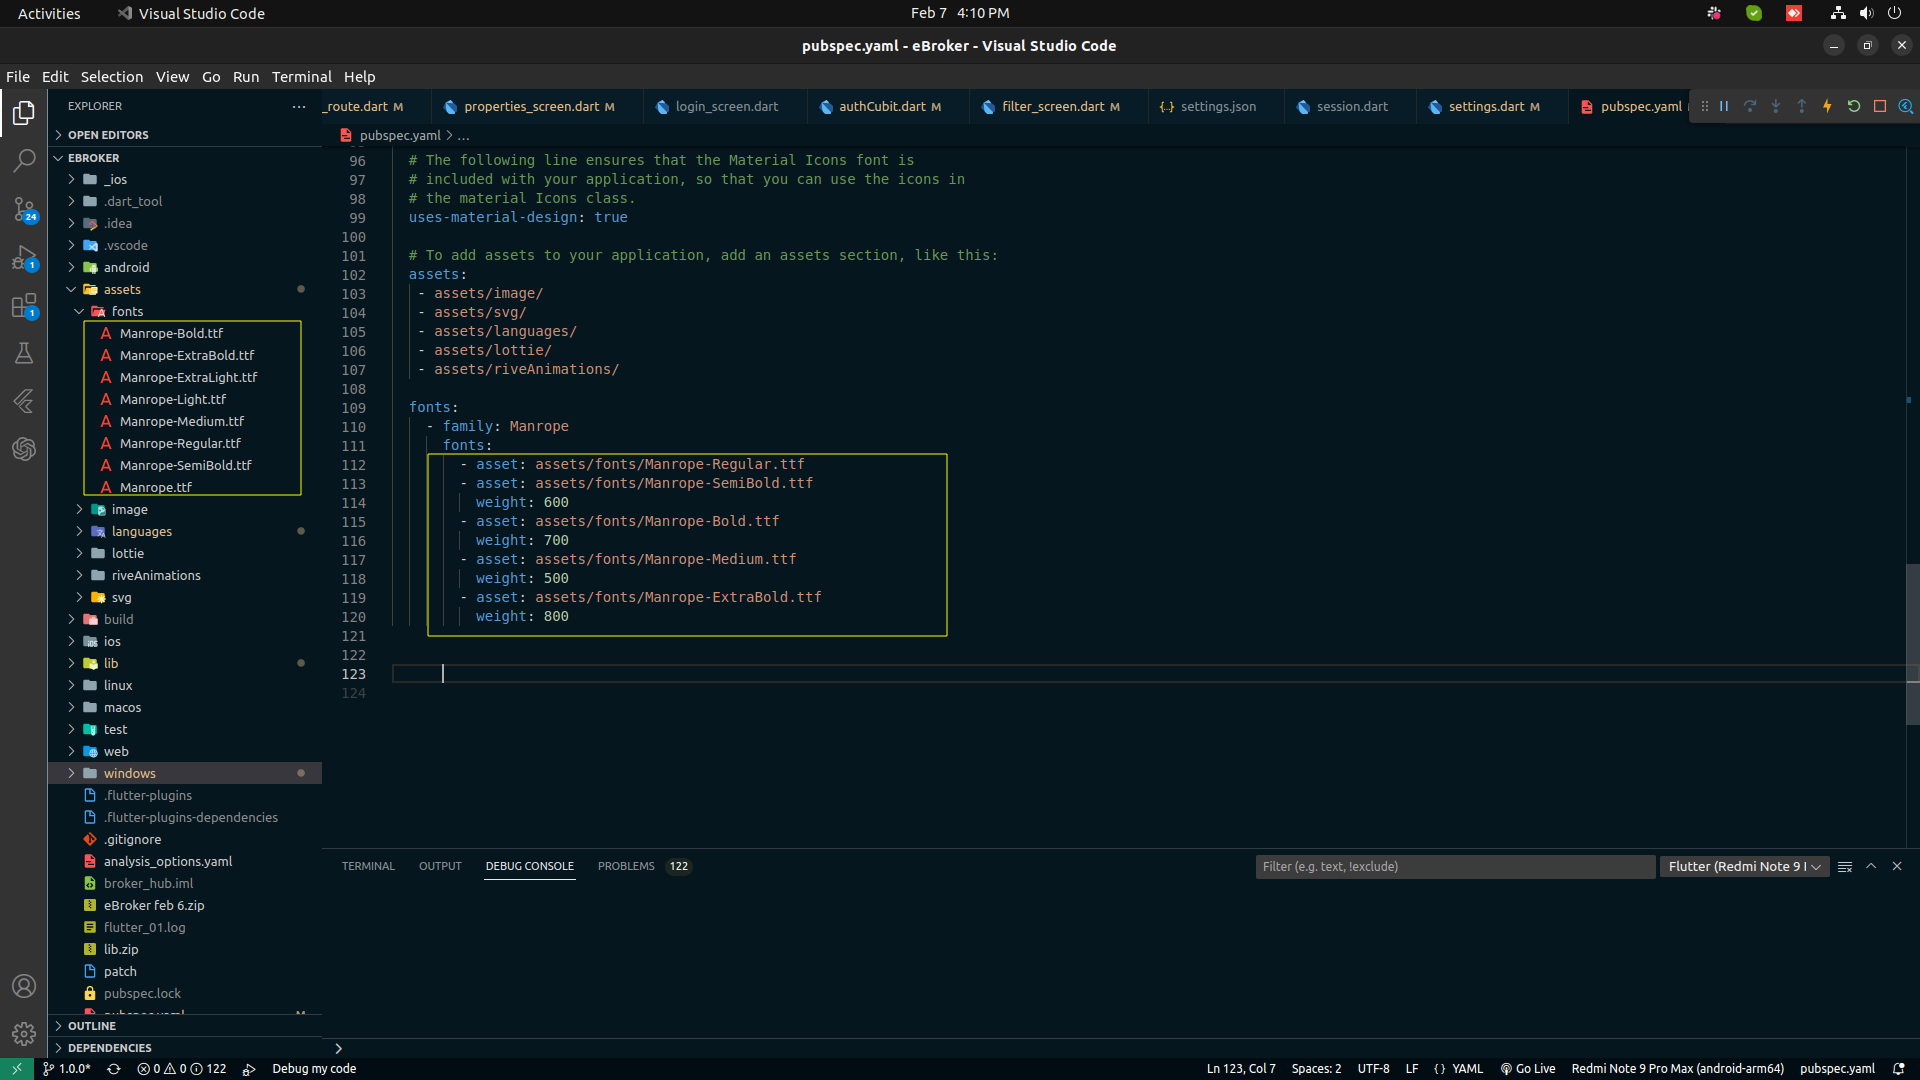
    1. First go to assets/fonts, and replace your fonts files there
    2. and go to pubspec.yaml
    3. replace with your file names


    How to Change Colour ?

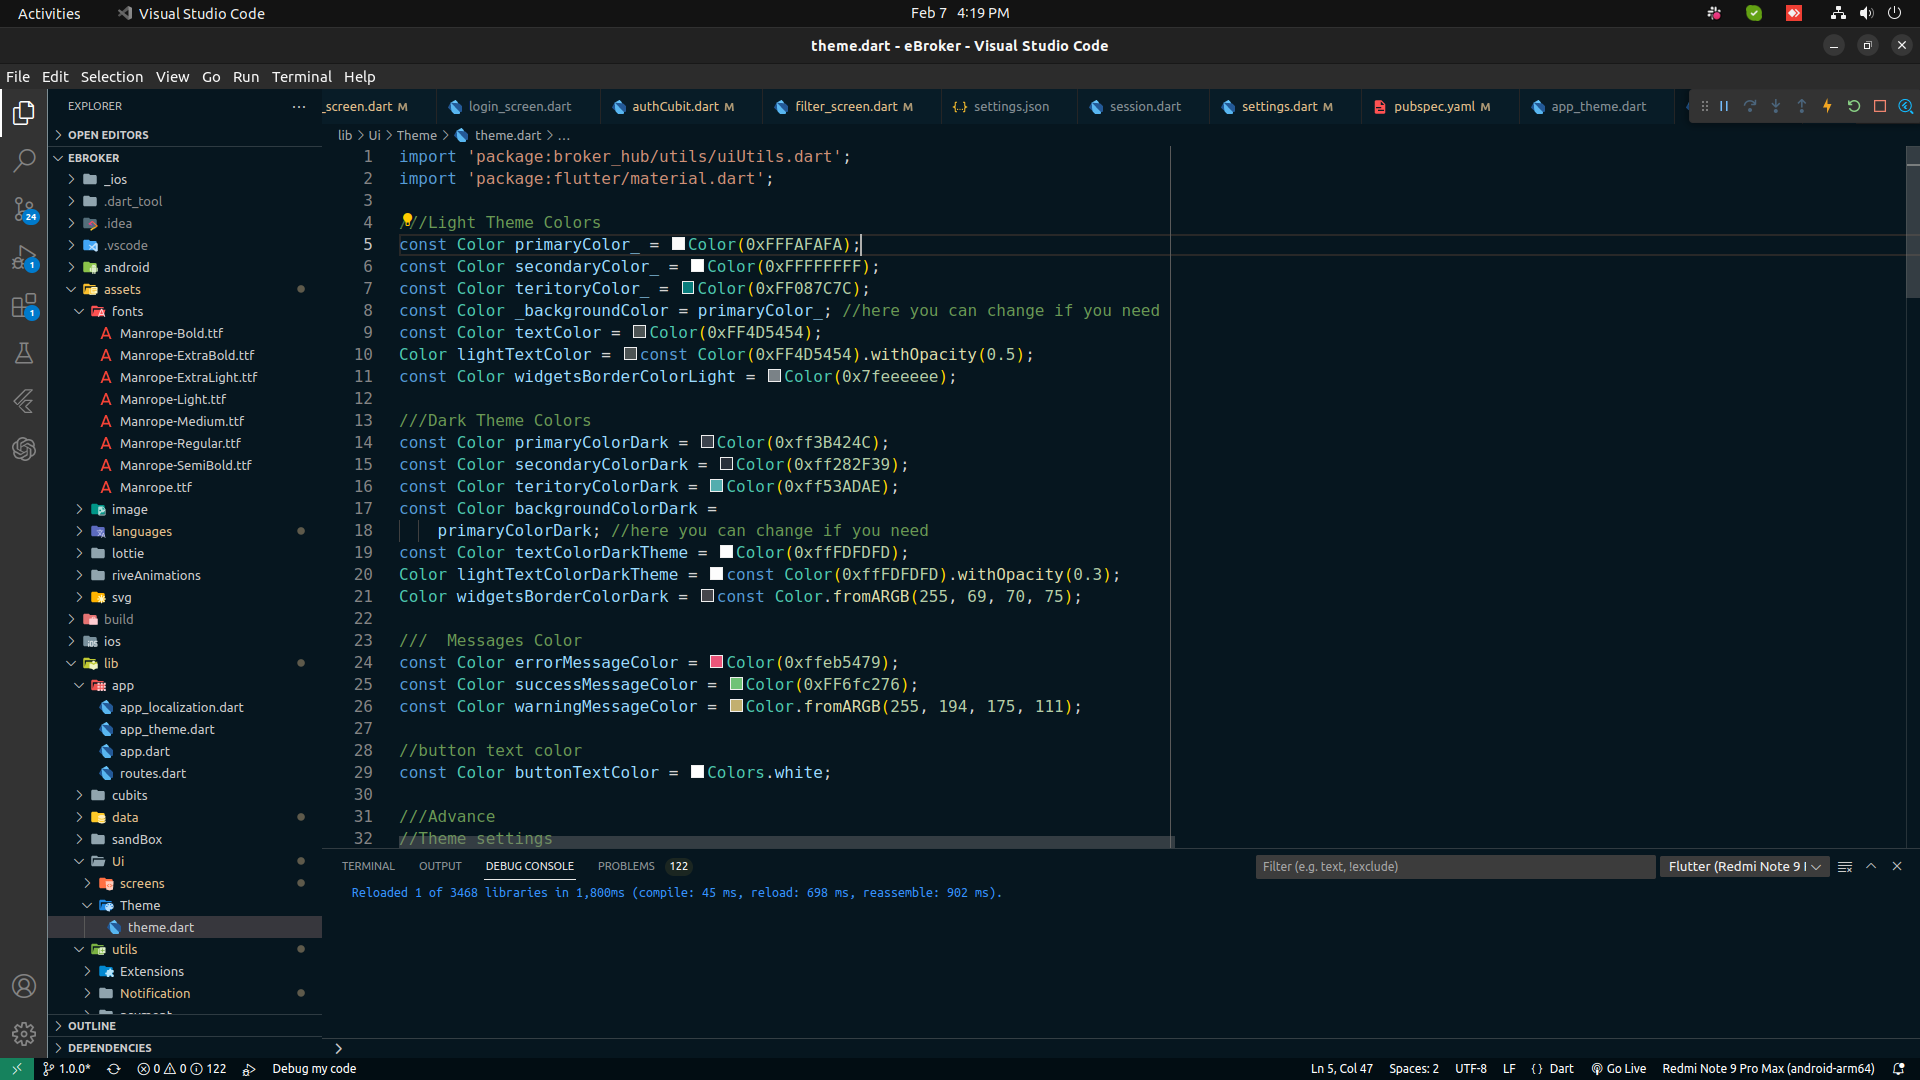
    1. Go to lib/Ui/Theme/theme.dart
    2. In this file you will find light mode,dark mode,message colors


    How to Change App Icons ?

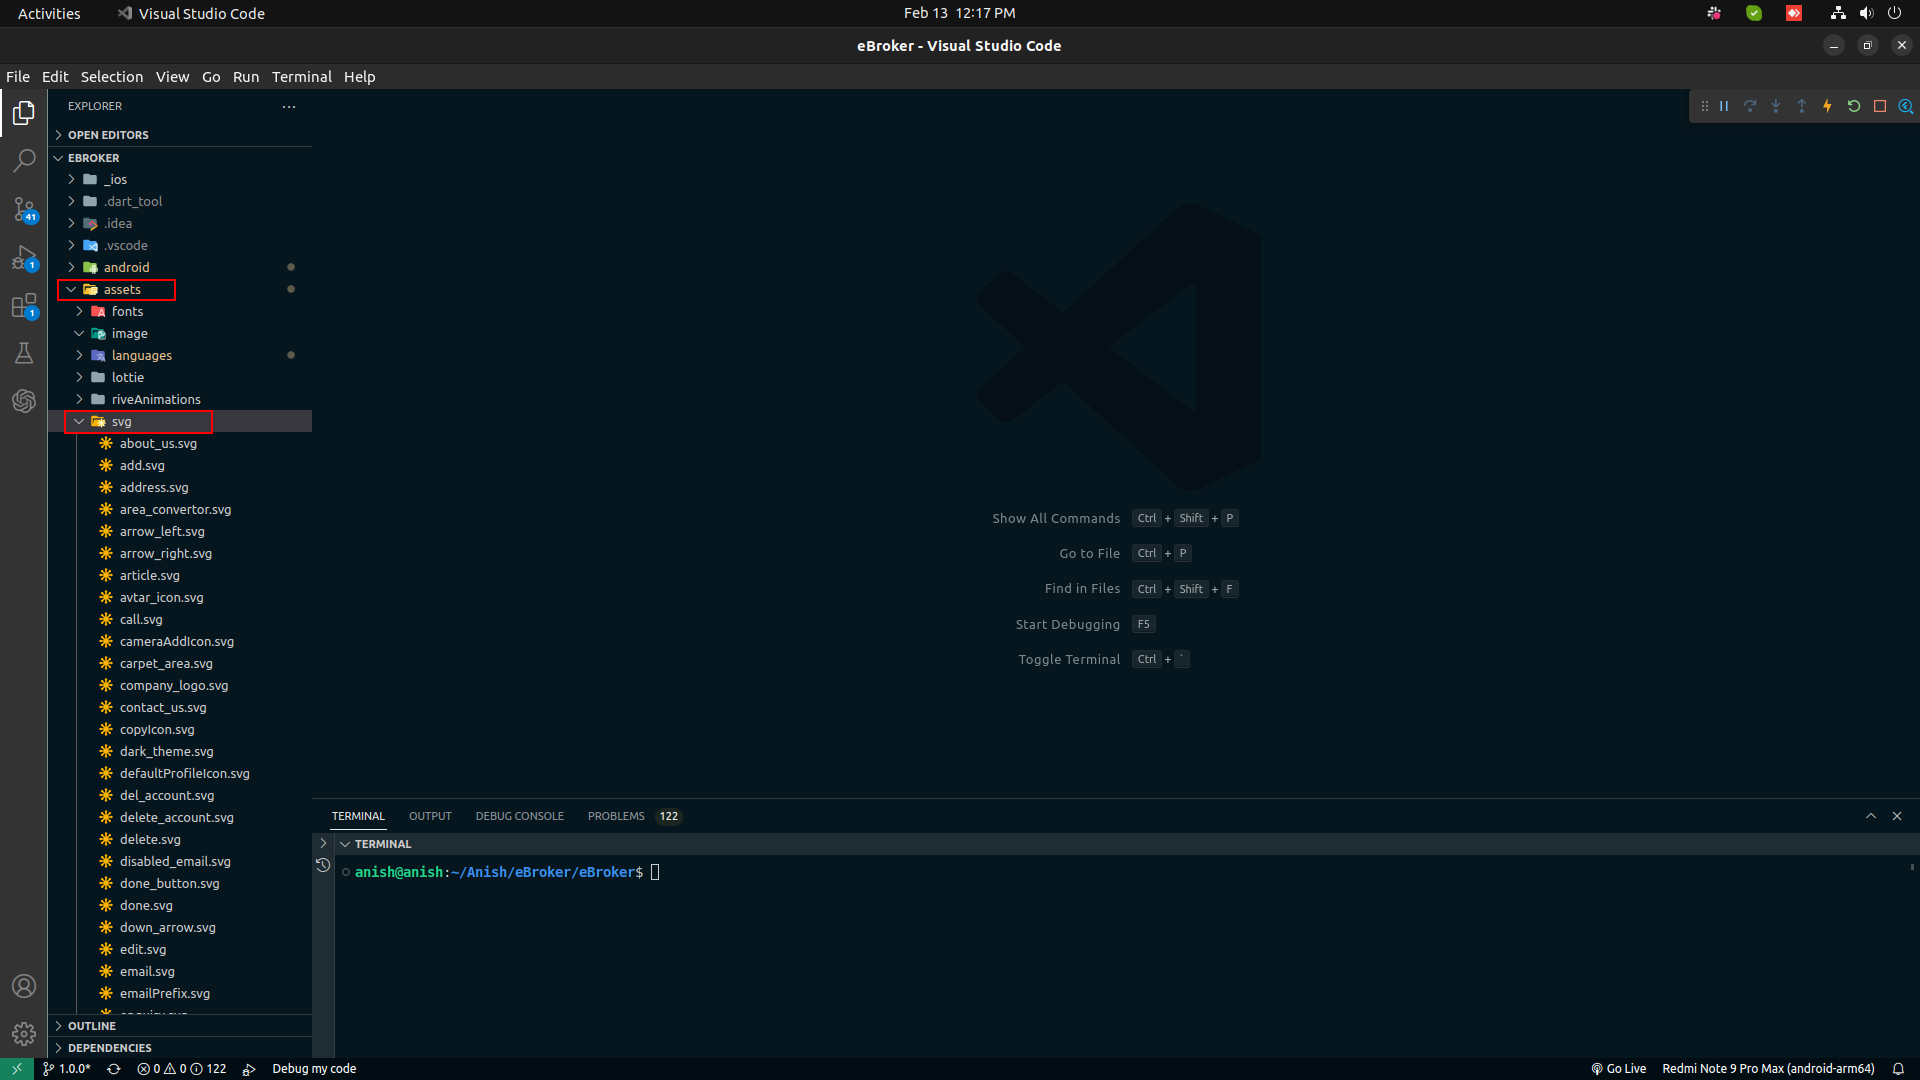
    1. Go to assets/svg/
    2. In this folder you can change icon files


    How to change or add language in app ?

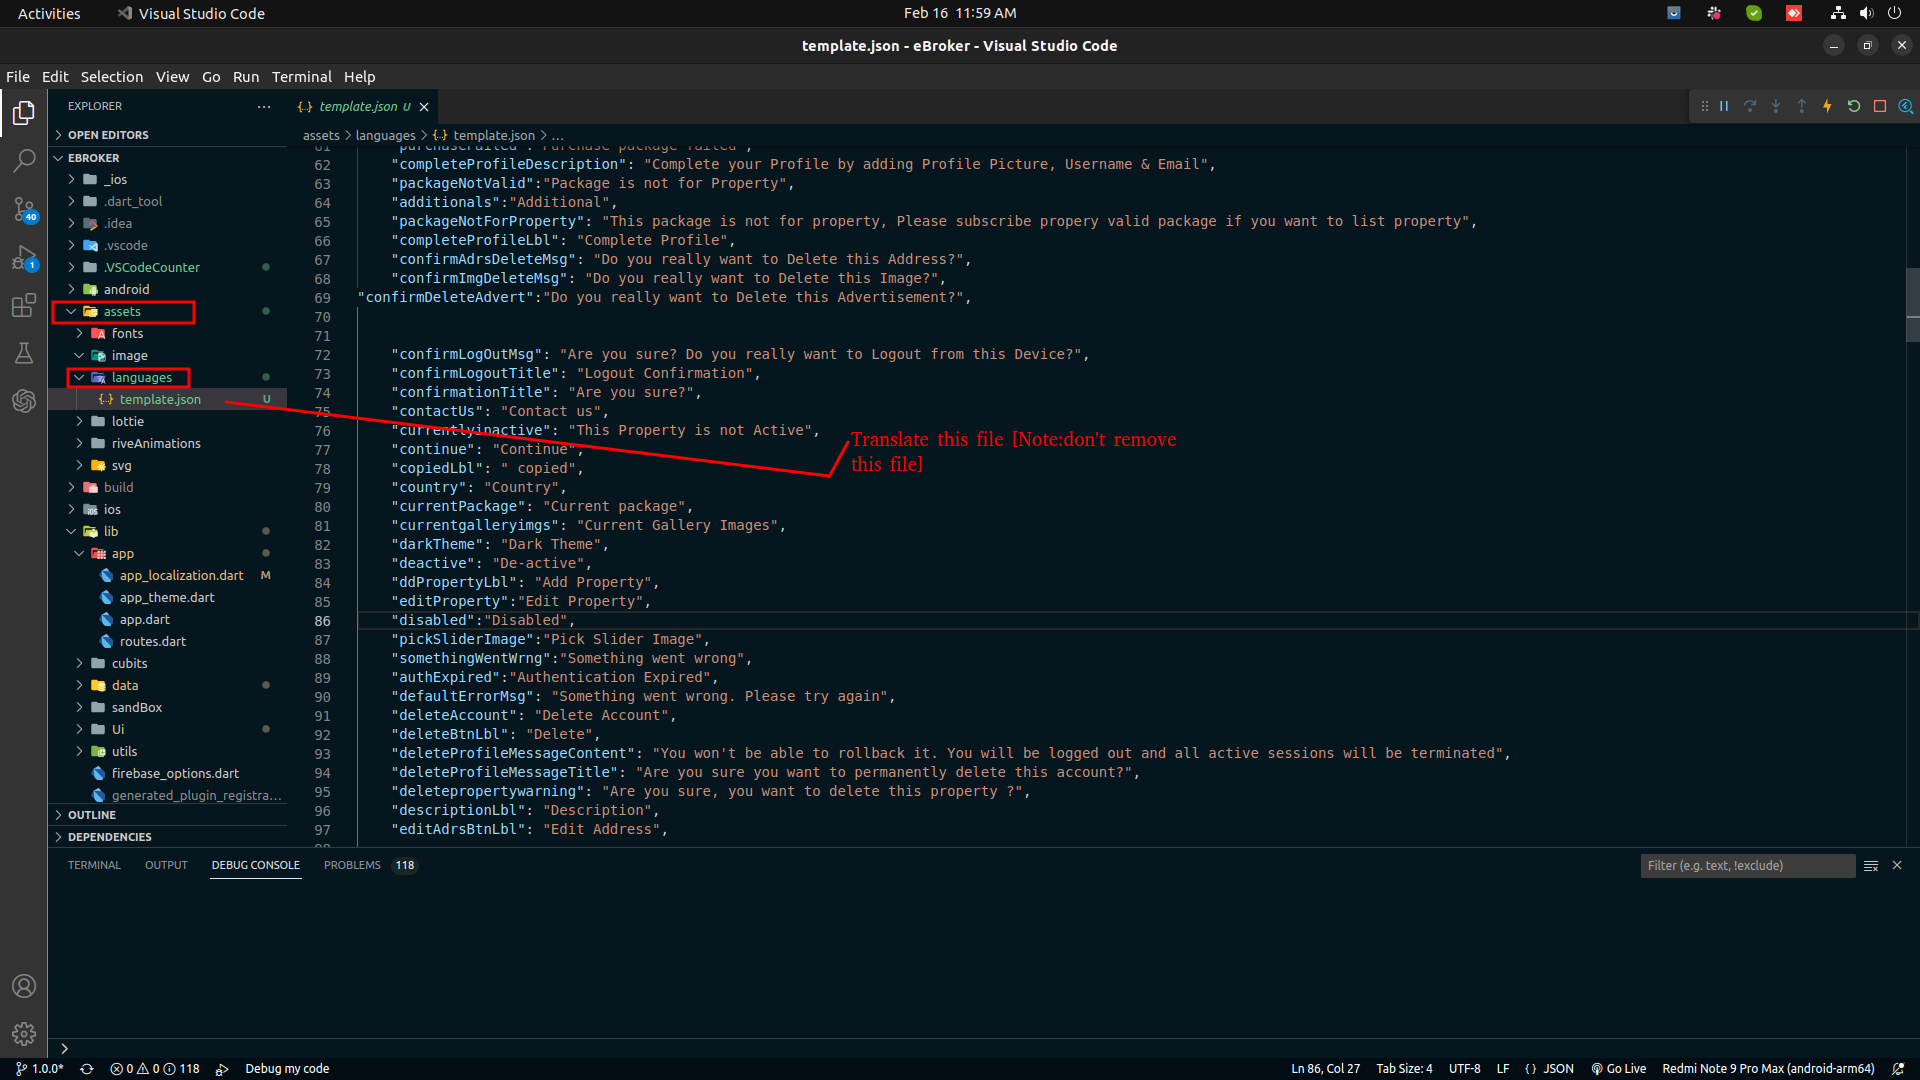
    1. Go to assets/languages/
    2. In this folder you can see template.json file

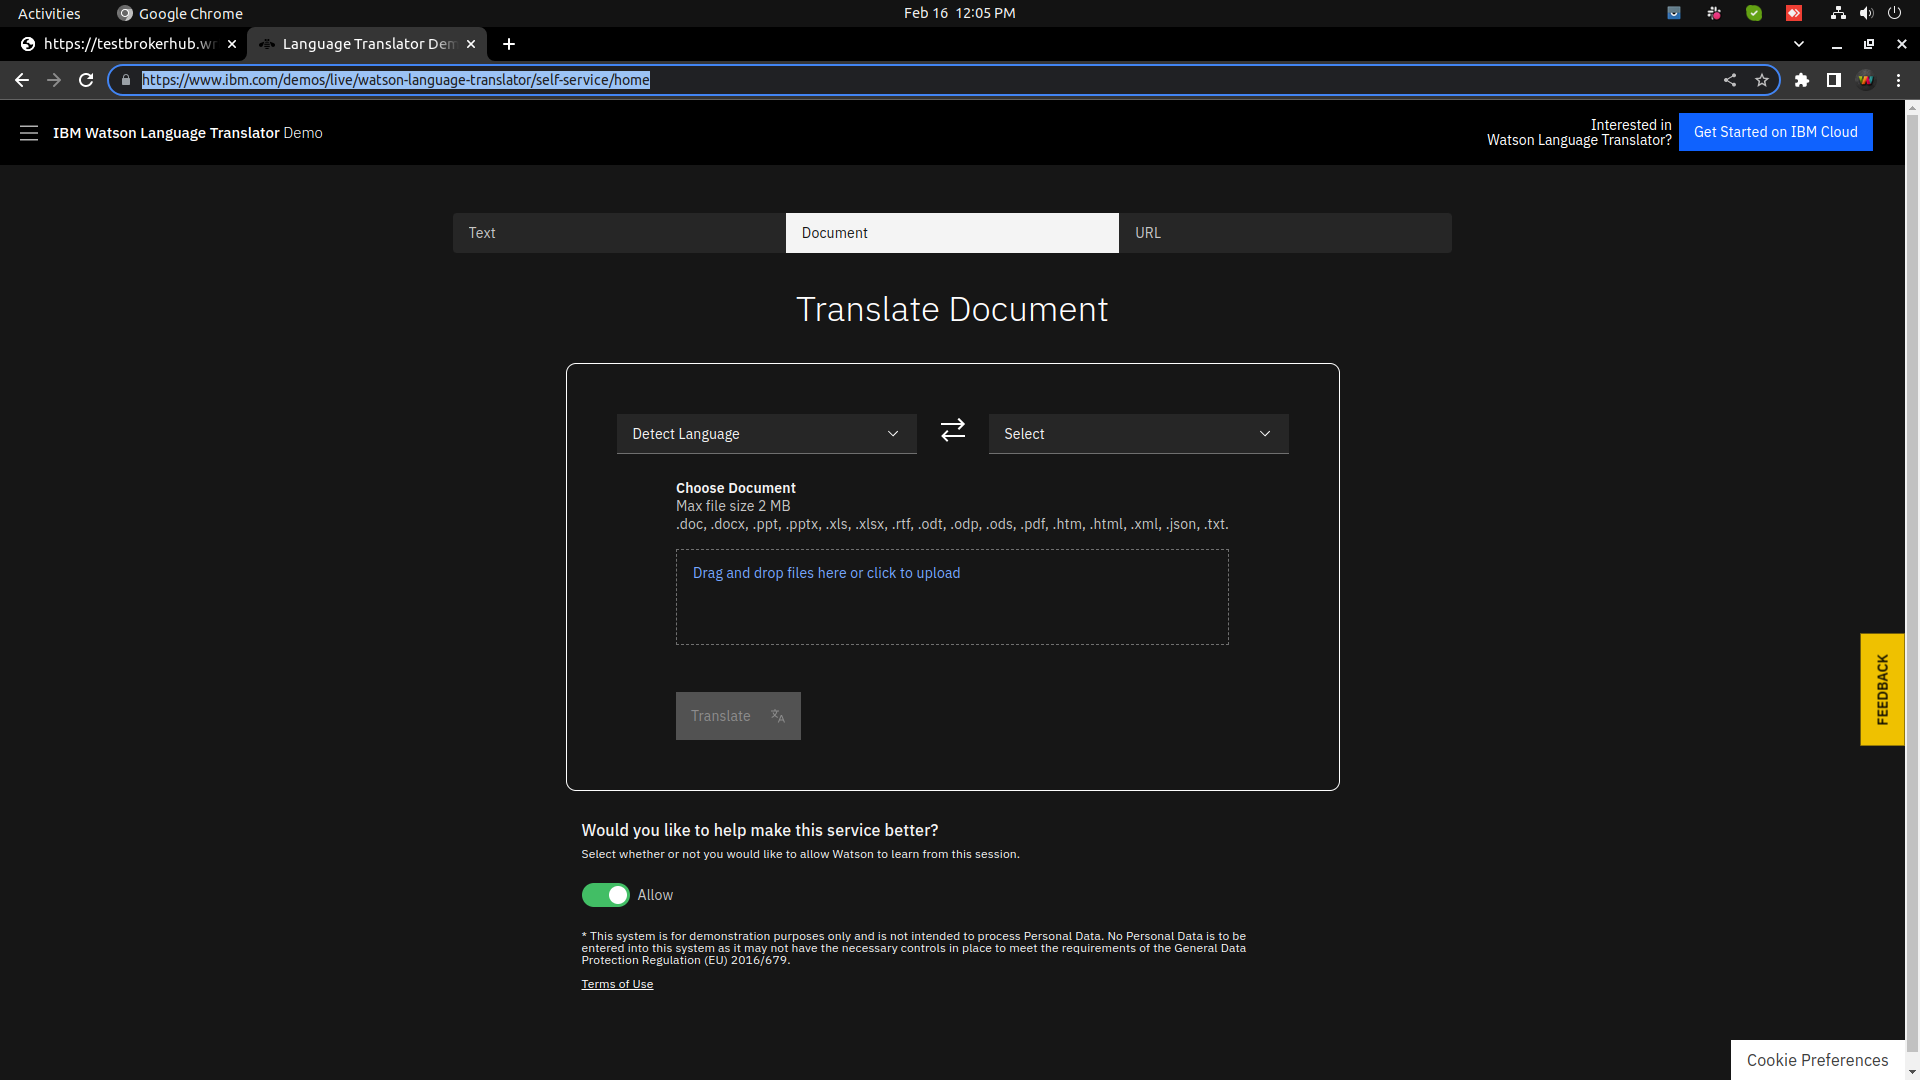
    3. You can translate this file on any service or can change values mannually, Here is the website (Click Here)
    4. go to document tab and translate template file there
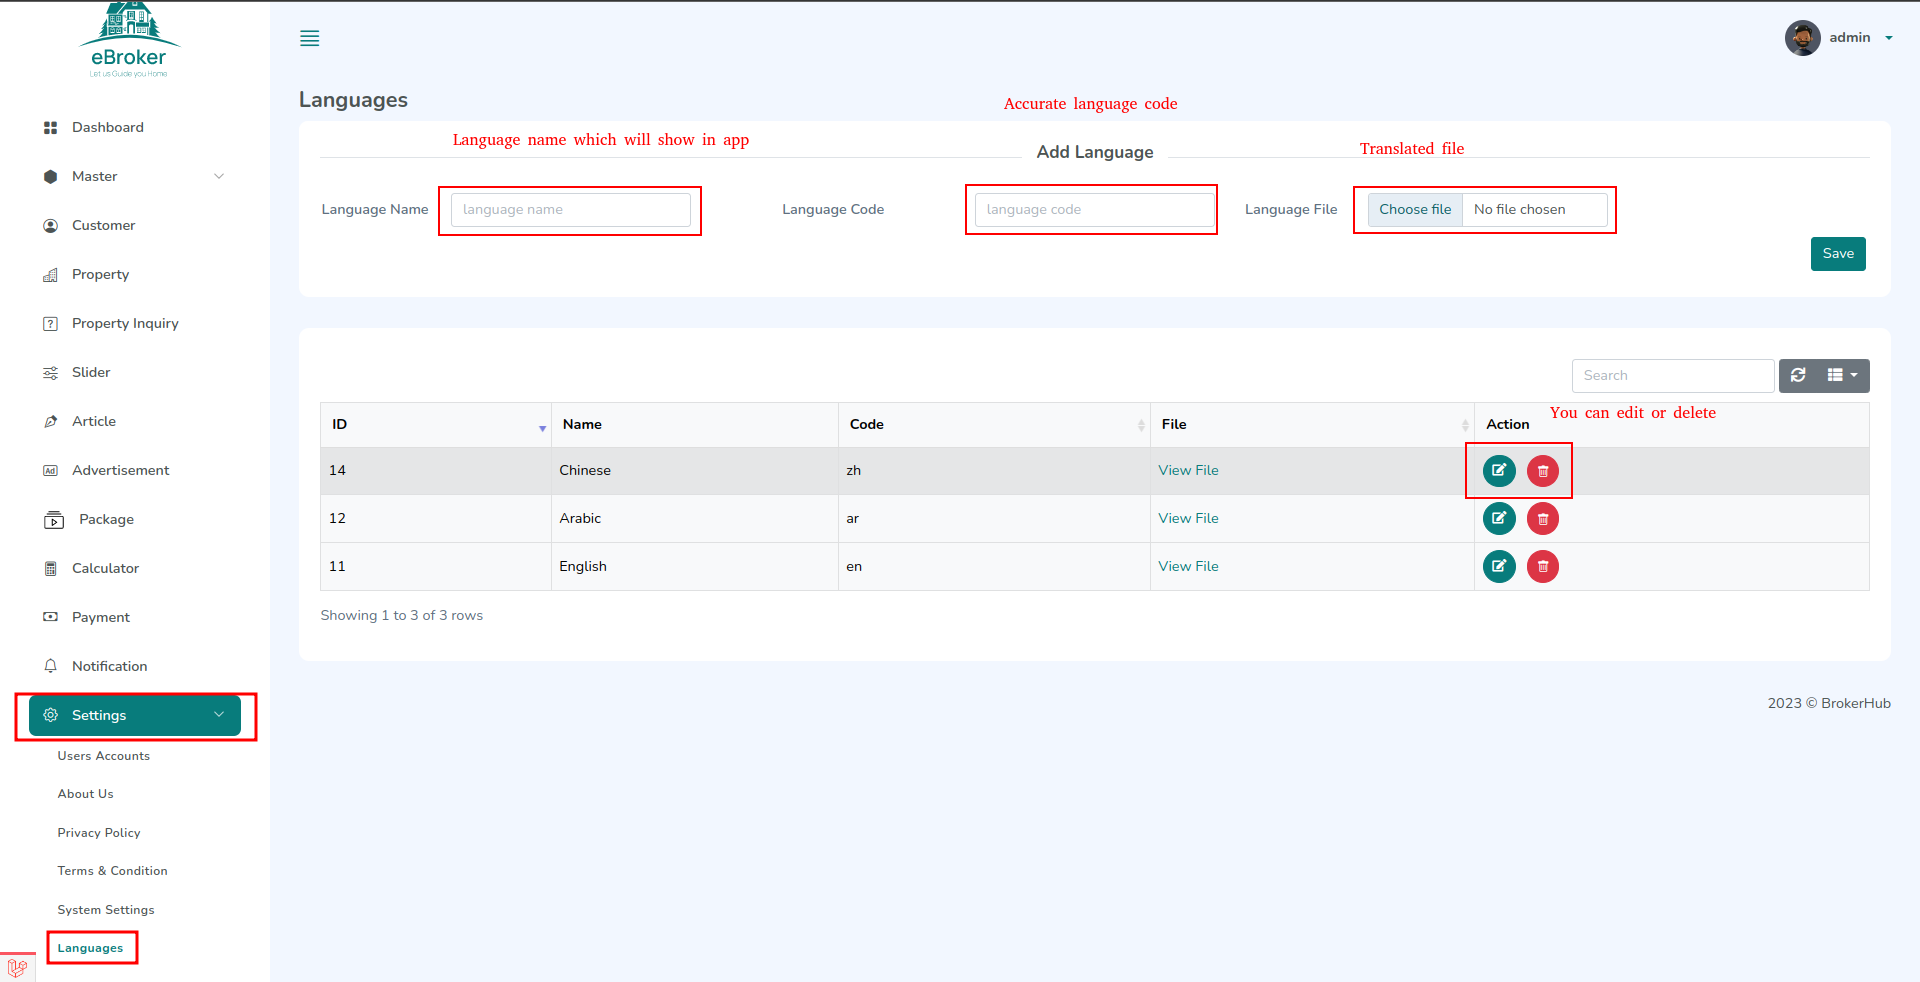
    5. Now go to panel and settings>language

    6. You can change or add languages from here.


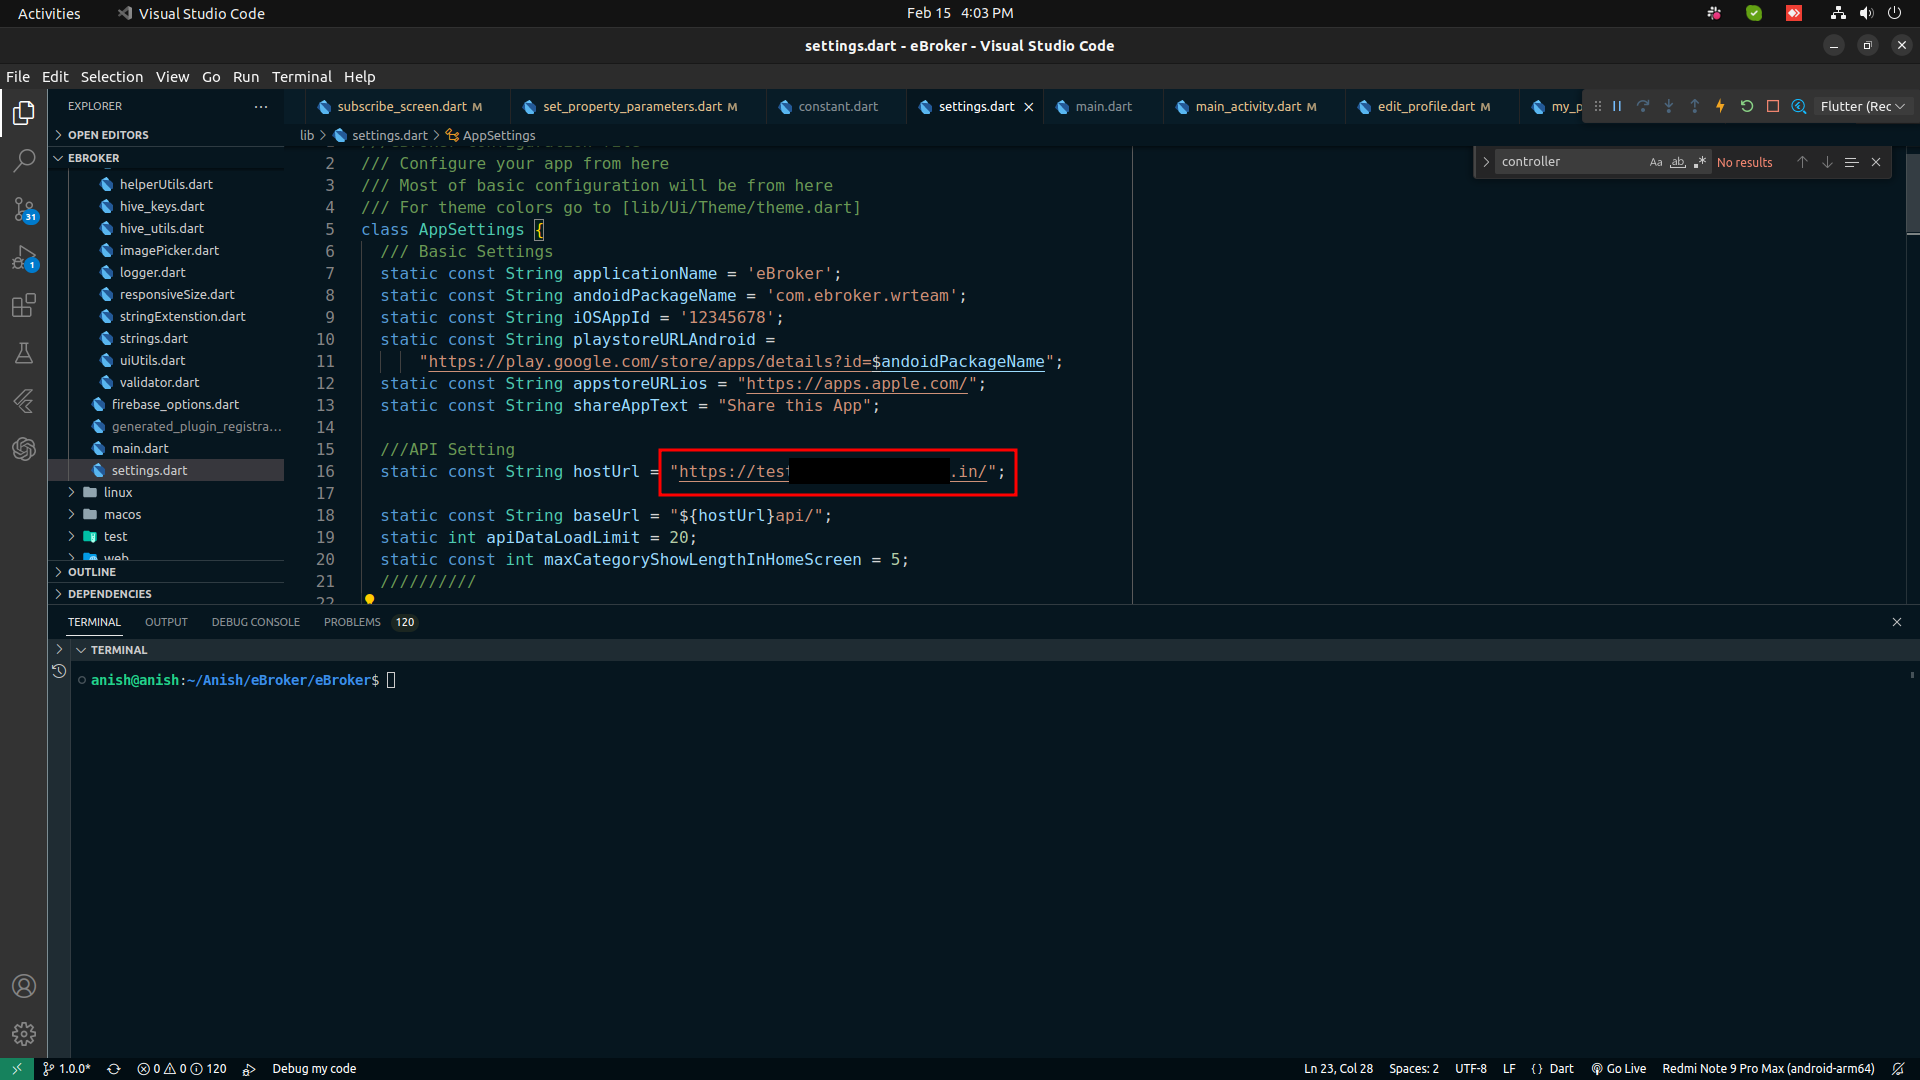
    Setup Host URL


    1. Go to lib>settings.dart
    2. set your panel url at hostUrl variable
    3. Note: Your panel url must be valid


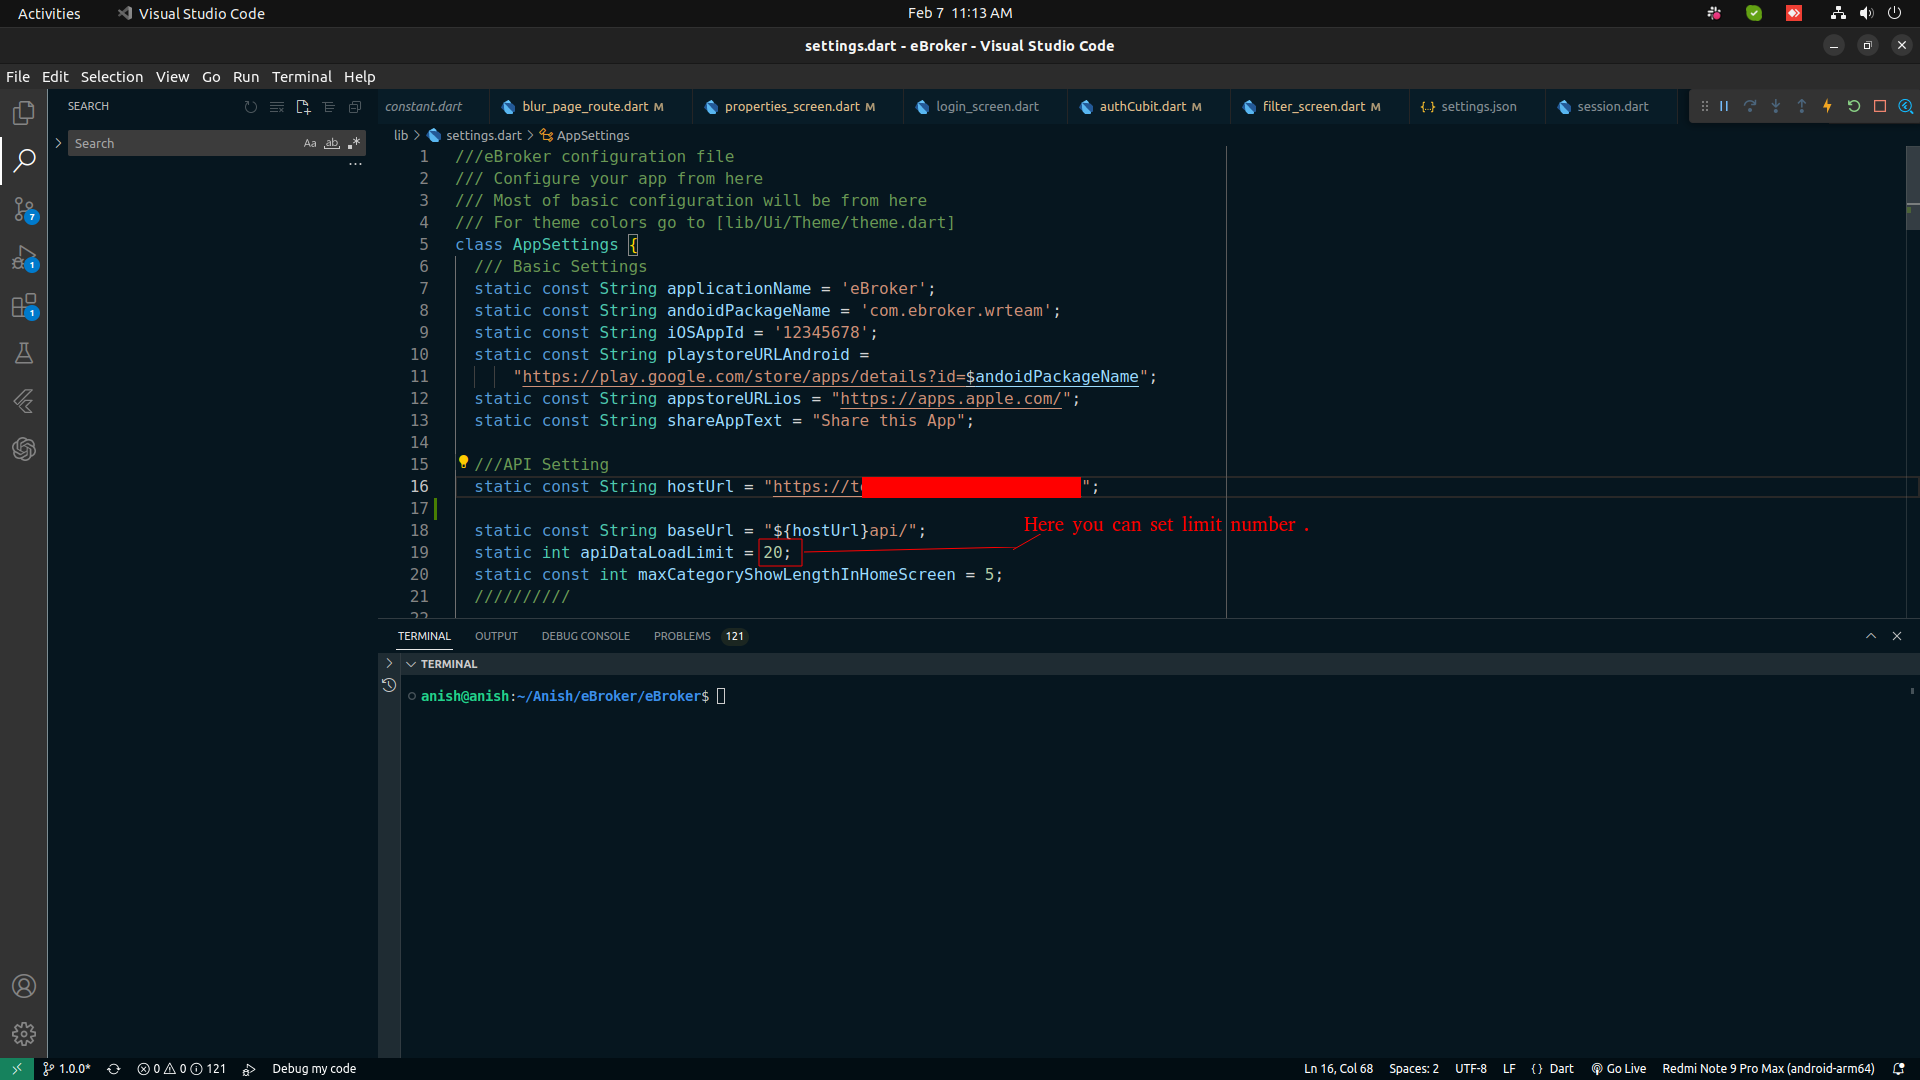
    Change API data load limit


    1. Go to lib>settings.dart
    2. Here change apiDataLoadLimit variable value to number you want


    How to Add Map API key

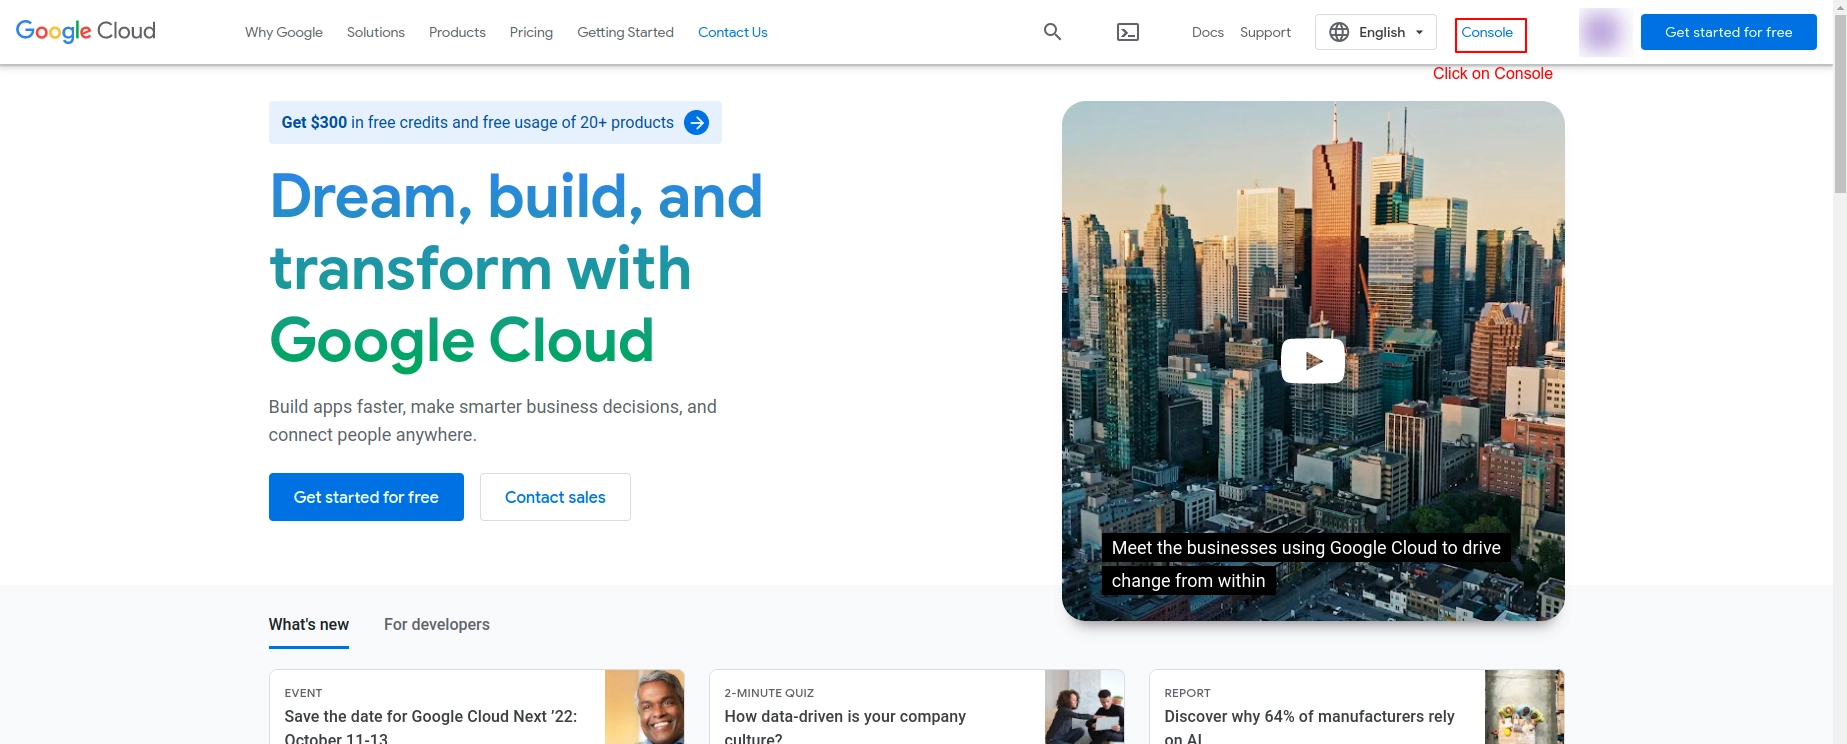
    1. Go to Google Cloud Platform. Click here
    2. Click on console.

      eBroker


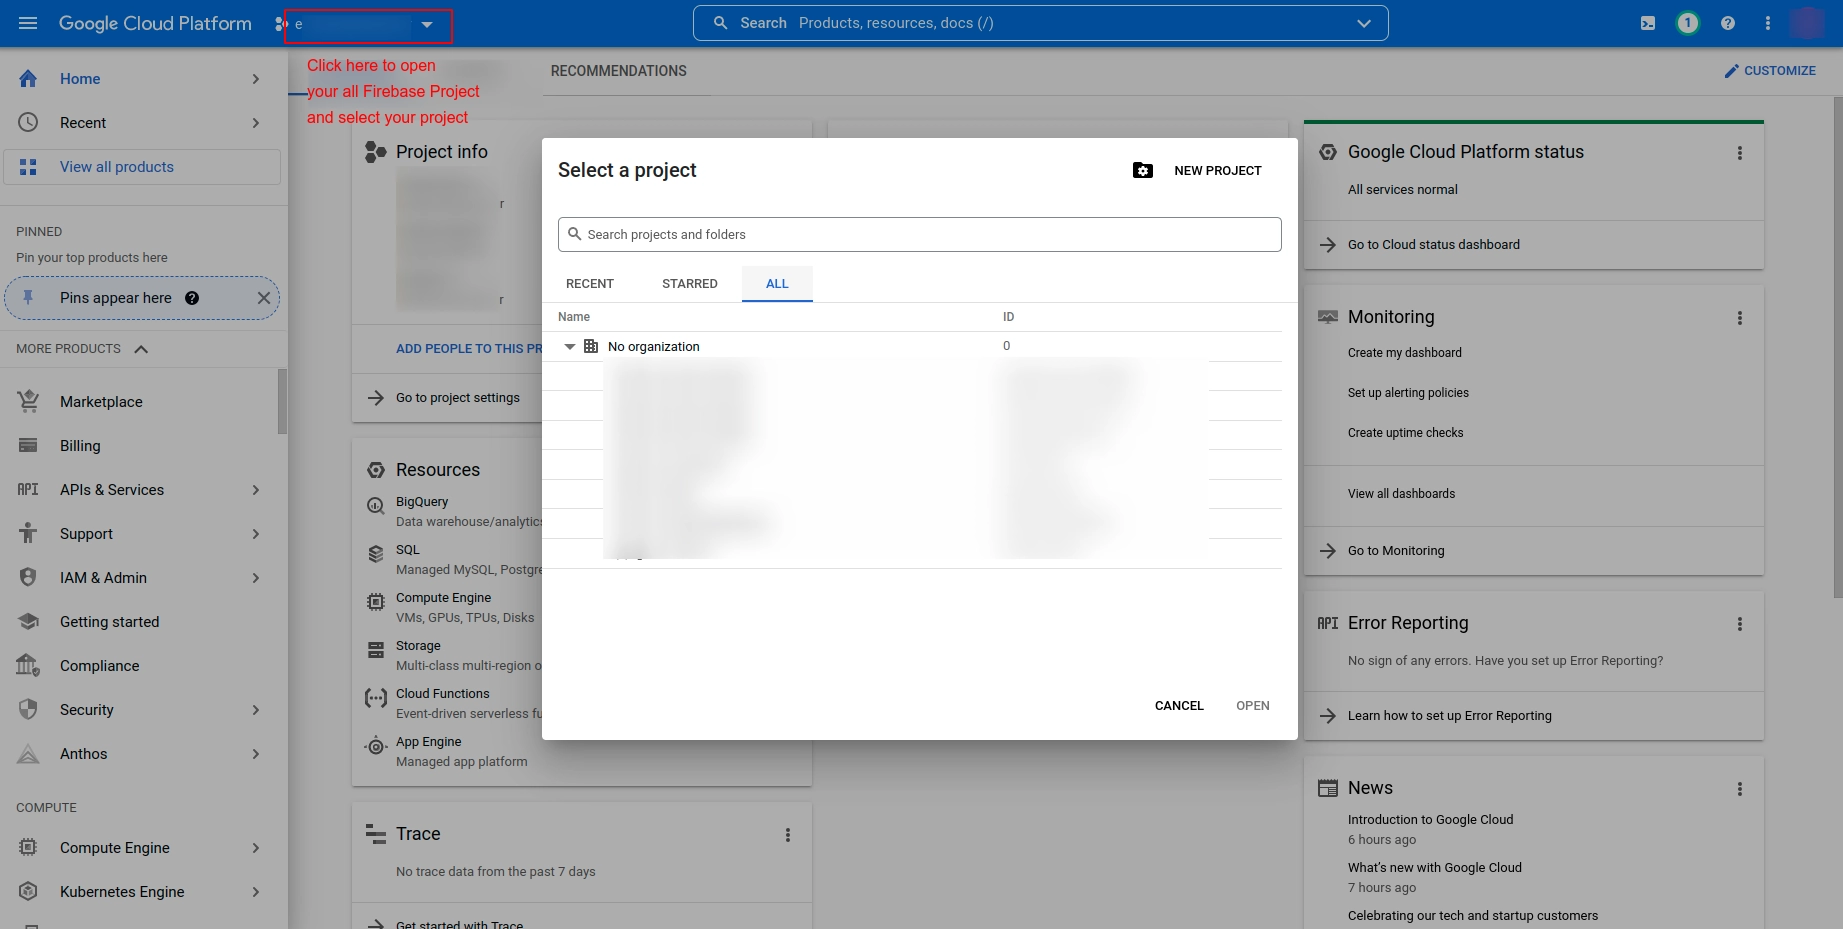
    3. Select your Firebase Project

      eBroker


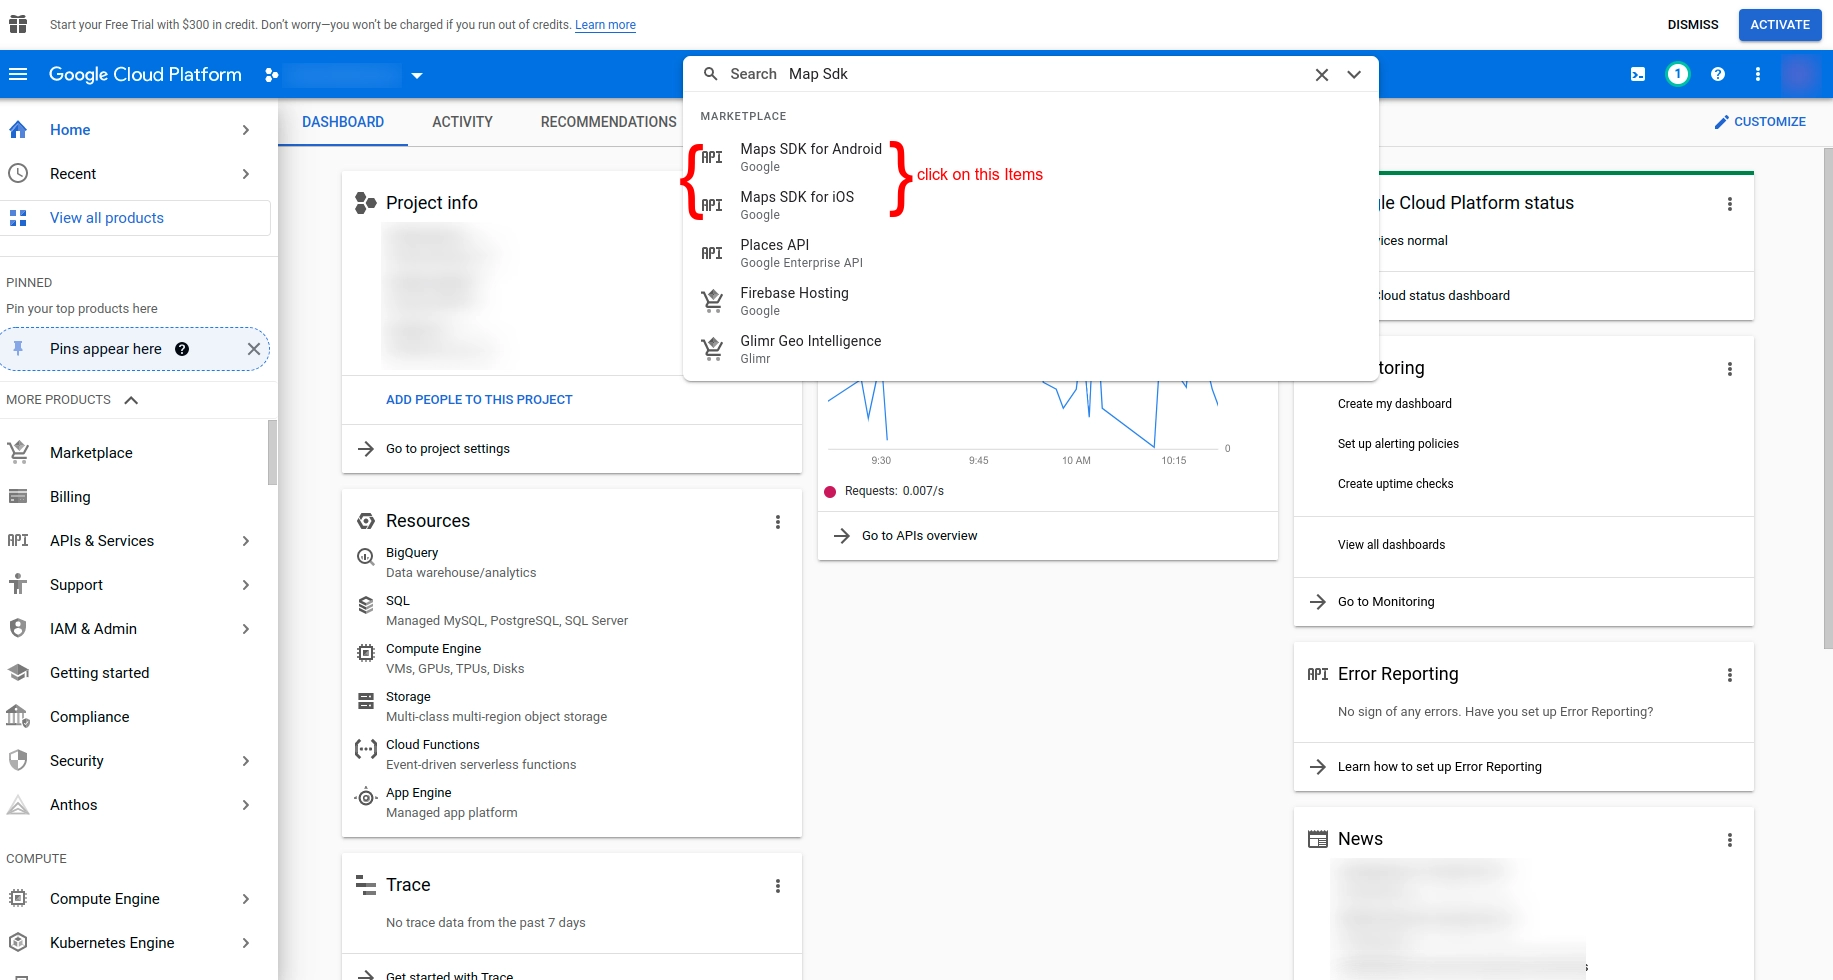
    4. Search for APIs, which are shown in below image.

      eBroker


    5. Click on Enable to, enable that APIs

      eBroker


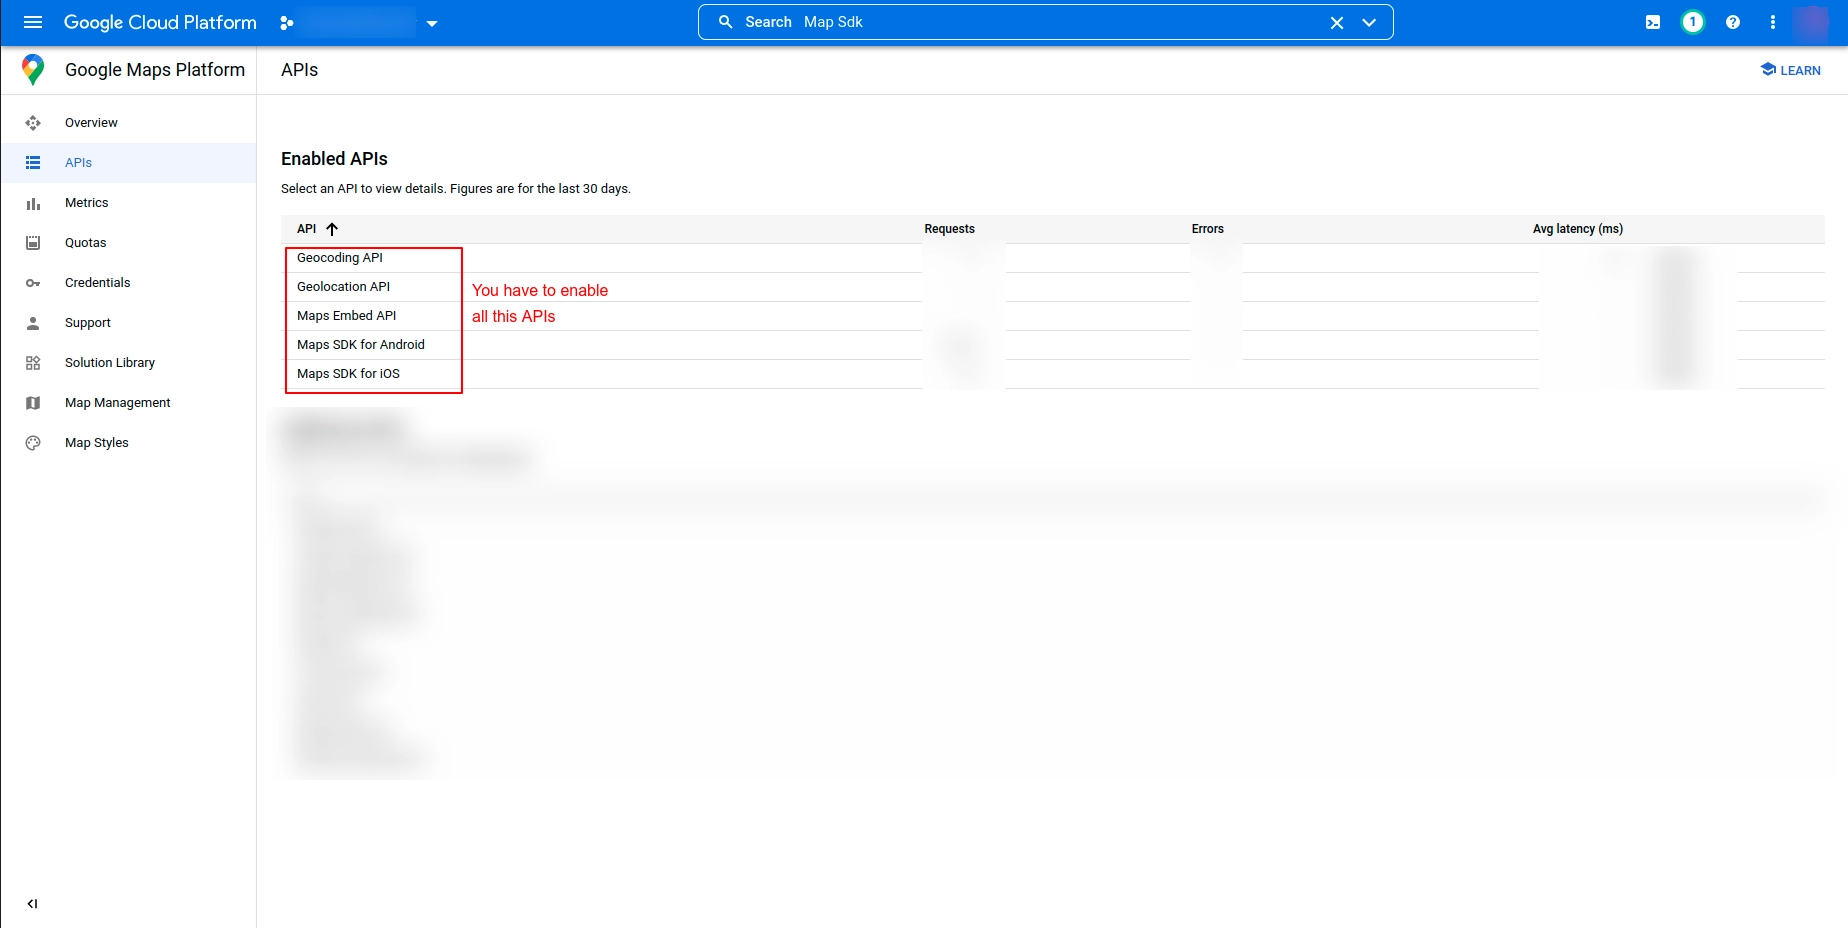
    6. Do above steps for below listed API. (enable all below APIs one by one by searching)

      eBroker


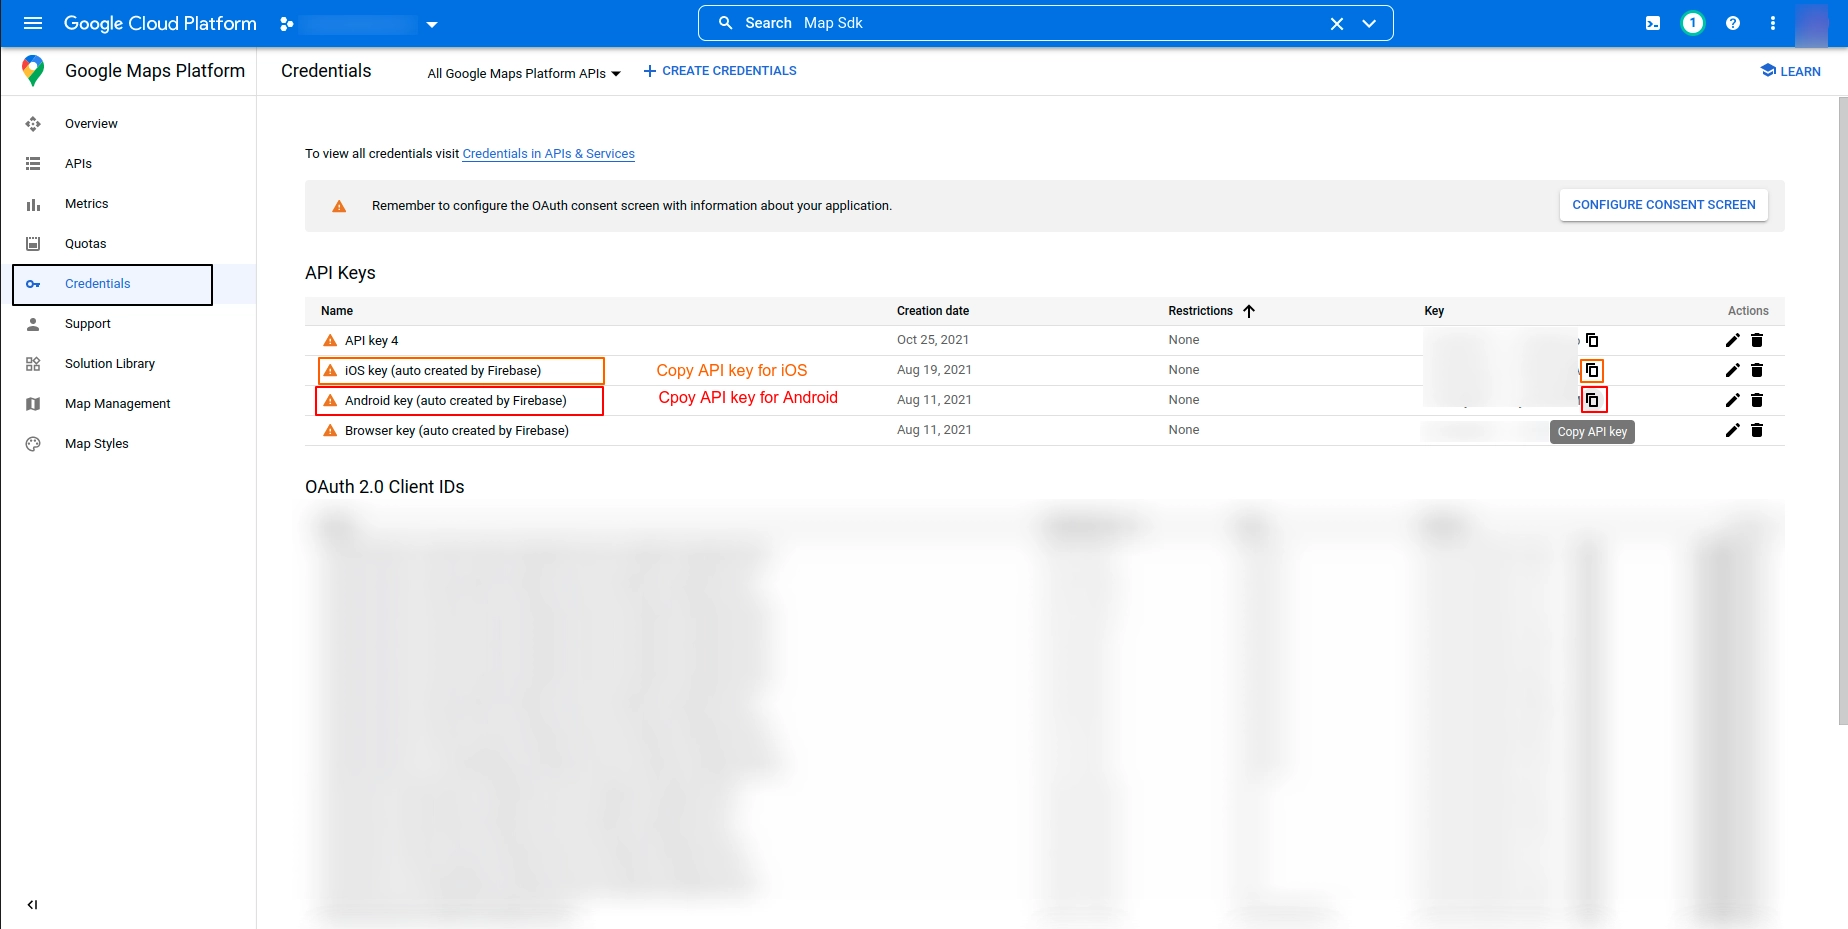
    7. Go to Credential Tab. you will find your Androiod and iOS API keys.

      eBroker


    8. You have to setup those above API keys for both Platform.
      1. Android Setup
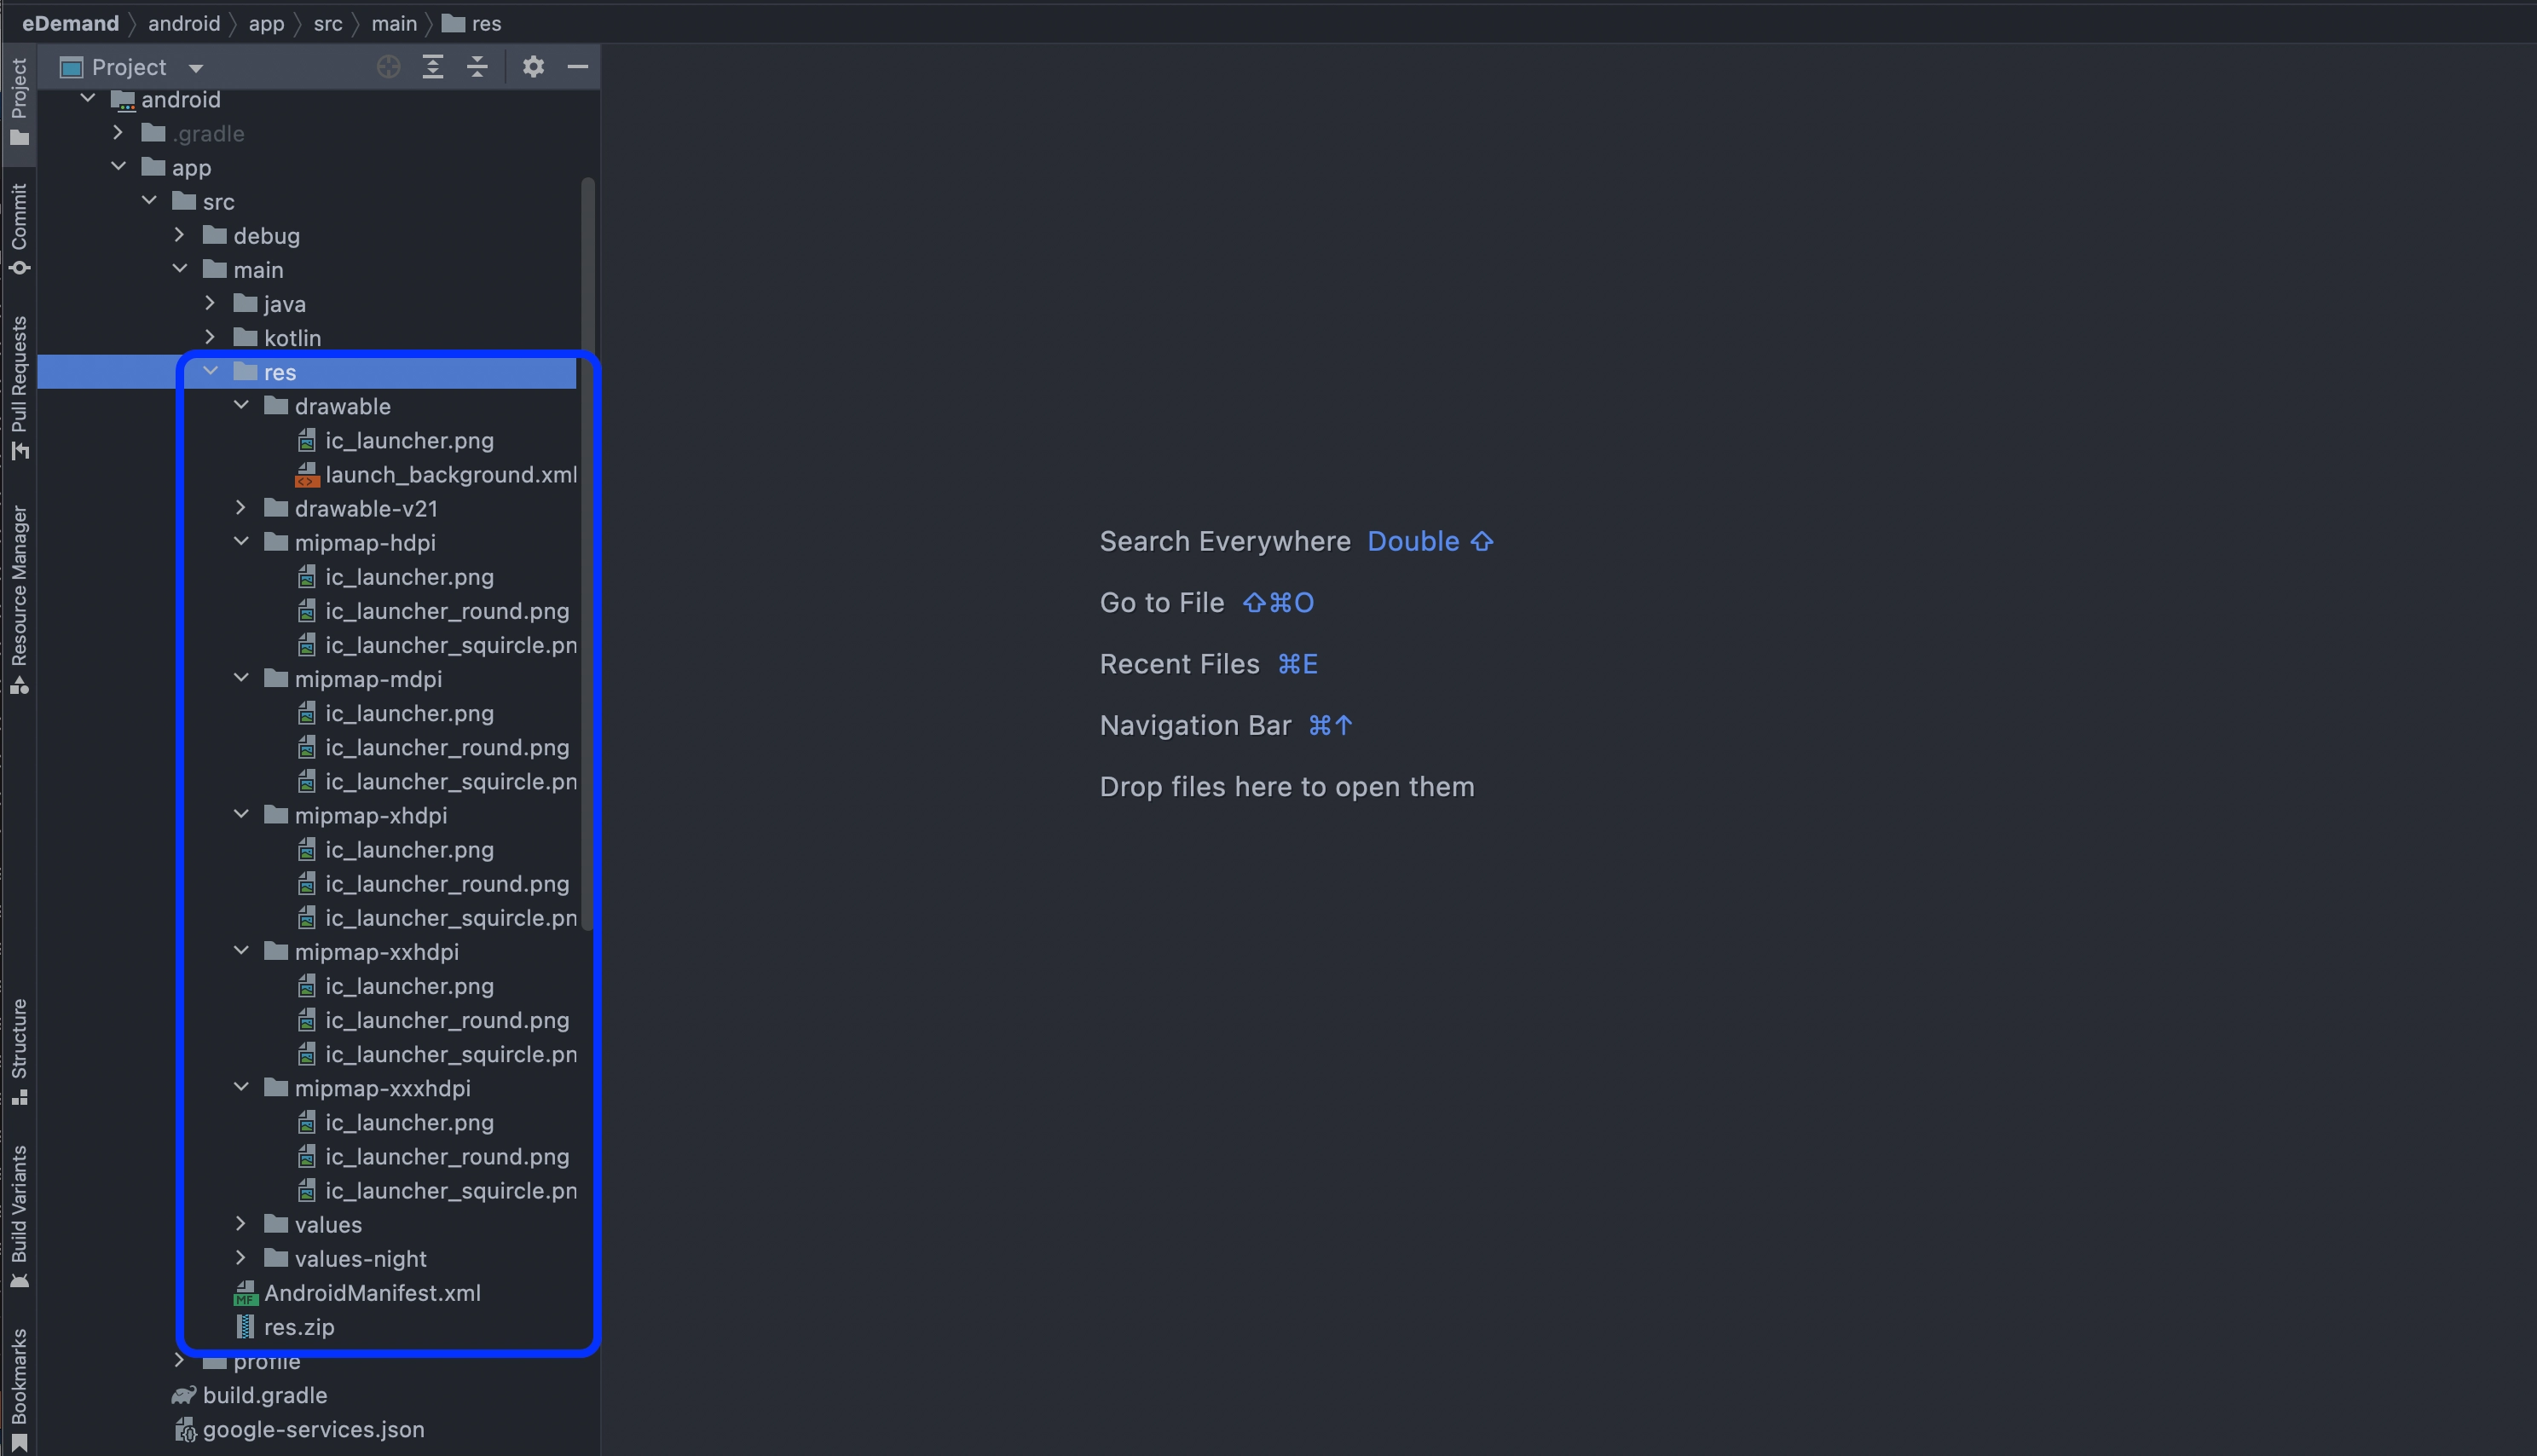
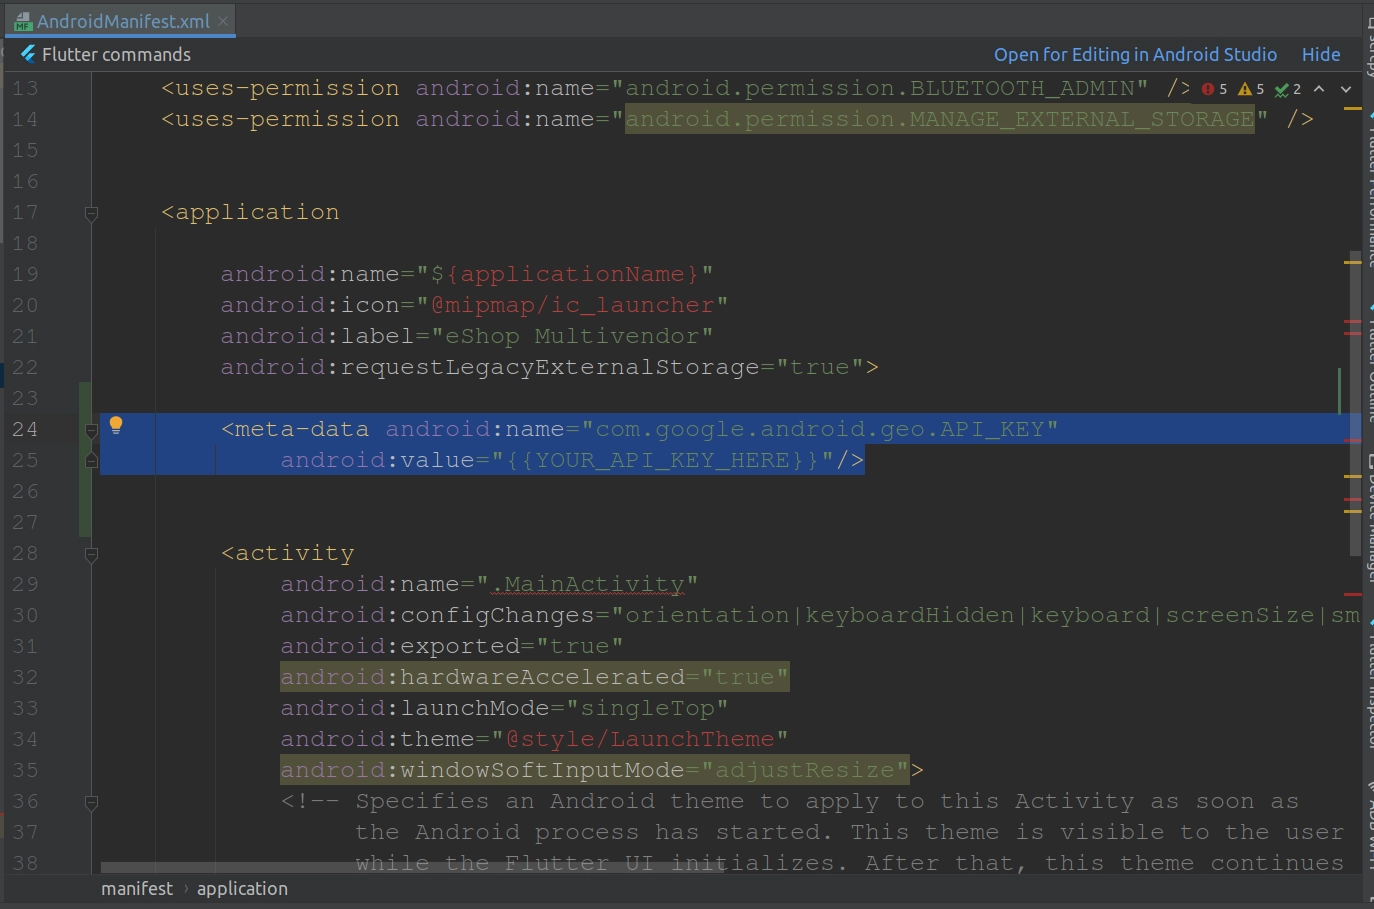
        • Next, open android ‣ app ‣ src ‣ main ‣ AndroidManifest.xml and paste the Google Maps meta data tag into your application tag before the activity tag, placing the API key you copied before to replace {{YOUR_API_KEY_HERE}}.
        • <meta-data android:name="com.google.android.geo.API_KEY" android:value="{{YOUR_API_KEY_HERE}}" />
      2. Note: For the value field, please paste in your API Key from the Google Maps API registration process.

        eBroker

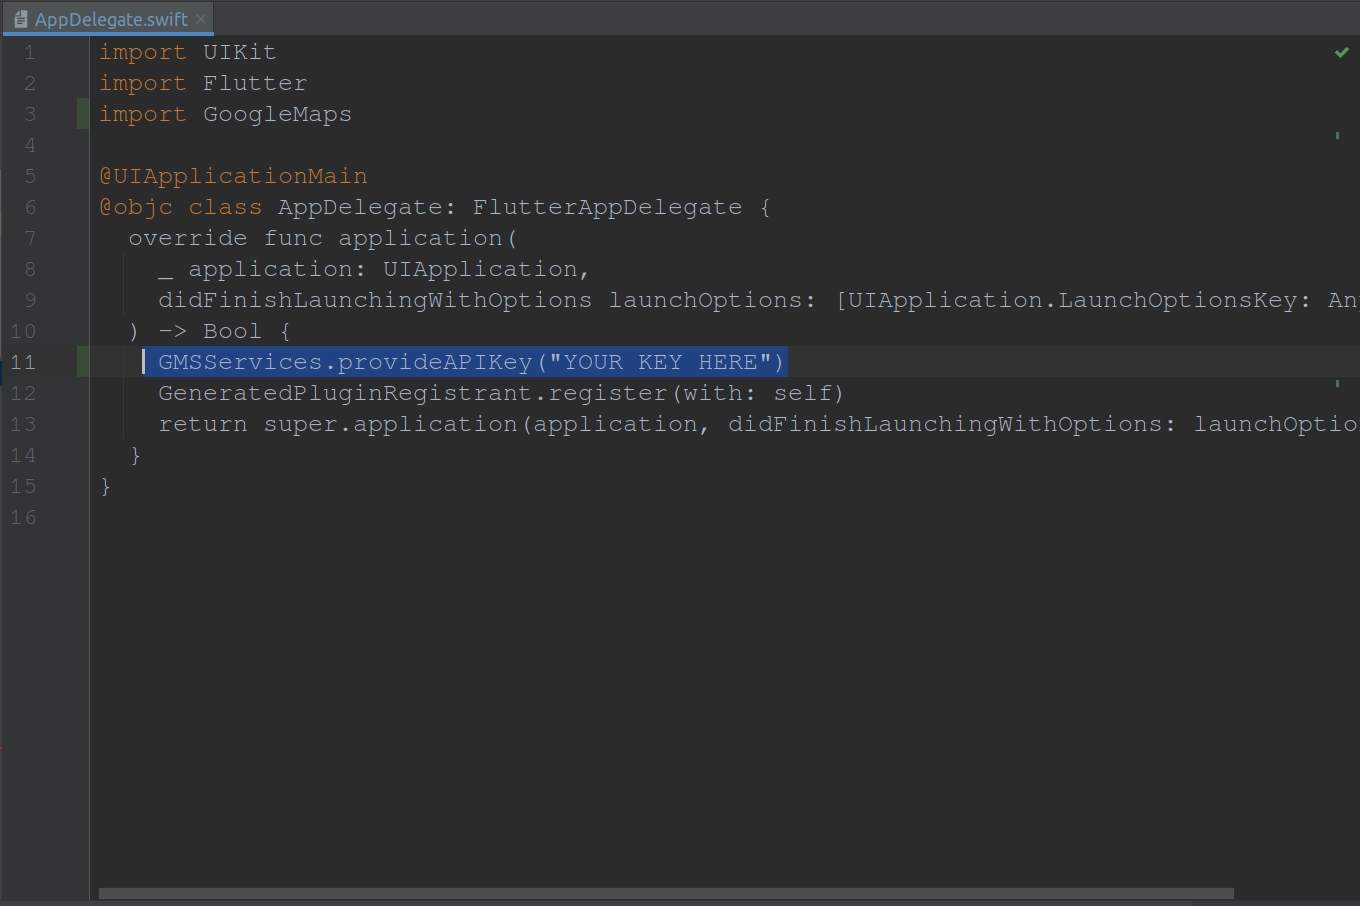
      3. iOS Setup
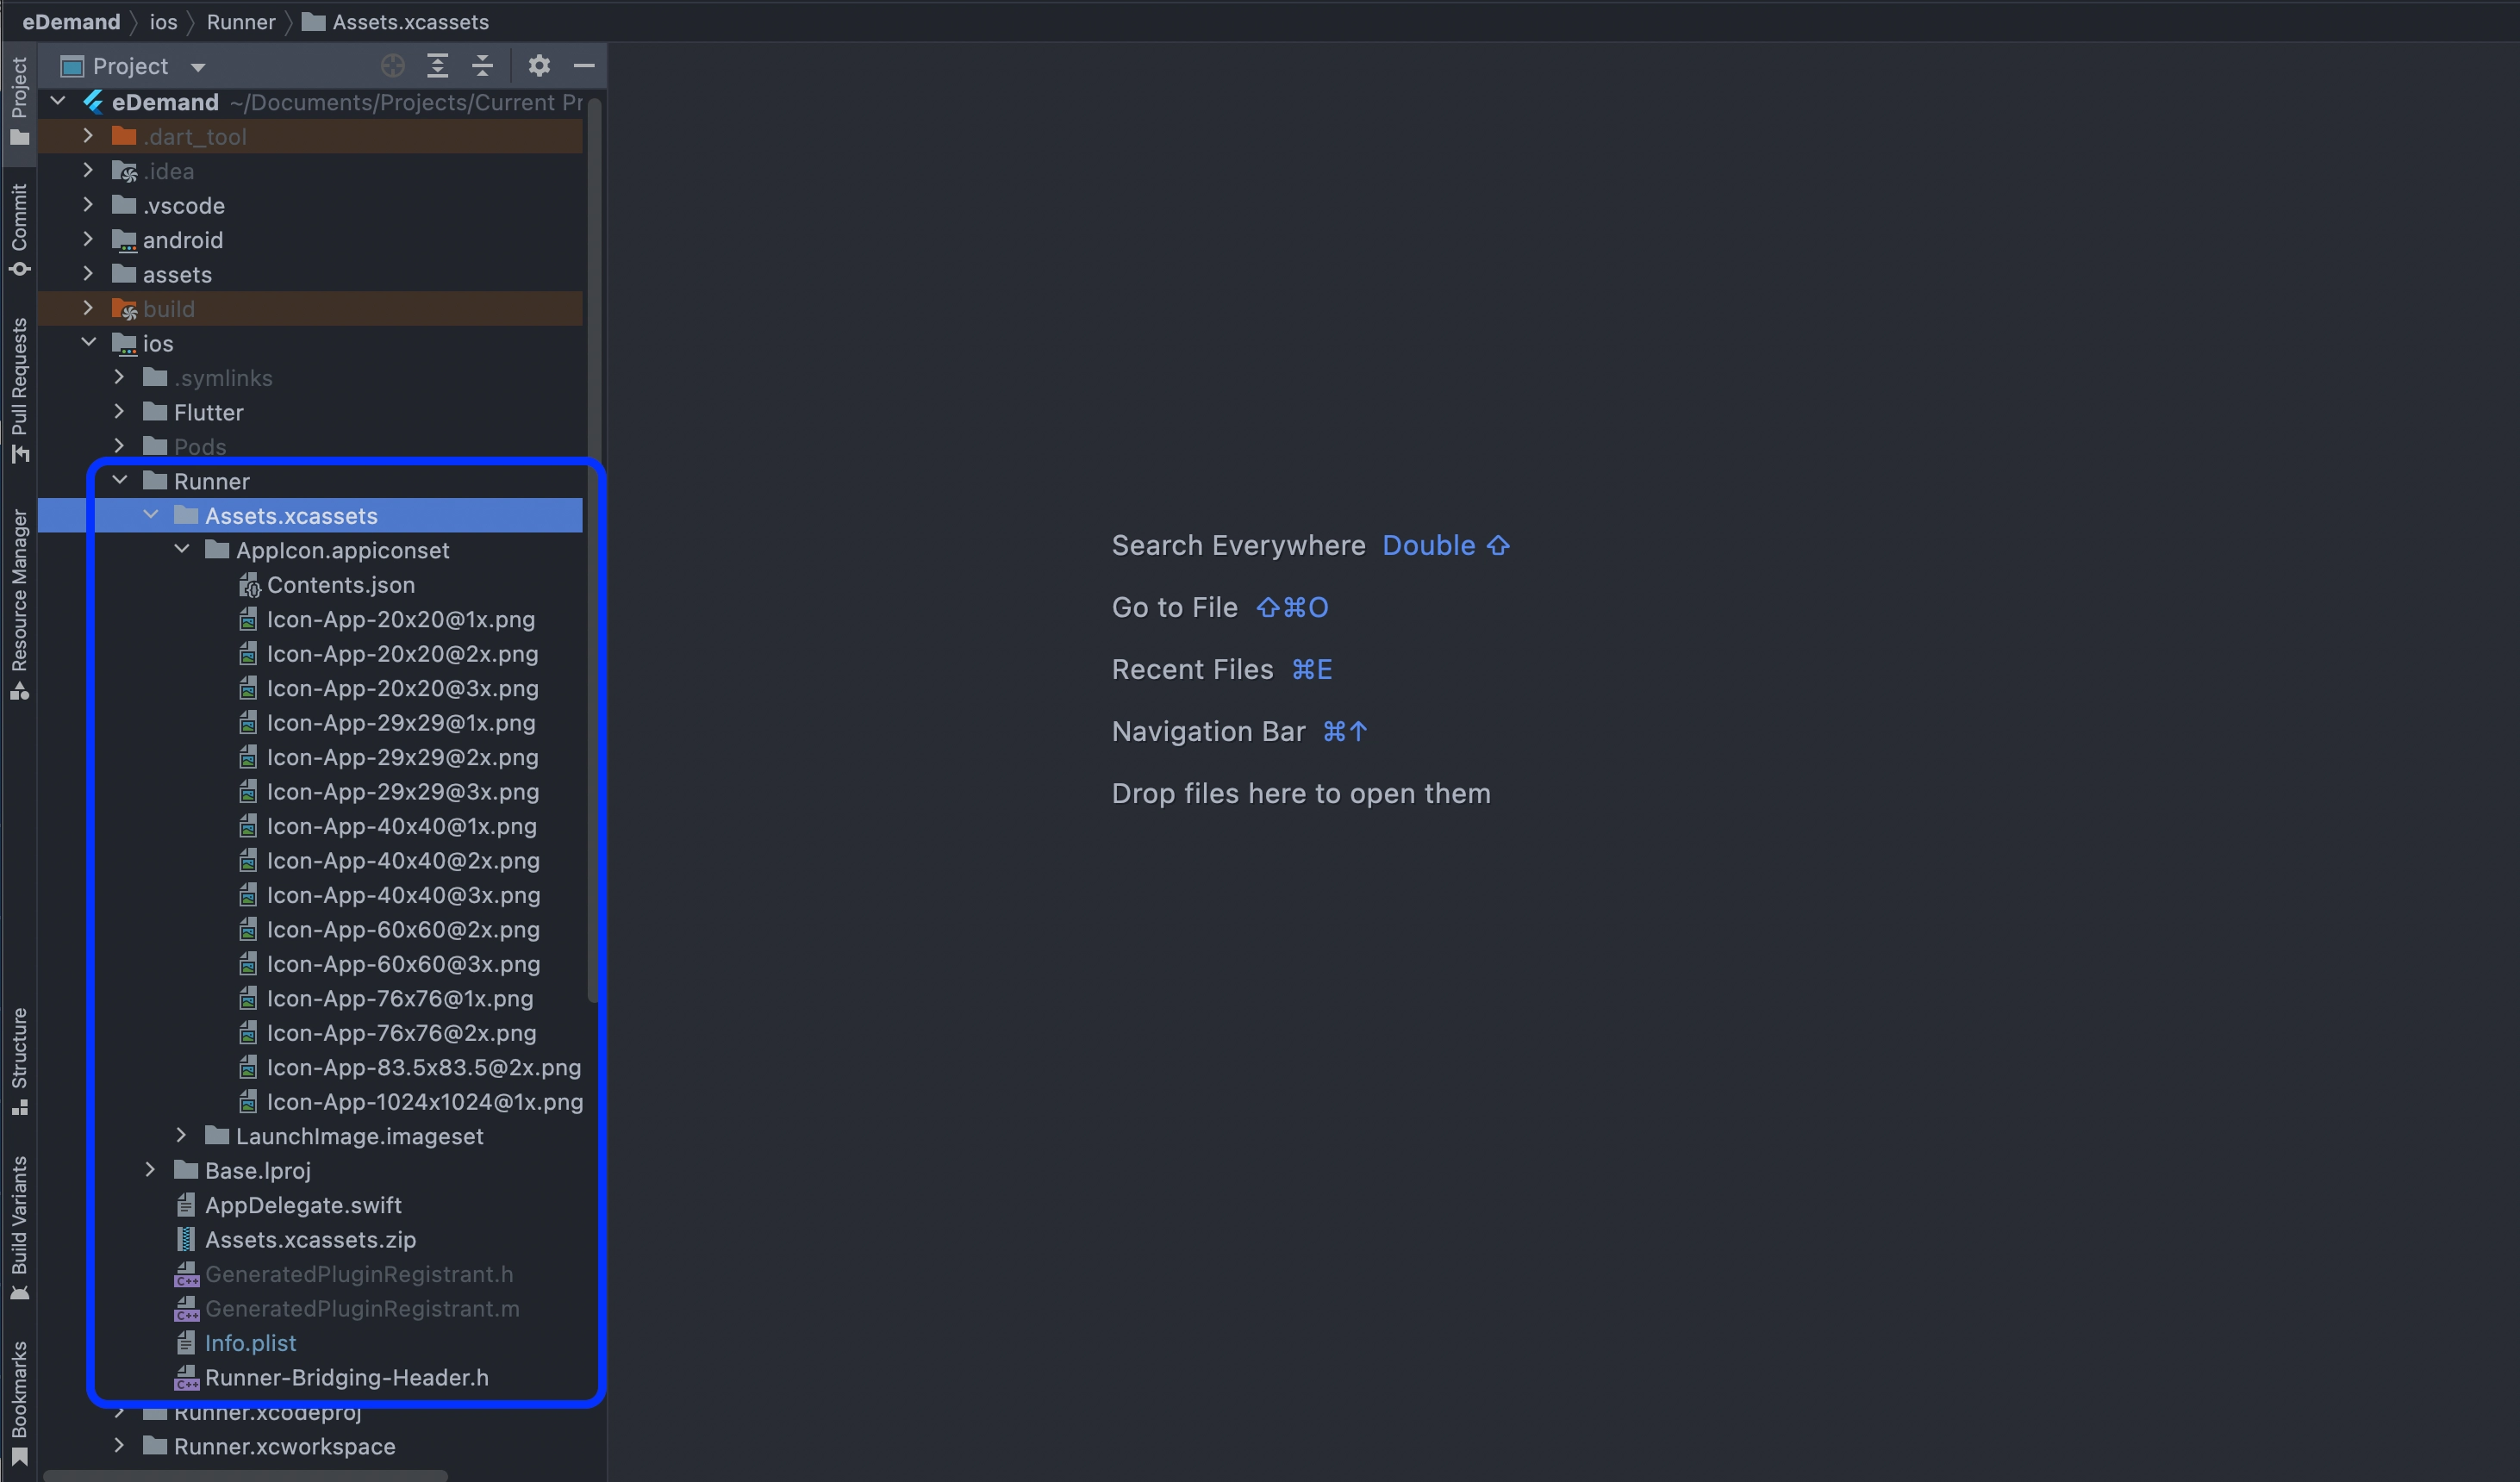
        • Next, open the ios ‣ Runner ‣ AppDelegate.swift file and paste the following code at shown in image.

          GMSServices.provideAPIKey("YOUR KEY HERE")
      4. Note: Again, for the value field please paste in your API Key from the registration process.

        eBroker


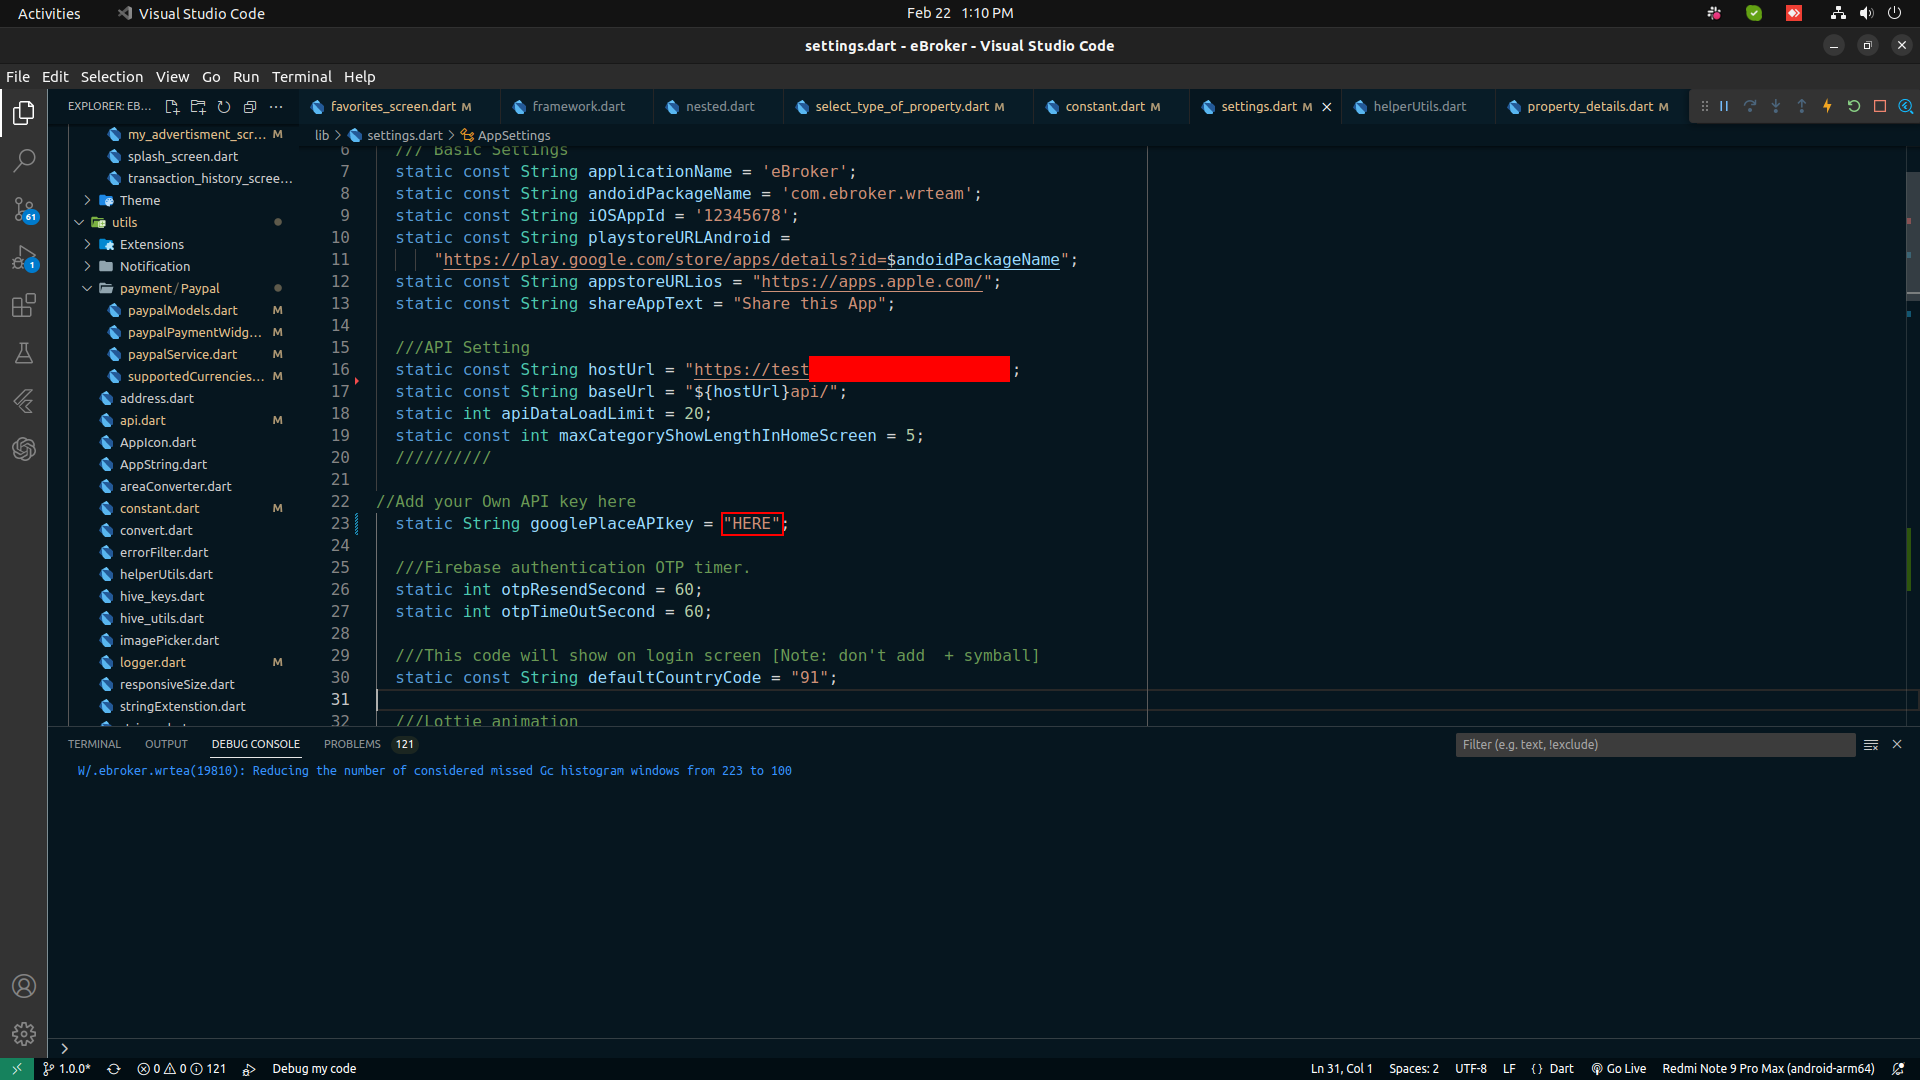
    How to Setup Place API key

    1. Go to lib/settings.dart
    2. Replace your place API key


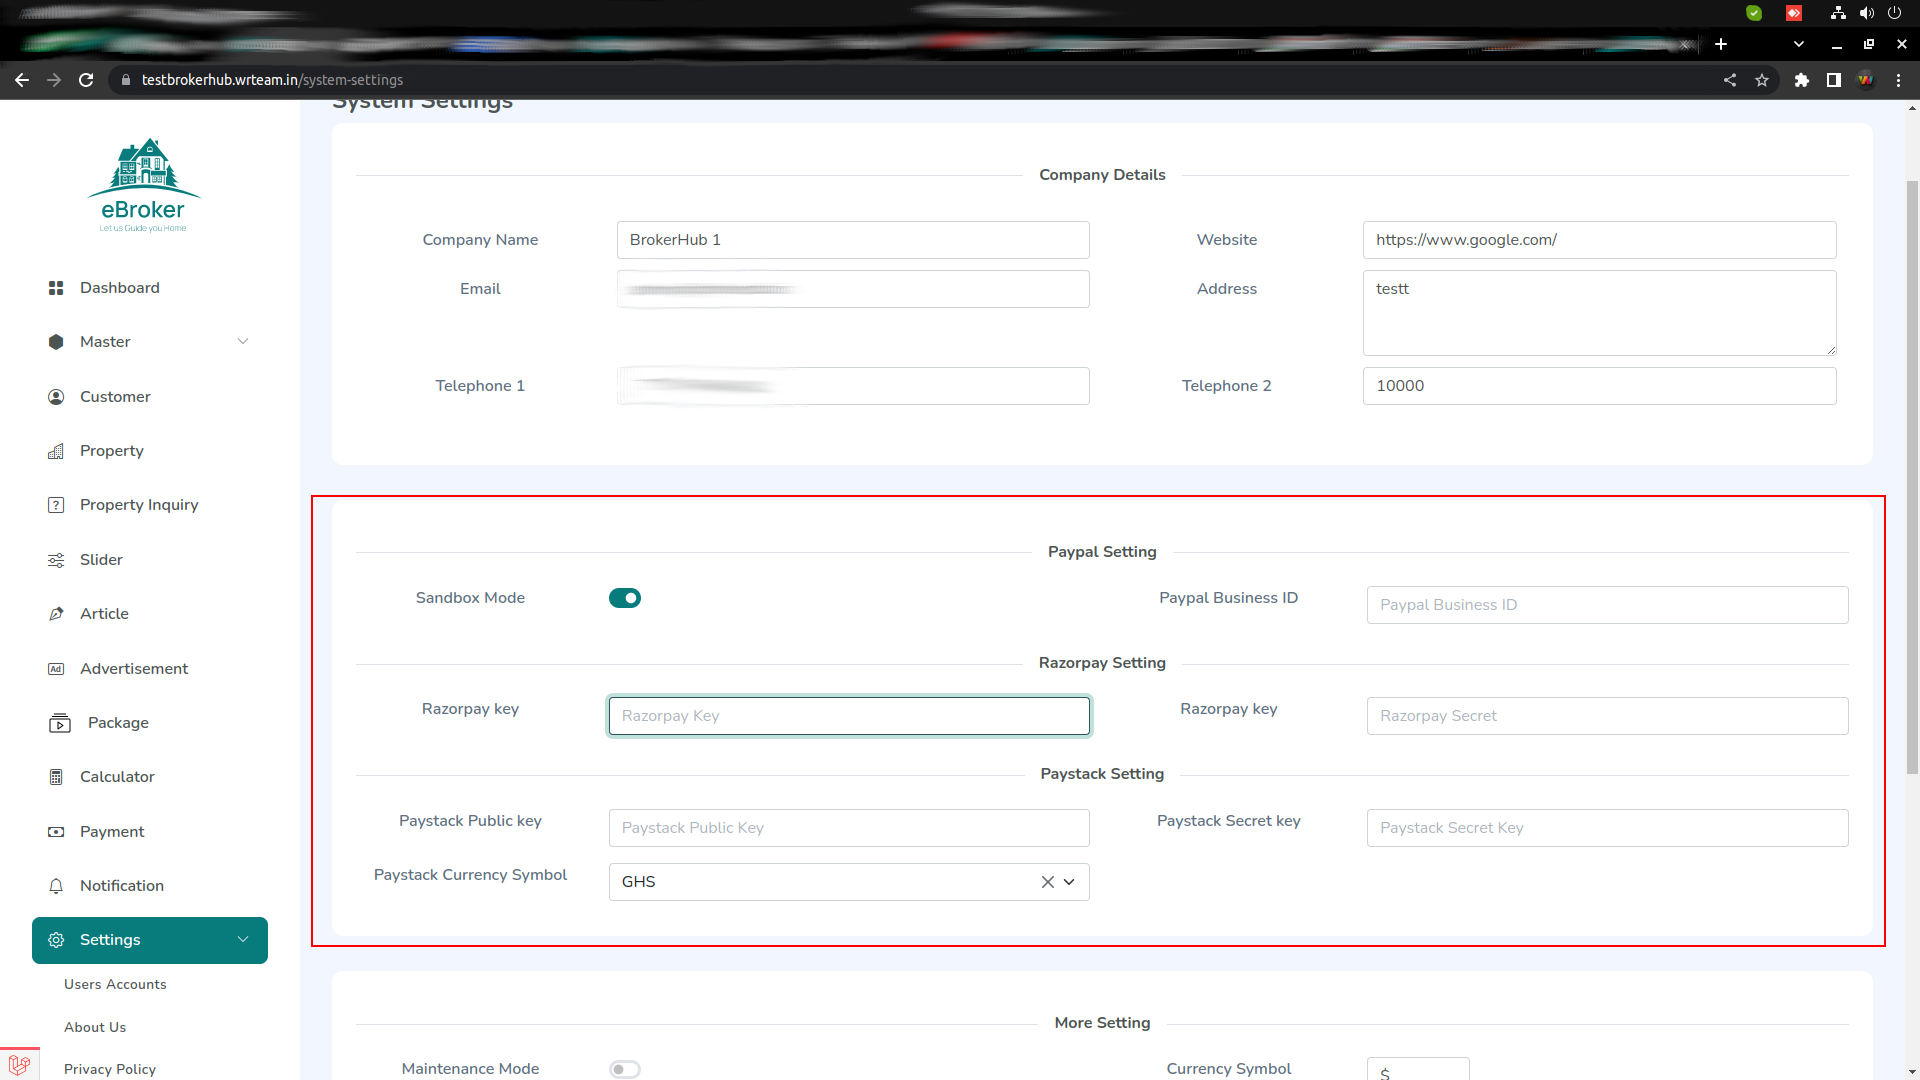
    How to setup Payment API keys

    1. Go to your panels settings section
    2. Replace your place API keys

    Support

    Need Support ?

    Its our pleasure to serve our service and support. please contact our support team.

    Develoer:Anish Sumra,
    Skype: Anish Sumra

    To help our customers, we constantly be in touch with every customer if they need any assistance regarding our product. We offer our customers a support from Mon ─ Fri 9.00am to 6.00pm IST (GMT +5.30) ─ We are a Team located in India ─ Asia.
    Typically we reply our customers for all the questions and queries within 24 hours of time via comments, support forum or emails.

    Your Feedback

    Dear valuable customer, Thank you very much for choosing our product. It's our pleasure to serve top-notch service to you. Please give us your honest feedback that will help us to make a more strong and reliable product by click here Rate Us . Thank you very much.
    Contact Us

    WRTeam has creative and dedicated group of developers who are mastered in Apps Developments and Web Application Development with a niche in delivering quality solutions to customers across the globe. Contact us today to find out how we can help you or for freelance work.
    Visit Us : https://wrteam.in

    Mail Us : info@wrteam.in

    Call Us : +91 9033 646589

    Skype : Anish Sumra

    Mail Us : info@wrteam.in

    Thank you very much.